| Chapter | Name | Excerpt | Usage | |||||||||||||||||||||||||||||||||||||||||||||||||||||||||
|---|---|---|---|---|---|---|---|---|---|---|---|---|---|---|---|---|---|---|---|---|---|---|---|---|---|---|---|---|---|---|---|---|---|---|---|---|---|---|---|---|---|---|---|---|---|---|---|---|---|---|---|---|---|---|---|---|---|---|---|---|
| Apache Kafka | kafka_message | The Apache Kafka documentation speaks of events that contain a message, or of records in more technical parts of the documentation. This documentation summarizes all under the term "message". | ||||||||||||||||||||||||||||||||||||||||||||||||||||||||||
| Configuring the Instance List | instance_list_basics | Each deployed application offers two basic functionalities during execution: The user can start a process (and start a so-called instance of the process) - and he can also view the existing instances that have not yet been completed. These "instances in progress" are displayed in the instance list. For each BPMN model, a dedicated instance list is generated. | ||||||||||||||||||||||||||||||||||||||||||||||||||||||||||
Configuring the Instance List Supported Form Elements | add_column | Use the Add button to add a new column. | ||||||||||||||||||||||||||||||||||||||||||||||||||||||||||
Configuring the Instance List Supported Form Elements | column_cancel | Use the Cancel button to discard your changes. | ||||||||||||||||||||||||||||||||||||||||||||||||||||||||||
Configuring the Instance List Supported Form Elements | column_drag | Use this area to move the columns by drag and drop. | ||||||||||||||||||||||||||||||||||||||||||||||||||||||||||
Configuring the Instance List Supported Form Elements | column_hidden | Activate this checkbox to hide this column during execution. | ||||||||||||||||||||||||||||||||||||||||||||||||||||||||||
Configuring the Instance List Supported Form Elements | column_label | The input in this field is displayed as header of the column. | ||||||||||||||||||||||||||||||||||||||||||||||||||||||||||
Configuring the Instance List Supported Form Elements | column_name | Technical identifier for data processing. Not visible for the end user. The input in this field is mandatory. | ||||||||||||||||||||||||||||||||||||||||||||||||||||||||||
Configuring the Instance List Supported Form Elements | column_save | Use the Save button to save your changes. | ||||||||||||||||||||||||||||||||||||||||||||||||||||||||||
| Constants and Names | service_types_parameters |
| ||||||||||||||||||||||||||||||||||||||||||||||||||||||||||
| Constants and Names | service_types_protocols |
| ||||||||||||||||||||||||||||||||||||||||||||||||||||||||||
| Constants and Names | transaction_id | The Transaction ID identifies a transaction. It is a unique number used to trace service calls through the call stack of multiple service calls.
This ID will be passed on through the call stack of the xUML service, so that the whole transaction can be traced. This can be useful, when analyzing the log file in case of error. | ||||||||||||||||||||||||||||||||||||||||||||||||||||||||||
| Designer Administration | backup_upload_change_file | The name of the selected file is displayed. If you want to select a different file, use the Change File button. The file's name is also displayed in field Name. If you download a backup file from the Designer administration, the file name is extended by the creation date of the backup (timestamp). | ||||||||||||||||||||||||||||||||||||||||||||||||||||||||||
| Designer Administration | backup_upload_change_name | Change the contents of the Name field of you want to rename the backup before uploading it. The Confirm button is only enabled after you have selected the namespace to which the file is to be uploaded. | ||||||||||||||||||||||||||||||||||||||||||||||||||||||||||
Designer Administration | library_documentation | If documentation is available, it will be displayed in a separate pop-up. | ||||||||||||||||||||||||||||||||||||||||||||||||||||||||||
Designer Administration Getting Started With Designer | different_admin_views | The content of the tree in the administration tab depends on the profile assigned to your account within Scheer PAS Administration . | ||||||||||||||||||||||||||||||||||||||||||||||||||||||||||
Designer Administration Working With Libraries | clear_compiler_cache | Do not forget to clear the compiler cache when you have updated a library. You will find the option to clear the cache in the Controls Panel menu. Example:
| ||||||||||||||||||||||||||||||||||||||||||||||||||||||||||
| Designer User Guide | add_horizontal_space | Use this icon if you need more or less space on the diagram pane. Click on the pane to display the start line, the second click marks the end line and defines the size of the area to be added. To add space, click from left to right to define the area. If you want to delete a horizontal space, click from right to left to define the area | ||||||||||||||||||||||||||||||||||||||||||||||||||||||||||
| Designer User Guide | add_vertical_space | Use this icon if you need more or less space on the diagram pane. Click on the pane to display the start line, the second click marks the end line and defines the size of the area to be added. To add space, click from top to bottom to define the area. If you want to delete a vertical space, click from bottom to top to define the area. | ||||||||||||||||||||||||||||||||||||||||||||||||||||||||||
| Designer User Guide | panel_customization | You have several options to adjust the diagram pane. When you open the pane for the first time, the default view is displayed:
| ||||||||||||||||||||||||||||||||||||||||||||||||||||||||||
| Designer User Guide | show_invalid | Activate the icon to highlight all invalid elements. | ||||||||||||||||||||||||||||||||||||||||||||||||||||||||||
| Designer User Guide | toggle_grid | Use this icon to enable or disable the grid on the diagram pane. The grid supports you during modeling: If the grid is enabled, elements snap to the grid points. | ||||||||||||||||||||||||||||||||||||||||||||||||||||||||||
| Designer User Guide | tip_info_about_roles_in_admin_guide | Go to page Managing Roles in the Administration Guide for detailed information about roles. | ||||||||||||||||||||||||||||||||||||||||||||||||||||||||||
| Drawing a Business Process | exclusive_gateway_conditions |
| ||||||||||||||||||||||||||||||||||||||||||||||||||||||||||
| Drawing a Business Process | instance_persistent_state | Process instances are kept in the persistent state database: The instances are created on process start and deleted on process end. Go to page xUML Service State Machines for further information. | ||||||||||||||||||||||||||||||||||||||||||||||||||||||||||
| Filesystem Adapter | hint_backslash_in_path | When using the Windows style with backward slashes "\" you have to be aware that you need to escape this character. The escape character is also the "\". To avoid this, use forward slashes with Windows as well. | pp. | |||||||||||||||||||||||||||||||||||||||||||||||||||||||||
| Form Elements | prepopulation_no | This element cannot be prepopulated. | ||||||||||||||||||||||||||||||||||||||||||||||||||||||||||
| Form Elements | prepopulation_yes | This element can be prepopulated.
| ||||||||||||||||||||||||||||||||||||||||||||||||||||||||||
| Implementing Your Process | default_value_attribute | Specify a default value for the related variable here. | ||||||||||||||||||||||||||||||||||||||||||||||||||||||||||
| Implementing Your Process | execution_preliminaries | You need to perform two steps to implement executional parts to your model:
| ||||||||||||||||||||||||||||||||||||||||||||||||||||||||||
| Implementing Your Process | execution_tabs |
| ||||||||||||||||||||||||||||||||||||||||||||||||||||||||||
| Implementing Your Process | local | Variables created in section Local are only available for use within the current execution. | ||||||||||||||||||||||||||||||||||||||||||||||||||||||||||
| Implementing Your Process | persisted | Variables created in section Persisted are usable in all executions of the BPMN model. | ||||||||||||||||||||||||||||||||||||||||||||||||||||||||||
| Implementing Your Process | persisted_variable_added | The variable is added to the execution pane. | ||||||||||||||||||||||||||||||||||||||||||||||||||||||||||
| Implementing Your Process | second_persisted_variable | Once a variable is defined as to be persisted, it is available in all executions throughout the BPMN model. | ||||||||||||||||||||||||||||||||||||||||||||||||||||||||||
Implementing Your Process Modeling BPMN | class | A class is an aggregation of properties and operations that describes a complex data type from which objects can be created. | ||||||||||||||||||||||||||||||||||||||||||||||||||||||||||
Implementing Your Process Modeling BPMN | implementation_folder | All elements inside the Implementation folder need to be created within packages. Add a new package via the quick action or the context menu. | ||||||||||||||||||||||||||||||||||||||||||||||||||||||||||
Implementing Your Process Modeling BPMN | operation | An operation adds behavior to a class or interface. The behavior describes how to process the data given by the parameters. In the context of the Designer, you can implement operations as mapping, action script or activity. | ||||||||||||||||||||||||||||||||||||||||||||||||||||||||||
Implementing Your Process Modeling BPMN | packages | A package is like a directory for the file system. It is used to group executable data model elements. Packages can have any depth of nesting: To structure your work, you can create packages within packages. | ||||||||||||||||||||||||||||||||||||||||||||||||||||||||||
Implementing Your Process Modeling BPMN | property | Properties are data fields that describe the structure of the class. | ||||||||||||||||||||||||||||||||||||||||||||||||||||||||||
Implementing Your Process Modeling Data Structures | hint_naming_conventions | Apply the same naming conventions to all your models. This makes reading a model much easier. Go to page Naming Conventions and Containment Tree Organization in the Builder User Guide for an overview on practice-approved naming conventions. | ||||||||||||||||||||||||||||||||||||||||||||||||||||||||||
Implementing Your Process Modeling Data Structures | interface | In contrast to a class, an interface has no properties nor implementations. Interfaces are used to define common operations of multiple classes, and then derive from that interface. | ||||||||||||||||||||||||||||||||||||||||||||||||||||||||||
Implementing Your Process Modeling Data Structures | parameter | Operations can have parameters that define the input and output objects. Operation parameters can be of simple type (Base Types) or of complex type (class or interface). | ||||||||||||||||||||||||||||||||||||||||||||||||||||||||||
| Modeling Activities | hint_activity_diagram | Activities are modeled in activity diagrams. Refer to Modeling Activities for more information on how to create an activity diagram. | ||||||||||||||||||||||||||||||||||||||||||||||||||||||||||
Modeling APIs | api | An API is the entrance port of your service. It can be used to communicate with the service from the outside. There are different kinds of APIs (e.g. REST API, SOAP API, ...) that describe different communication standards. | ||||||||||||||||||||||||||||||||||||||||||||||||||||||||||
Modeling APIs | port | Ports are elements of the UML modeling standard. A port defines an entrance point to the service and connects the API to an interface or class. | ||||||||||||||||||||||||||||||||||||||||||||||||||||||||||
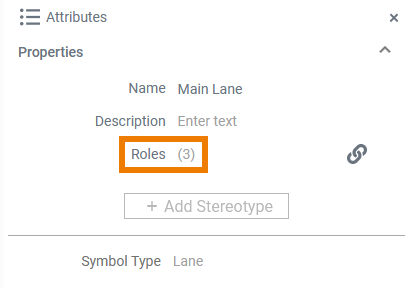
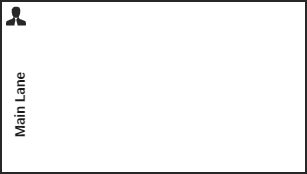
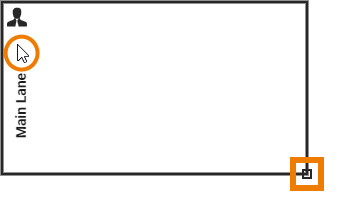
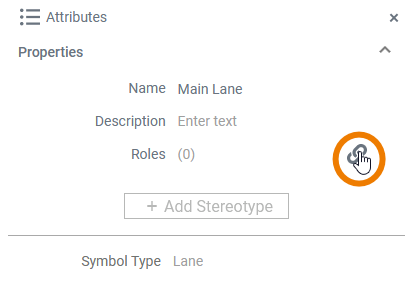
| Modeling BPMN | activating_lanes | To activate the lane element, click its border or icon/header. If the element is active, an indicator is displayed in the lower right corner. | ||||||||||||||||||||||||||||||||||||||||||||||||||||||||||
| Modeling BPMN | add_bpmn_elements | Drag the element you want to create from the toolbar and drop it on the diagram pane. Another way to create a form element is to click on the element in the toolbar, switch to the editor and click again. To cancel the operation, press the Esc key. | ||||||||||||||||||||||||||||||||||||||||||||||||||||||||||
Modeling BPMN | add_bpmn_model | In the Process folder you can create your BPMN models. One service can contain several BPMN models. To create a model, hover over the Process folder to display the quick start icons and click | ||||||||||||||||||||||||||||||||||||||||||||||||||||||||||
| Modeling BPMN | add_library | To add an unused library to the project, click on the | ||||||||||||||||||||||||||||||||||||||||||||||||||||||||||
| Modeling BPMN |
| |||||||||||||||||||||||||||||||||||||||||||||||||||||||||||
Modeling BPMN | bpmn_created | The new BPMN model is also displayed in the service panel and you can use icon | ||||||||||||||||||||||||||||||||||||||||||||||||||||||||||
Modeling BPMN | bpmn_new_tab | When you create a new model, it opens automatically in a new tab and you can directly start modeling. Go to page Working with the BPMN Editor for detailed information. | ||||||||||||||||||||||||||||||||||||||||||||||||||||||||||
Modeling BPMN | create_bpmn | Enter a name for the BPMN model in the pop-up window Create New Model. Click Save. | ||||||||||||||||||||||||||||||||||||||||||||||||||||||||||
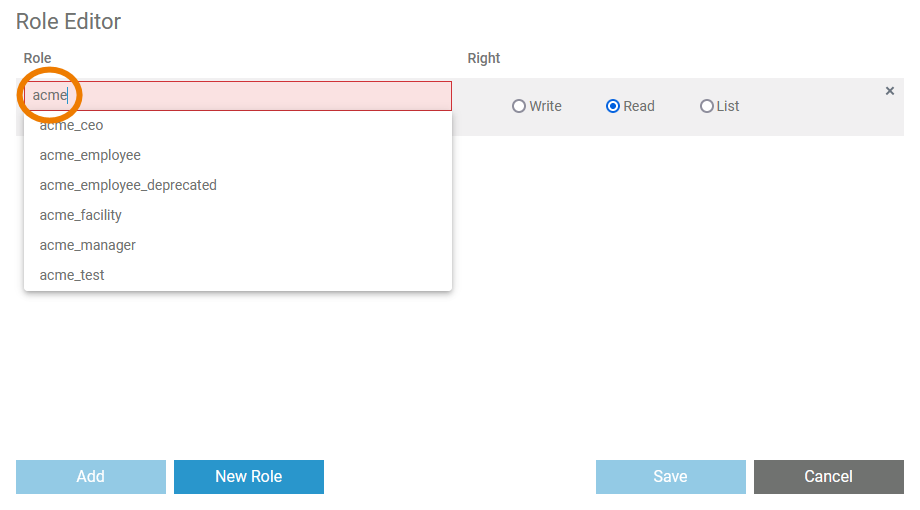
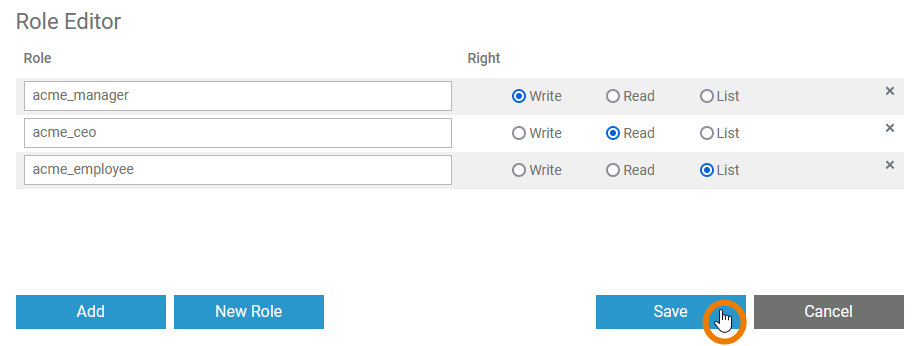
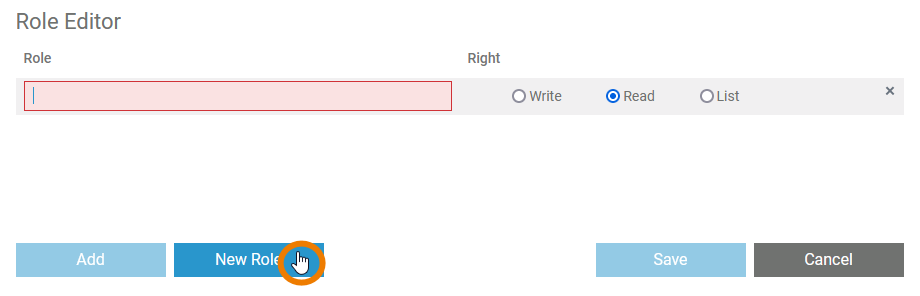
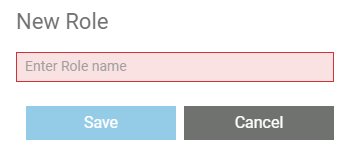
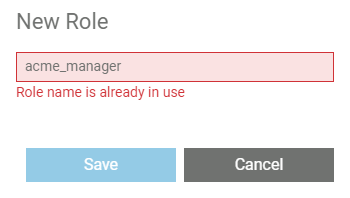
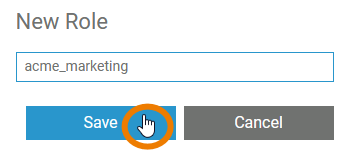
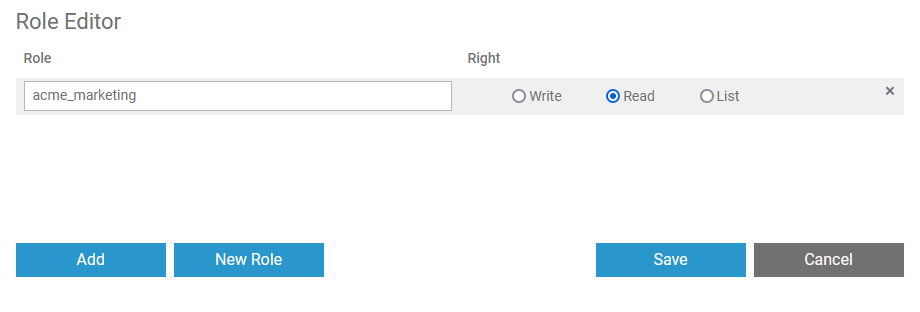
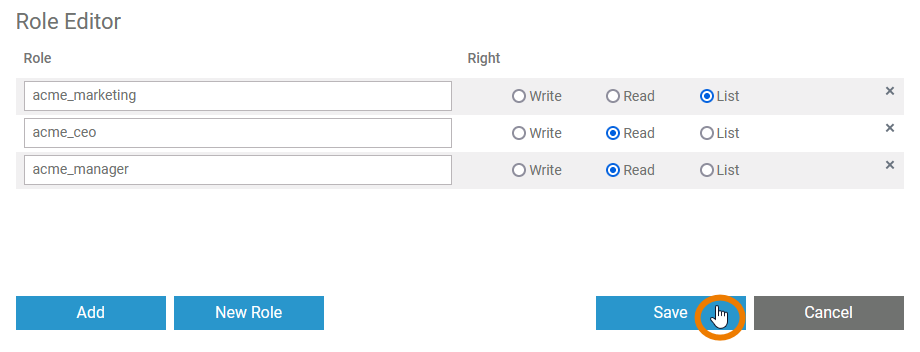
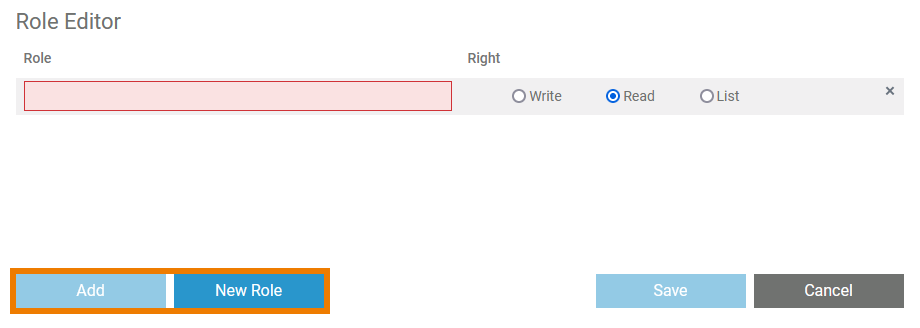
| Modeling BPMN | creating_a_role Moved to _designer_excerpts_big. |
| ||||||||||||||||||||||||||||||||||||||||||||||||||||||||||
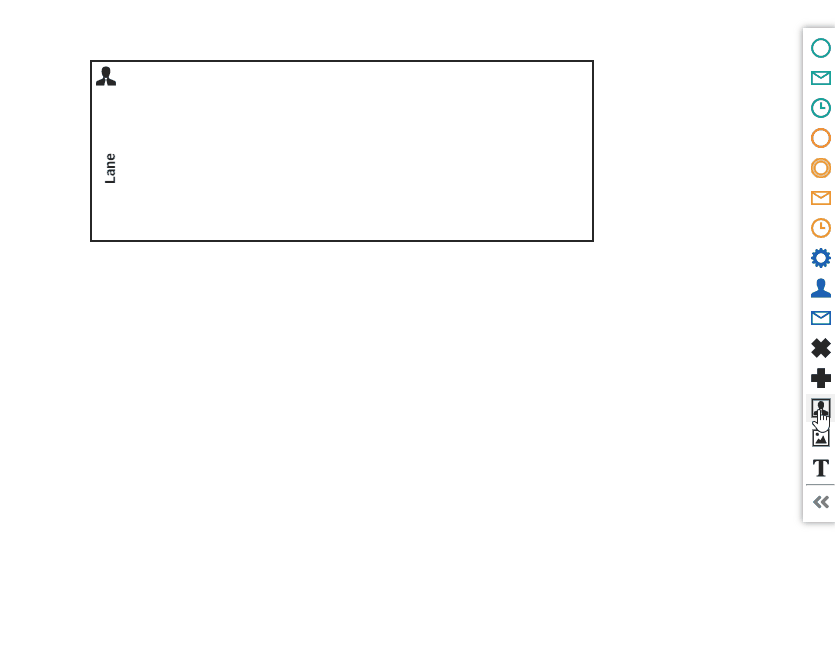
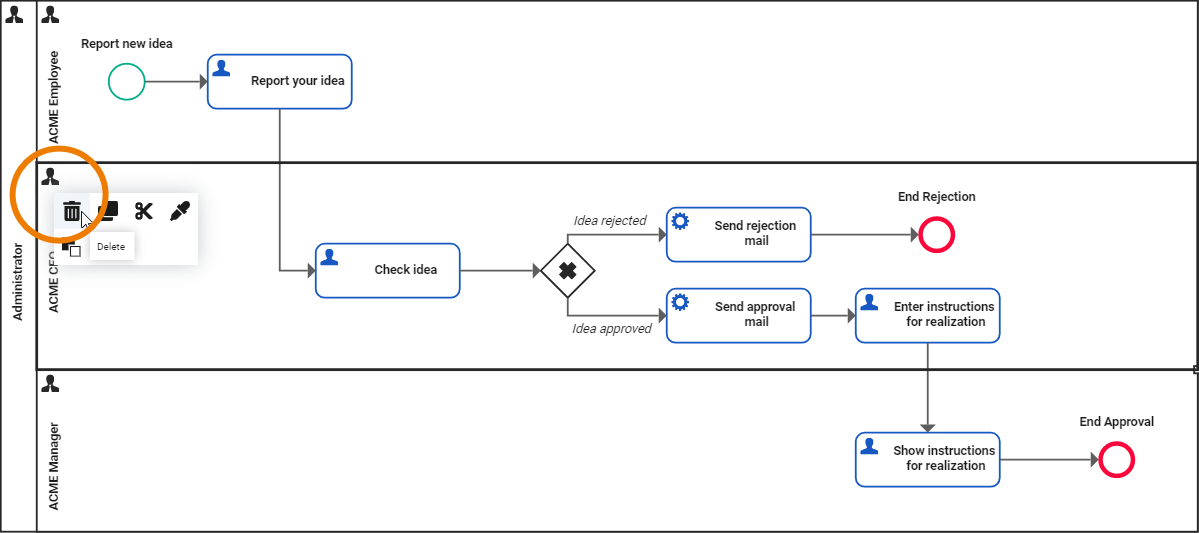
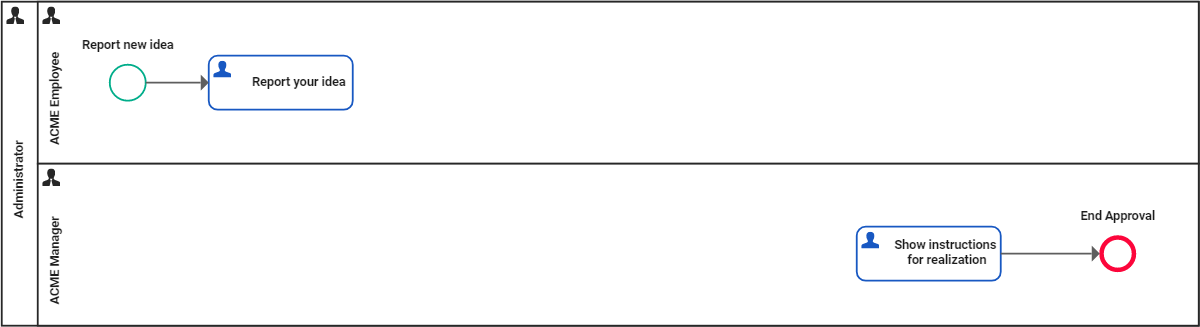
| Modeling BPMN | lane_handling Moved to _designer_excerpts_big. |
| ||||||||||||||||||||||||||||||||||||||||||||||||||||||||||
| Modeling BPMN | no_role_assigned_to_lane | If no roles are assigned to a lane, the process steps inside the lane can be executed by all users. | ||||||||||||||||||||||||||||||||||||||||||||||||||||||||||
| Modeling BPMN | open_role_editor Moved to _designer_excerpts_big. |
| ||||||||||||||||||||||||||||||||||||||||||||||||||||||||||
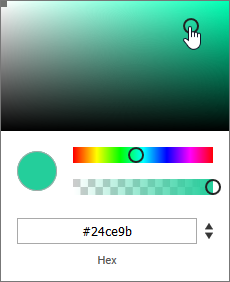
| Modeling BPMN | other_background_color | Background Color If you want to select a background color, activate the checkbox and click on the color placeholder that will appear. Then use the color picker to select a new color or enter the hexadecimal code of the desired color:
| ||||||||||||||||||||||||||||||||||||||||||||||||||||||||||
| Modeling BPMN | tip_export_import_in_service_panel | Go to page Exporting and Importing Service Panel Contents for further information about the possible options. | ||||||||||||||||||||||||||||||||||||||||||||||||||||||||||
| Modeling BPMN | tip_service_panel_options | For detailed explanations of the item options in the Service panel, such as Cut, Copy, Rename, and Delete, see page Service Panel. | ||||||||||||||||||||||||||||||||||||||||||||||||||||||||||
Modeling BPMN Implementing Your Process | attribute_name | Click here to insert or change the Name of the related element. Generated elements (like e.g. message) cannot be renamed. | ||||||||||||||||||||||||||||||||||||||||||||||||||||||||||
Modeling BPMN Implementing Your Process | create_form | Enter a name for the form in the pop-up window Create New Form. Click Save. | ||||||||||||||||||||||||||||||||||||||||||||||||||||||||||
Modeling BPMN Modeling Forms | form_created | The new form is also displayed in the service panel and you can use icon | ||||||||||||||||||||||||||||||||||||||||||||||||||||||||||
Modeling BPMN Modeling Forms | form_new_tab | When you create a new form, it opens automatically in a new tab and you can directly start designing. Go to page Working with the Form Editor for detailed information. | ||||||||||||||||||||||||||||||||||||||||||||||||||||||||||
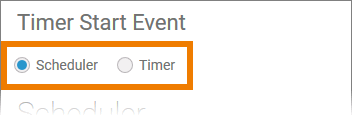
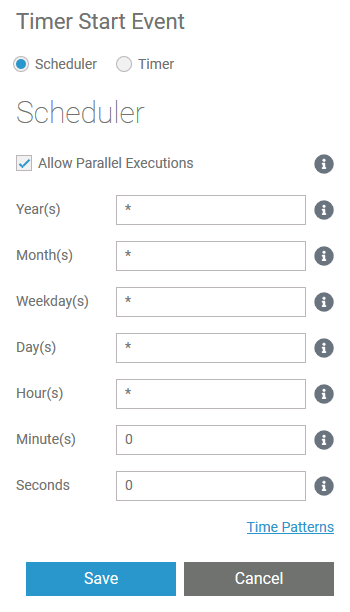
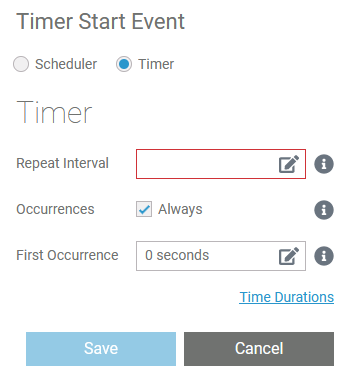
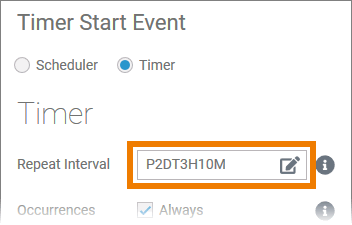
Modeling BPMN Supported BPMN Elements | define_timer | To define the timer settings, click the icon | ||||||||||||||||||||||||||||||||||||||||||||||||||||||||||
Modeling BPMN Supported BPMN Elements | how_to_use_the_timer Moved to _designer_excerpts_big. Delete after publication of 22.1 |
| ||||||||||||||||||||||||||||||||||||||||||||||||||||||||||
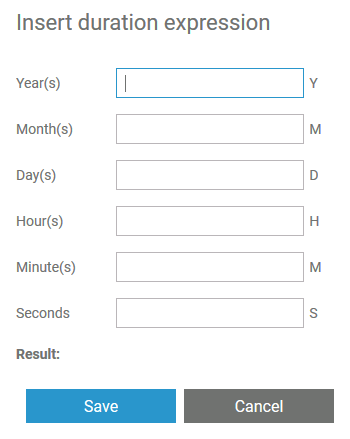
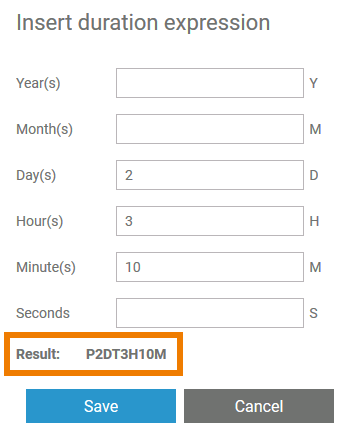
Modeling BPMN Supported BPMN Elements | set_timeout | To set the duration of the timer, the event should be trigged by a persisted property of type integer or datetime. You have two options to set the timeout in the attributes panel:
| ||||||||||||||||||||||||||||||||||||||||||||||||||||||||||
Modeling BPMN Working With Libaries | show_library_doc | Use the documentation icon You can find it in the Manage Libraries dialog... | ||||||||||||||||||||||||||||||||||||||||||||||||||||||||||
Modeling BPMN Working With Libaries | show_library_doc_in_panel | ... as well as in the service panel when you hover over a library. | ||||||||||||||||||||||||||||||||||||||||||||||||||||||||||
Modeling BPMN Working With Libraries | add_libraries_to_folder | If you want to add your own libraries to a service, hover over the Libraries folder in the service panel and click icon Manage Libraries | ||||||||||||||||||||||||||||||||||||||||||||||||||||||||||
Modeling BPMN Working With Libraries | library_in_service_panel | The added library is now displayed in the service panel and you can use it during modeling. | ||||||||||||||||||||||||||||||||||||||||||||||||||||||||||
Modeling BPMN Working With Libraries | manage_libraries | The dialog Manage Libraries opens. All libraries that have been uploaded to the current namespace are shown in this dialog:
Expand the drop-down lists to display the details of each library such as versions and dependencies. | ||||||||||||||||||||||||||||||||||||||||||||||||||||||||||
Modeling BPMN Working With Libraries | remove_libraries | You can also remove libraries from the service. Open the dialog Manage Libraries again and click the The library will switch back to the Unused Libraries column. Do not forget to confirm the deletion with the Save button. | ||||||||||||||||||||||||||||||||||||||||||||||||||||||||||
Modeling BPMN Working With Libraries | used_libraries | The library is now displayed in the column Used Libraries. If you have finished, do not forget to Save. | ||||||||||||||||||||||||||||||||||||||||||||||||||||||||||
| Running Designer Applications | access_app_uis | You can access your application UIs directly from the controls panel. | ||||||||||||||||||||||||||||||||||||||||||||||||||||||||||
| Running Designer Applications | create_new_instance | C hoose the process start you want to trigger from the drop-down menu. | ||||||||||||||||||||||||||||||||||||||||||||||||||||||||||
| Running Designer Applications | instance_list_content | The instance list shows all open instances. | ||||||||||||||||||||||||||||||||||||||||||||||||||||||||||
| Running Designer Applications | instance_list_progress_view | A progress view is displayed...
You can wait until the process reaches the next form (or the process end) or switch back to the overview and proceed with another instance. | ||||||||||||||||||||||||||||||||||||||||||||||||||||||||||
| Running Designer Applications | instance_list_refresh | Use icon Refresh | ||||||||||||||||||||||||||||||||||||||||||||||||||||||||||
| Running Designer Applications | instance_list_role_concept | If the view of the instance list is associated with a role-based authorization concept, only users with appropriate permissions can access it. | ||||||||||||||||||||||||||||||||||||||||||||||||||||||||||
| Running Designer Applications | instance_list_role_label | If the process is role-based, role labels are displayed - one for each role assigned to your user. For detailed information about role usage in apps, see chapter Role-based Authorization Concept. | ||||||||||||||||||||||||||||||||||||||||||||||||||||||||||
| Running Designer Applications | search_expressions | Search Expressions
To search for a substring, use the percent sign % as a wildcard for any character and underscore _ for a single arbitrary character. |
| |||||||||||||||||||||||||||||||||||||||||||||||||||||||||
| Running Designer Applications | select_process_to_create_instance | Select the process for which you want to create a new instance by clicking the corresponding | ||||||||||||||||||||||||||||||||||||||||||||||||||||||||||
Searching in the Designer Modeling BPMN Working With Libraries Implementing Your Process Validating a Service | tip_panel_management | Go to Customizing Editors and Panels for detailed information about panel management in general. | ||||||||||||||||||||||||||||||||||||||||||||||||||||||||||
Searching in the Designer Working With the Explorer | explorer_search | On top of the explorer tree you can find a search box. Select the part of the explorer tree (namespace, folder or service) you want to search, and enter a search term. | ||||||||||||||||||||||||||||||||||||||||||||||||||||||||||
Service Panel | add_form_via_context_menu | Alternatively, you can open the context menu of a Forms folder and select the option Add Form. | ||||||||||||||||||||||||||||||||||||||||||||||||||||||||||
Service Panel | add_model_via_context_menu | Alternatively, you can open the context menu of a Process folder and select the option Add Model. | ||||||||||||||||||||||||||||||||||||||||||||||||||||||||||
| Supported BPMN Elements | attribute_trigger_events | Trigger Events: Use the attribute Trigger Events in the Attributes Panel to define which button of a form associated to the element triggers the default process flow of a BPMN process. This attribute is only available for boundary events. | ||||||||||||||||||||||||||||||||||||||||||||||||||||||||||
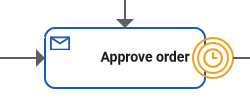
| Supported BPMN Elements | boundary_events | Plain Event, Message Event and Timer Event can be used as boundary events along with User Task and Receive Task. When using the events as boundary events, attach the element directly to the border of the corresponding task:
| ||||||||||||||||||||||||||||||||||||||||||||||||||||||||||
| Supported BPMN Elements | creation_of_start_events | A start event can only be created via the elements toolbar. | ||||||||||||||||||||||||||||||||||||||||||||||||||||||||||
| Supported BPMN Elements | editing_and_styling |
| ||||||||||||||||||||||||||||||||||||||||||||||||||||||||||
| Supported BPMN Elements | execution_other_elements | None. The content of this element is ignored during execution. | ||||||||||||||||||||||||||||||||||||||||||||||||||||||||||
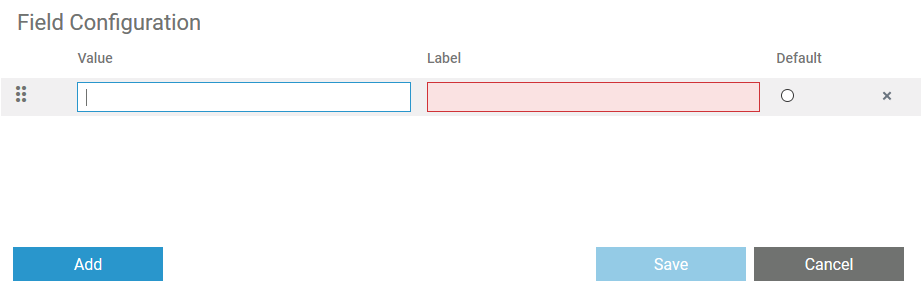
| Supported Form Elements | field_config_editor Moved to _designer_excerpts_big. | If you click icon
Use the editor to add and manage the content of your element:
| ||||||||||||||||||||||||||||||||||||||||||||||||||||||||||
| Supported Form Elements | form_elements_cssClass | Enables a field-acurate layout customization. | ||||||||||||||||||||||||||||||||||||||||||||||||||||||||||
| Supported Form Elements | form_elements_cssClass_value | A valid CSS class. |
| |||||||||||||||||||||||||||||||||||||||||||||||||||||||||
| Supported Form Elements | form_elements_description | A commentary field for the developer. The content is invisible to users and its sole purpose is internal documentation. |
| |||||||||||||||||||||||||||||||||||||||||||||||||||||||||
| Supported Form Elements | form_elements_editing | Go to page Modeling Forms for further information regarding editing of form elements using the context menu. |
| |||||||||||||||||||||||||||||||||||||||||||||||||||||||||
| Supported Form Elements | form_elements_label | Field name shown in the form. |
| |||||||||||||||||||||||||||||||||||||||||||||||||||||||||
| Supported Form Elements | form_elements_mandatory | The element must be filled or used if the checkbox is activated. |
| |||||||||||||||||||||||||||||||||||||||||||||||||||||||||
| Supported Form Elements | form_elements_mandatory_false | Element may remain empty (default). |
| |||||||||||||||||||||||||||||||||||||||||||||||||||||||||
| Supported Form Elements | form_elements_mandatory_true | Element must be filled. |
| |||||||||||||||||||||||||||||||||||||||||||||||||||||||||
| Supported Form Elements | form_elements_name | Technical identifier for data processing and not visible for the end user. |
| |||||||||||||||||||||||||||||||||||||||||||||||||||||||||
| Supported Form Elements | form_elements_name_value | Alphanumercial characters and underscore. It is not allowed to start the name with a number. |
| |||||||||||||||||||||||||||||||||||||||||||||||||||||||||
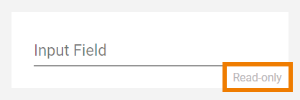
| Supported Form Elements | form_elements_read-only | This field is write-protected. When you use the option, Read-only is added to the bottom right of the element:
|
| |||||||||||||||||||||||||||||||||||||||||||||||||||||||||
| Supported Form Elements | form_elements_read-only_false | User can enter values (default). |
| |||||||||||||||||||||||||||||||||||||||||||||||||||||||||
| Supported Form Elements | form_elements_read-only_true | User cannot enter values. |
| |||||||||||||||||||||||||||||||||||||||||||||||||||||||||
| Supported Form Elements | form_elements_symbolType | Displays the type of the form element in read-only mode. |
| |||||||||||||||||||||||||||||||||||||||||||||||||||||||||
| Supported Form Elements | form_elements_text | In this field, you can enter text. Content added to attribute Text is shown in the element. If the user does not change the content of the field during form execution, the content of Text will be saved to the database. | ||||||||||||||||||||||||||||||||||||||||||||||||||||||||||
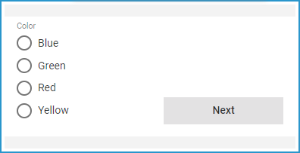
| Supported Form Elements | form_elements_vertical_alignment | The attribute is used to adjust the position of a form element in context to a bigger neighboring element. Example: The Radio Button Group Color is much bigger than the Button Next, but the button should be shown at the bottom of the form. Therefore, the button's attribute Vertical Alignment is set to Bottom. | ||||||||||||||||||||||||||||||||||||||||||||||||||||||||||
Supported Form Elements | form_elements_vertical_alignment_bottom | Align the element at the bottom of the element cell. | ||||||||||||||||||||||||||||||||||||||||||||||||||||||||||
| Supported Form Elements | form_elements_vertical_alignment_center | Align the element in the middle of the element cell. | ||||||||||||||||||||||||||||||||||||||||||||||||||||||||||
| Supported Form Elements | form_elements_vertical_alignment_top | Align the element on top of the element cell (default). | ||||||||||||||||||||||||||||||||||||||||||||||||||||||||||
| Supported Form Elements | grouping_deletion | Deletion Behavior of Grouping Elements If you delete a grouping element, it is erased from your work area including all content ! | ||||||||||||||||||||||||||||||||||||||||||||||||||||||||||
| Supported Form Elements | note_on_instance_table | The Instance List is a special form of the data table which is created for every BPMN model. Go to page Configuring the Instance List for detailed information. | ||||||||||||||||||||||||||||||||||||||||||||||||||||||||||
Supported Form Elements Modeling Forms | form_elements_placeholder | The content of this attribute is displayed in the element when attribute Text has not been filled. The placeholder is a sample value, it is not saved to the database. When a user overwrites the placeholder, it disappears and the user's input is saved to attribute Text. If content is added to both attributes Text and Placeholder, the content of Text is displayed in the element. | ||||||||||||||||||||||||||||||||||||||||||||||||||||||||||
| Technical Concepts | http_headers | Designer services read the following incoming HTTP headers containing correlation information:
These headers will be all logged to the transaction log. Having this information, you can use this for error analysis or usage metrics. | ||||||||||||||||||||||||||||||||||||||||||||||||||||||||||
| Technical Concepts | http_headers_adapter | With adapter calls, the xUML Runtime adds the following outgoing HTTP headers containing correlation information to the request:
Transaction id and request id will be logged to the transaction log on the adapter call. Having this information, you can use this for error analysis or usage metrics. | ||||||||||||||||||||||||||||||||||||||||||||||||||||||||||
| Testing and Integration | tip_api_organizations | For detailed information about the usage of organizations in API Management, refer to Organizations in the API Management guide. | ||||||||||||||||||||||||||||||||||||||||||||||||||||||||||
| Tips | click_to_see_gif | Click the image to see an animated version. |
| |||||||||||||||||||||||||||||||||||||||||||||||||||||||||
| Tips | click_to_see_gif_above | Click the image above to see an animated version. |
| |||||||||||||||||||||||||||||||||||||||||||||||||||||||||
| Working With Libraries | bridge_base | The Designer provides all necessary base types in a Bridge Base standard library. This library is available in all services and cannot be removed. It contains the following Bridge base types:
Most of these base types are only able to hold one single piece of information, like text in a string, true or false in a boolean, or binary data in a blob. Refer to the Bridge documentation (Base Types) for more information on the Bridge base types. If you want to associate several bits of information, you have to define a complex type that combines a number of independent base types and possibly other complex types. Such complex types are modeled as classes. To use your own types, you can
How to upload your own libraries is explained on Designer Administration > Libraries. | ||||||||||||||||||||||||||||||||||||||||||||||||||||||||||
| Working With Libraries | library_concepts | Libraries are code repositories that are useful to organize your development project into re-usable pieces that can be used in multiple services. They contain predefined classes, interfaces, operations and parameters you can use during modeling by simple drag & drop. | ||||||||||||||||||||||||||||||||||||||||||||||||||||||||||
Working With the Explorer | create_project | Enter a name for the service in the pop-up window Create New Service. Click Save. | ||||||||||||||||||||||||||||||||||||||||||||||||||||||||||
Working With the Explorer | folder_created | The new folder is created and displayed in the tree. | ||||||||||||||||||||||||||||||||||||||||||||||||||||||||||
| Working With the Explorer | import_limitations |
| ||||||||||||||||||||||||||||||||||||||||||||||||||||||||||
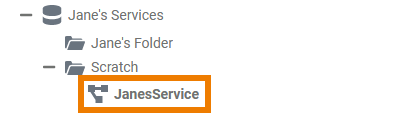
Working With the Explorer | open_a_service | To open a service, click on the service name in the explorer tree.
To access the service, click on the the explorer tab icon or on the service details area to close the explorer tab. Go to page Service Panel for further information. | ||||||||||||||||||||||||||||||||||||||||||||||||||||||||||
| Working With the Explorer | project_created | The new service is created and displayed in the tree. | ||||||||||||||||||||||||||||||||||||||||||||||||||||||||||
| Working With the Explorer | tip_profiles_admin_guide | Go to the Administration Guide for further information on the creation of namespaces. | ||||||||||||||||||||||||||||||||||||||||||||||||||||||||||
| Working With the Explorer | version_considerations | By exporting and importing, you can transfer Designer contents between PAS installations. These installations may have divergent versions. As of Designer 21.1.3, import will perform migrations on the imported service if the data to be imported is not older than Designer 21.1.3 (2.0.165). | ||||||||||||||||||||||||||||||||||||||||||||||||||||||||||
Working With the Explorer | whats_a_service | A Service contains one executable service. Services are created in the explorer tree. The necessary settings for your micro service such as the service properties, the BPMN model, the data model, used libraries and forms are managed within the service. You need to open a service to access its contents via the Service panel, see Service Panel for details. | ||||||||||||||||||||||||||||||||||||||||||||||||||||||||||
Working With the Explorer Modeling BMPN | cutting_and_pasting_explorer Moved to _designer_excerpts_big. |
| ||||||||||||||||||||||||||||||||||||||||||||||||||||||||||
Working With the Explorer Modeling BPMN | cockpit_tip | Further information about the Cockpit, tiles and groups can be found in the BPaaS Guide. | ||||||||||||||||||||||||||||||||||||||||||||||||||||||||||
Working With the Explorer Modeling BPMN | create_folder | Enter a name for the folder in the pop-up window Create New Folder. Click Save. | ||||||||||||||||||||||||||||||||||||||||||||||||||||||||||
Working With the Explorer Modeling BPMN | paste_url | You are now able to paste the URL, for example in an email. | ||||||||||||||||||||||||||||||||||||||||||||||||||||||||||
Working With the Explorer Modeling BPMN | toast_confirmation | The action is confirmed by a toast message. | ||||||||||||||||||||||||||||||||||||||||||||||||||||||||||
Working With the Explorer Modeling BPMN Modeling Forms | note_element_restrictions | Restrictions on Element Names Element names...
Furthermore, ...
| ||||||||||||||||||||||||||||||||||||||||||||||||||||||||||


Overview
Content Tools