|
Element |
|
|---|---|
|
Description |
A Timer Start Event allows you to start a BPMN model after a defined cycle or at a defined time. Every time the timer is triggered, the model will be started. |
|
Attributes
|
|
|
Particularity |
A start event can only be created via the elements toolbar. Another particularity of the Timer Start Event is the attribute Timer which is available in the Attributes Panel: 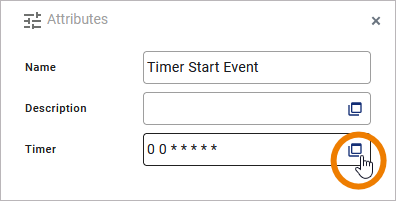
To define the timer settings, click Open Timer to open the timer editor. For detailed explanations see How to Use the Scheduler/Timer. |
|
Execution |
On Event: Without input or output parameters. |
|
Editing and Styling |
|
How to Use the Scheduler/Timer
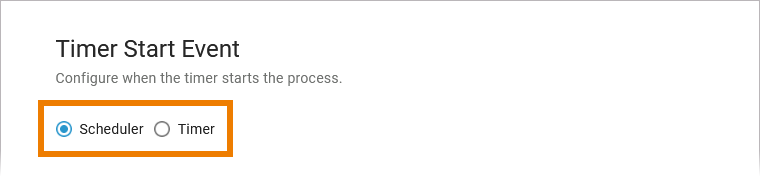
If you use option Open timer in the attribute panel, a separate editor will open where you can define the settings of your Timer Start Event. You have two options with different settings:
-
Scheduler (see below)
-
Timer (see below)
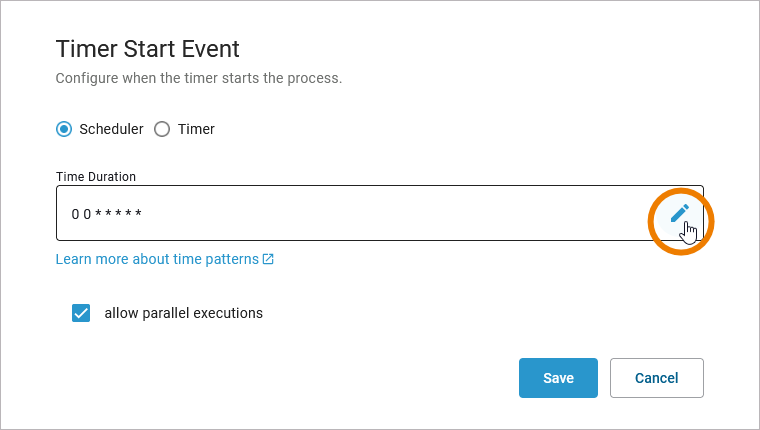
Scheduler
Use the scheduler if you want to define a pattern for your Timer Start Event, for example to start the model every monday, every hour etc. You can enter the desired duration as a valid cron expression with 7 values directly in field Time Duration. If you are not familiar with the formatting, open the field in edit mode:
An easy-to-use editor helps you put together the time pattern. Your entries in the fields below are combined into a time pattern that is displayed on top of the editor. You can use option Copy to copy this pattern to the clipboard:
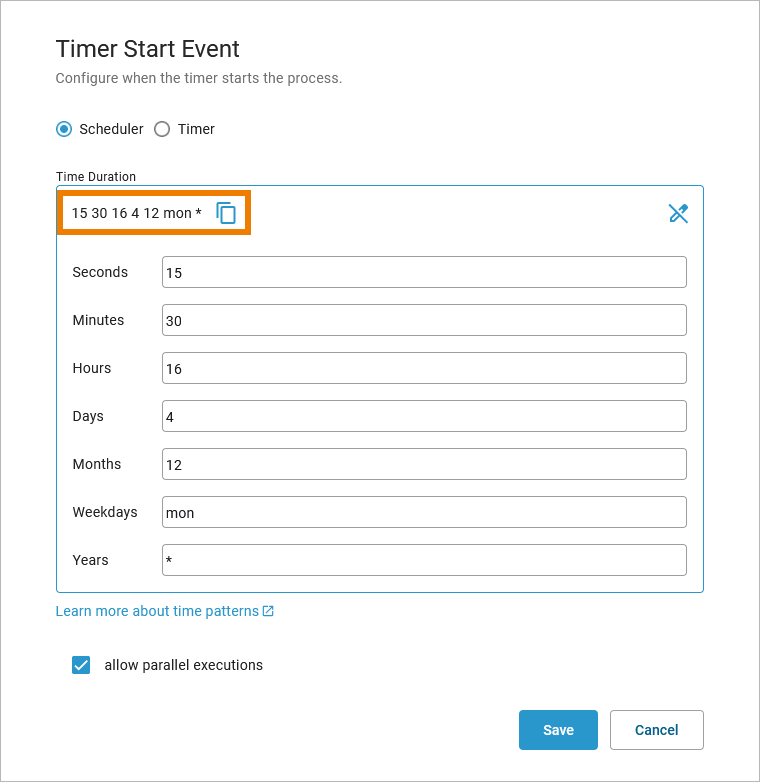
Your changes will be saved when you exit edit mode or click Save at the bottom.
|
Setting |
Description |
Default |
|---|---|---|
|
Time Duration |
Open this field in edit mode to enter the desired duration as a valid cron expression with 7 values.
Click Learn more about time patterns to open our documentation page Date and Time Scheduling Patterns. |
0 0 * * * * * |
|
Seconds |
Use 0 to 59 or a pattern. |
0 |
|
Minutes |
Use 0 to 59 or a pattern. |
0 |
|
Hours |
Use 0 to 23 or a pattern. |
* |
|
Days |
Depending on the month, valid input are numbers from 1 to 31 or a pattern. |
* |
|
Weekdays |
Valid input:
|
* |
|
Months |
Use numbers 1 to 12 or a pattern. |
* |
|
Years |
Insert a positive integer or a pattern. |
* |
|
Allow Parallel Executions |
If checked, each time a scheduler pattern matches, the scheduler activity diagram is executed - even if another execution is already running.
|
Enabled |
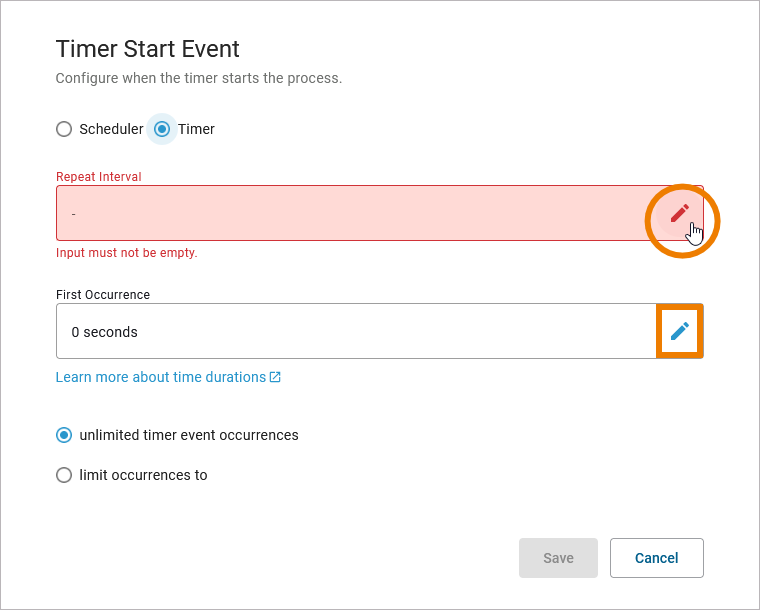
Timer
Select the timer if you want to define an interval, e.g. to start the model after one week, after two hours etc. You can enter the desired interval as a valid duration expression directly in field Repeat Interval. If you are not familiar with the formatting, open the field in edit mode (the same applies to field First Occurrence):
An easy-to-use editor helps you put together the duration expression. Your entries in the fields below are combined into a duration expression that is displayed on top of the editor. You can use option Copy to copy this expression to the clipboard:

Your changes will be saved when you exit edit mode or click Save at the bottom.
|
Setting |
Description |
Default |
|---|---|---|
|
Repeat Interval |
Defines the time interval between two calls of the timer action. Open this field in edit mode to enter the desired interval as a valid duration expression. If you are familiar with the formatting, you can also insert the duration expression directly in the field. Click Learn more about time durations to open our documentation page Time Durations. |
- |
|
First Occurence |
Defines the wait interval after service start before the timer is executed for the first time. Open this field in edit mode to enter the desired wait interval as a valid duration expression. If you are familiar with the formatting, you can also insert the duration expression directly in the field. Click Learn more about time durations to open our documentation page Time Durations. |
0 seconds |
|
Unlimited Timer Event Occurrences |
If you want the timer to be endless, select this option. |
Enabled |
|
Limit Occurrences to |
If you want to define a count of repetitions, select this option. Insert a positive integer in the displayed field: 
|
Disabled |
BPMN_StartEvent_Example
Click here to download a simple example model that shows what you can do with Start Events in Scheer PAS Designer.