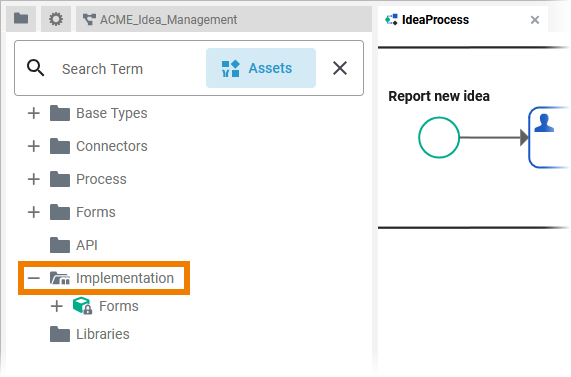
If you want to create your own data model within the Designer, you need to create a service first. In the Service Panel resides a folder Implementation where you can add your own data model to. Go to the Implementation folder in the service panel of your service:
Restrictions on Element Names
A process name must be unique within one service. In addition, the following name restrictions apply to all service panel elements:
Element names...
-
... must not be empty.
-
... must not contain spaces. Exception: Spaces are allowed in operation names.
-
... must not start with numbers.
-
... must not contain a dot ( . ).
-
... must not contain any special characters. Exception: Operation names may end with a slash ( / ).
-
In addition, Action Script commands and some system-relevant strings (refer to Reserved Words) cannot be used as element names.
Your input is validated: If the name you enter violates these restrictions, the field in the editor turns red and cannot be saved.
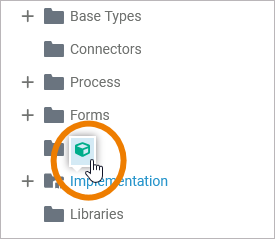
All elements inside the Implementation folder need to be created within packages. Add a new package via the quick action or the context menu.
Refer to Service Panel for more information on how to create elements in the service panel.
Expert Advice
Apply the same naming conventions to all your models. This makes reading a model much easier. Refer to Naming Conventions and Containment Tree Organization in the Builder User’s Guide for an overview on practice-approved naming conventions.
Implementation Elements
To model your own data structures, you have the following elements available:
|
Element |
Description |
Details |
|||||
|---|---|---|---|---|---|---|---|
|
Package
|
A package is like a directory for the file system. It is used to group executable data model elements. Packages can have any depth of nesting: To structure your work, you can create packages within packages. Also, packages define a sort of namespace to the contained elements. The name of the package is part of the element path, e.g. Package1.Class is different from Package2.Class. |
||||||
|
|
Class
|
A class is an aggregation of properties and operations that describes a complex data type from which objects can be created. |
|||||
|
|
Property
|
Properties are data fields that describe the structure of the class. |
|||||
|
Operation
|
An operation adds behavior to a class or interface. The behavior describes how to process the data given by the parameters. In the context of the Designer, you can implement operations as mapping diagram, activity, Action Script or JavaScript . |
||||||
|
|
Parameter
|
Operations can have parameters that define the input and output objects. Operation parameters can be of simple type (Available Base Types) or of complex type (class or interface). |
|||||
|
Operation
|
Operations can have suboperations with their own parameters. |
||||||
|
|
Parameter
|
||||||
|
...
|
Suboperations can have suboperations with their own parameters and so on... |
||||||
|
Interface
|
In contrast to a class, an interface has no properties nor implementations. Interfaces are used to define common operations for multiple classes. In the deriving class, you must implement all interface operations. |
||||||
|
|
Interface
|
Interfaces can have sub-interfaces and sub-classes. |
|
||||
|
Class
|
|||||||
|
Operation
|
Operations and parameters for interfaces are the same as for classes. The difference is that they have no implementation but only define the signature for the dependent classes to derive from. |
||||||
|
|
Parameter
|
||||||
Each element of the Implementation folder has a context menu and quick actions. The context menu contains options to create new elements to the selected element, and to edit the current element. Via the quick actions, you can access the most used menu items directly with a single click.
In the Implementation folder, you can undo or redo (after undo) your previous changes using the corresponding functions in the Designer editors or using the corresponding keyboard standard shortcuts (Ctrl+Z/Y).
Package
A package is like a directory for the file system. It is used to group executable data model elements. Packages can have any depth of nesting: To structure your work, you can create packages within packages. Also, packages define a sort of namespace to the contained elements. The name of the package is part of the element path, e.g. Package1.Class is different from Package2.Class.
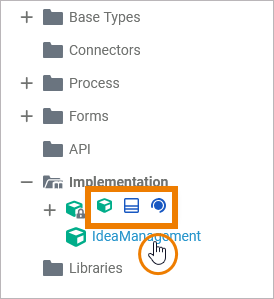
The quick actions of a package allow for the creation of packages, classes and interfaces:
|
Quick Action |
Description |
|---|---|
|
|
Create another package within the existing package. |
|
|
Create a class within the package. |
|
|
Create an interface within the package. |
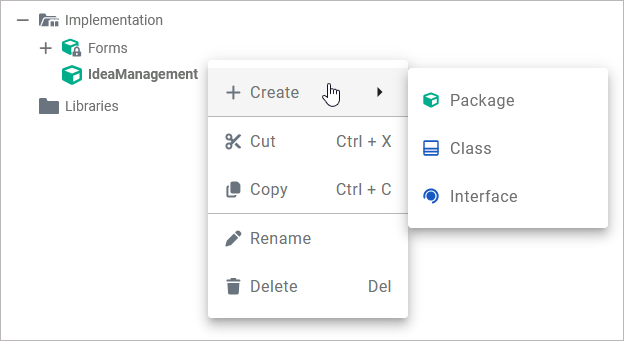
The context menu of a package allows you to create further elements, to cut, copy and paste the package, to change the name of the package, and to delete it:
|
Menu Item |
Description |
|---|---|
|
Create > Package |
Create another package within the existing package. |
|
Create > Class |
Create a class within the package. |
|
Create > Interface |
Create an interface within the package. |
|
Cut |
Cut the package to paste it elsewhere to the Implementation tree. |
|
Copy |
Copy the package to paste it elsewhere to the Implementation tree. |
|
Paste |
Paste the package elsewhere to the data model tree. Available if Copy or Cut option have been used before. |
|
Rename |
Change the package name. |
|
Delete |
Delete the package. You can also use the Del or backspace keys to delete the package. |
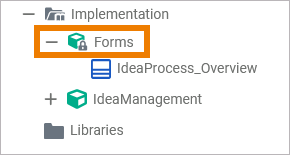
Package Forms is a generated package that contains all classes that are related to the forms you have already created to your Forms folder. This package is locked - you cannot change the generated form classes:
Class
A class is an aggregation of properties and operations that describes a complex data type from which objects can be created.
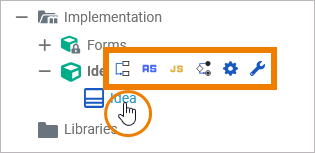
The quick actions of a class allow for the creation of properties as well as operations with different types of implementation:
|
Quick Action |
Description |
|---|---|
|
|
Add a mapping operation to the class. |
|
|
Add an action script operation to the class. |
|
|
Add a JavaScript operation to the class. |
|
|
Add an activity operation to the class. |
|
|
Add an operation to the class. The implementation is to be defined later. |
|
|
Add a property to the class. |
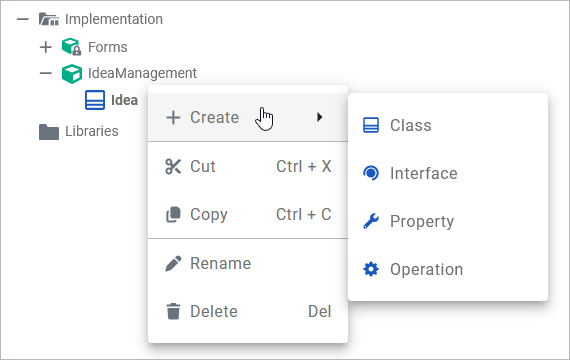
The context menu of a class allows you to create further elements, to cut, copy and paste the class, to change the name of the class, and to delete it:
|
Menu Item |
Description |
|---|---|
|
Create > Class |
Add a sub-class to the class. |
|
Create > Interface |
Add an interface to the class. |
|
Create > Property |
Add a property to the class. |
|
Create > Operation |
Add an operation to the class. The implementation is to be defined later. |
|
Cut |
Cut the class to paste it elsewhere to the API or Implementation folder. |
|
Copy |
Copy the class to paste it elsewhere to the API or Implementation folder. |
|
Paste |
Paste the class elsewhere to the API or Implementation folder. Available if Copy or Cut option have been used before. |
|
Rename |
Change the name of the class. |
|
Delete |
Delete the class. You can also use the Del or backspace key to delete the class. |
Property
Properties are data fields that describe the structure of the class.
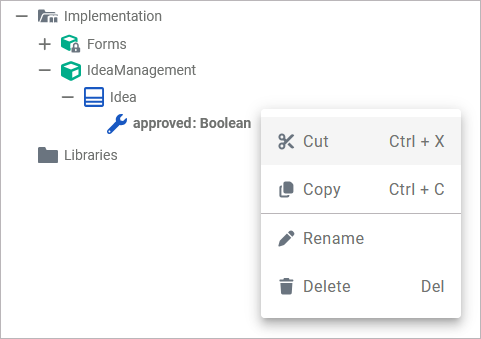
The context menu of a property allows you to cut, copy and paste the property, to change the name of the property and delete it. It is not possible to create further elements below a property:
|
Menu Item |
Description |
|---|---|
|
Cut |
Cut the property to paste it elsewhere to the data model tree. |
|
Copy |
Copy the property to paste it elsewhere to the data model tree. |
|
Paste |
Paste the property elsewhere to the data model tree.
|
|
Rename |
Change the name of the property. |
|
Delete |
Delete the property. You can also use the Del or backspace keys to delete the property. |
Operation
An operation adds behavior to a class or interface. The behavior describes how to process the data given by the parameters. In the context of the Designer, you can implement operations as:
For detailed information on how to implement the different types of operations refer to the the above mentioned pages.
The quick actions of an operation allow for the creation of parameters with different directions, and to jump to the implementation of the operation:
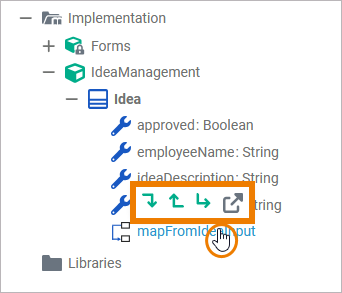
|
Quick Action |
Description |
|---|---|
|
|
Add an input parameter to the operation. |
|
|
Add an output parameter to the operation. |
|
|
Add a return parameter to the operation. |
|
|
Open the implementation of the operation in a separate tab. If you have not yet selected an implementation, a dialog opens first, which allows you to select the desired implementation. Refer to Create (Implementation) below for more information. |
The context menu of an operation allows you to create further elements, and to open the implementation of the operation (where you can change the implementation type of the operation). Furthermore you can cut, copy and paste the operation, change the name of the operation, and delete it via this menu:
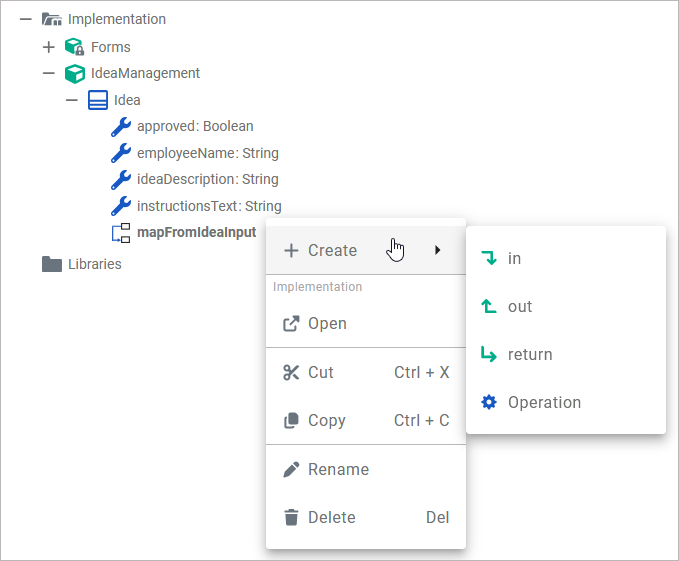
|
Menu Item |
Description |
|---|---|
|
Create > in |
Add an input parameter to the operation. |
|
Create > out |
Add an output parameter to the operation. |
|
Create > return |
Add a return parameter to the operation. |
|
Create > Operation (= Suboperation) |
Add a suboperation to the operation. |
|
Cut |
Cut the operation to paste it elsewhere to the API or Implementation folder. |
|
Copy |
Copy the operation to paste it elsewhere to the API or Implementation folder. |
|
Paste |
Paste the operation elsewhere to the API or Implementation folder. Available if Copy or Cut option have been used before. |
|
Rename |
Change the name of the operation. |
|
Delete |
Delete the operation. You can also use the Del or backspace key to delete the operation. |
Parameter
Operations can have parameters that define the input and output objects. Operation parameters can be of simple type (Available Base Types) or of complex type (class or interface).
Refer to Adding Parameters to Operations for information on how to create parameters.
The context menu of a parameter allows you to change the order of parameters as well as to change the name of a parameter. Furthermore you can cut, copy and paste as well as delete the parameter via this menu. It is not possible to create further elements below a parameter:
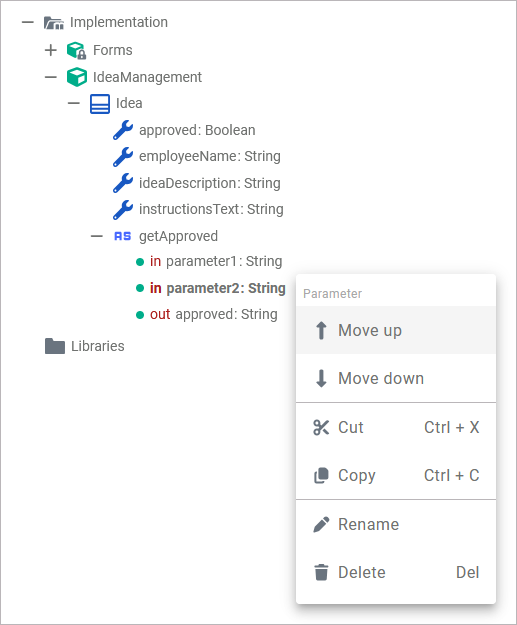
|
Menu Item |
Description |
|---|---|
|
Move up |
Change the order of parameters. |
|
Move down |
|
|
Cut |
Cut the parameter to paste it elsewhere to the API or Implementation folder. |
|
Copy |
Copy the parameter to paste it elsewhere to the API or Implementation folder. |
|
Paste |
Paste the parameter elsewhere to the API or Implementation folder. Available if Copy or Cut option have been used before. |
|
Rename |
Change the name of the parameter. |
|
Delete |
Delete the parameter. You can also use the Del or backspace key to delete the parameter. |
If you want to change the direction of a parameter, select the parameter and change attribute Direction in the Attributes panel:
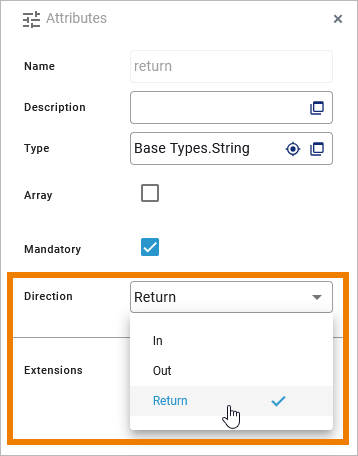
Interface
In contrast to a class, an interface has no properties nor implementations. Interfaces are used to define common operations for multiple classes. In the deriving class, you must implement all interface operations.
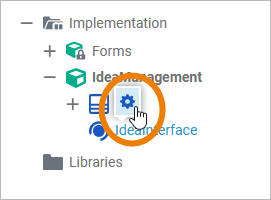
The quick action of an interface allows for the creation of operations:
|
Quick Action |
Description |
|---|---|
|
|
Add an operation to the interface. Operations of interfaces have no implementation, they only describe the signature of the operation. |
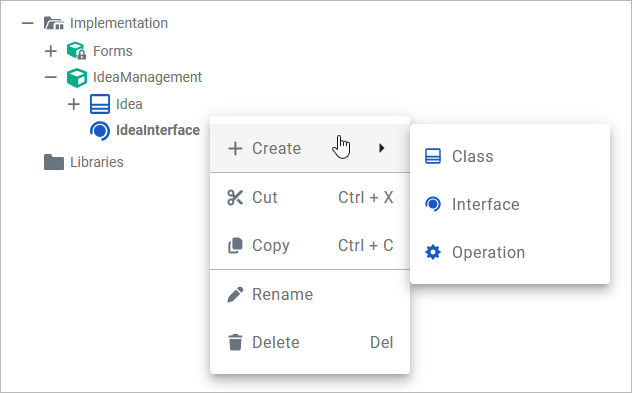
The Interface context menu allows you to create further elements and to change the name of the interface. Furthermore you can cut, copy and paste as well as delete the interface via this menu:
|
Menu Item |
Description |
|---|---|
|
Create > Class |
Add a class or subclass to the interface. Classes within interfaces can be nested. |
|
Create > Interface |
Add another interface to the interface. Interfaces can be nested. |
|
Create > Operation |
Add an operation to the interface. Operations of interfaces do not have an implementation but only define the signature (parameters and types). |
|
Cut |
Cut the interface to paste it elsewhere to the API or Implementation folder. |
|
Copy |
Copy the interface to paste it elsewhere to the API or Implementation folder. |
|
Paste |
Paste the interface elsewhere to the API or Implementation folder. Available if Copy or Cut option have been used before. |
|
Rename |
Change the name of the interface. |
|
Delete |
Delete the interface. You can also use the Del or backspace key to delete the interface. |
Related Content
Related Documentation:


