Once you have modeled your business process on the diagram pane, you have to add the necessary execution parts to this process to bring it to life. The execution pane is the place where you make your model executable.
You need to perform two steps to implement executional parts to your model:
- Provide all necessary data types and operations for the implementation of your process. These types and operations reside in the Service panel of the BPMN editor.
- You can use the Base Types that are provided with the Designer.
- You can create other necessary types yourself in the Implementation section.
Refer to Modeling Data Mapping for further information. - You can import a library that provides additional types and operations.
Refer to Designer Administration > Libraries for further information.
- In the second step, select data types and operations from the Service panel, and add them to your process at the right places.
- How this is done will be explained in this chapter.
The Execution Pane
The execution pane is displayed below the diagram pane. It is shown as soon as you click on one of the BPMN elements:
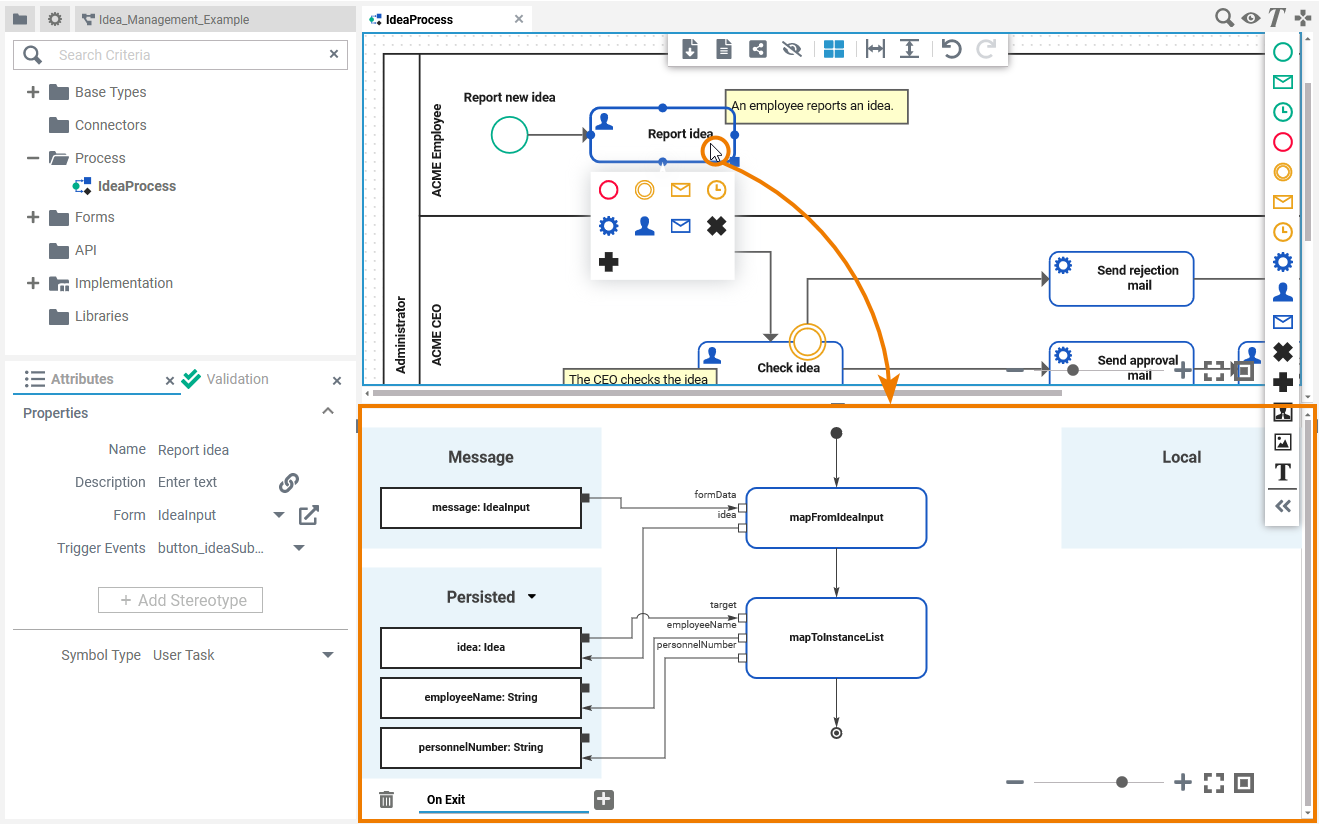
The content of the execution pane depends on the selected BPMN element - three different views are possible:
| Selected BPMN Elements | Pane Content | Execution Pane View |
|---|---|---|
|
| |
|
| |
|
|

Execution Pane Contents
| Section | Description |
|---|---|
Operations Flow | Every execution pane contains an empty operations flow with start and end node. |
Persisted | Variables created in section Persisted are usable in all executions of the BPMN model. |
| Local | Variables created in section Local are only available for use within the current execution. |
| Message | Section Message is shown for all BPMN elements that need to process an incoming message. As per default, the incoming message has type any. To gain access to the data used in your process, you have to apply the correct type from a customized library. |
| Return | Only for outgoing relations of Exclusive Gateways Section Return is displayed, containing the unchangeable variable return of type boolean. |
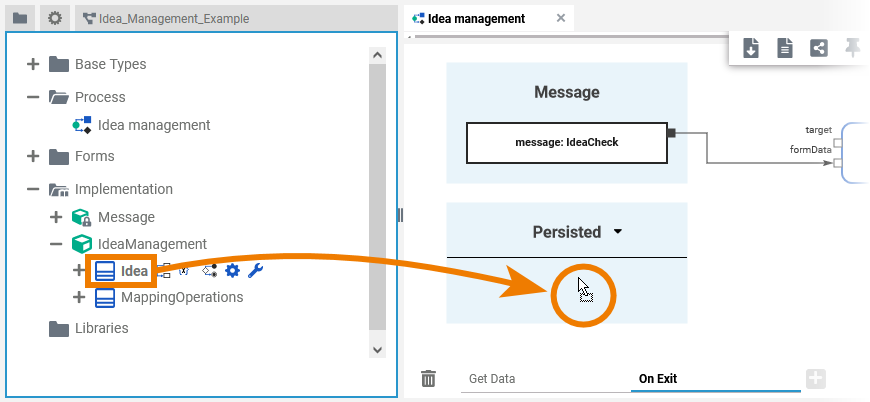
| Adding content to the execution pane is simple: Just drag & drop the elements you want to use from the library panel to the execution pane. Two different kinds of elements can be added to the pane:
|
A variable is added when you use a class ( For detailed information see pages Adding Variables and Persisting Data. | |
An operation call is added when you drag & drop an operation ( For detailed information see page Adding Operation Calls. |
Customizing the Execution Pane
| You have several options to adjust the execution pane. When you open the pane for the first time, the default view is displayed:
|

Managing the Execution Pane
MultiExcerpt named state_of_pane was not found -- Please check the page name and MultiExcerpt name used in the MultiExcerpt-Include macro
MultiExcerpt named enlarge_pane was not found -- Please check the page name and MultiExcerpt name used in the MultiExcerpt-Include macro | |
MultiExcerpt named hide_sidebar was not found -- Please check the page name and MultiExcerpt name used in the MultiExcerpt-Include macro | |
Use the |
Modeling on the Execution Pane
| Action | Example | Description |
|---|---|---|
| Zoom | When modeling, you have two options to apply the zoom on the pane.
| |
| Shifting Content | You have various options to shift the content on the pane:
| |
| Scaling | MultiExcerpt named fit_model_to_pane was not found -- Please check the page name and MultiExcerpt name used in the MultiExcerpt-Include macro | |
MultiExcerpt named scale_model was not found -- Please check the page name and MultiExcerpt name used in the MultiExcerpt-Include macro |
The Execution Context Menus
Two different context menus support the user on the execution pane:
Elements Context Menu | |
|---|---|
If you right click on an element, the tools context menu opens. Use it to edit the current element. The following options are available:
| |
| You can use the elements context menu on all elements on the execution pane. | |
Execution Pane Context Menu | |
A right click on the execution pane itself opens another context menu including the following options:
| |
Shortcuts
You can also use the following shortcuts on the execution pane. The operations are applied to the currently selected element. The following list of shortcurts can be searched. Enter your search term in the Global Filter field.
On this Page:
Overview
Content Tools