If you want to revise the settings of an API, you will have to open its details page. The details page opens, if you click on the name of an API belonging to one of your organizations.
If you want to edit API Management elements, you need to access them via the My... menu items (refer to "My" API Management items).
Basic Settings
The basic settings of an API are displayed in the frame on top:

If an API is published, more options appear:

|
|
API Details
Underneath the basic settings of the API its details can be configured. Use the tabs on the left side of the page or the links on the overview page to navigate to the different details:
- Overview
- Implementation
- Definition
- Plans
- Developer Portal PAS 22.1
- Policies
- Change Log
If an API has been published, the detail list is extended by more options:

Implementation
Open tab Implementation to provide the details about the backend API implementation:

These settings are necessary to enable the gateway to proxy API requests successfully.
You have to provide the following details:
| Option | Description |
|---|---|
API Endpoint | The URL that the API Management will use to proxy a request made for this API. |
| API Type | Choose between REST and SOAP. |
| API Content Type | You can select JSON or XML. This information is primarily used to respond with a policy failure or error in the appropriate format. |
| Enable stateful request payload inspection | If this feature is enabled, the gateway will parse the request body into an object prior to applying the policies. This allows policies to make decisions based on the content of the request payload. |
| Disable request keys stripping | If this feature is enabled, the gateway will not strip the X-API-KEY and apikey query parameter from the request. This allows the gateway to send the keys to the backend endpoint (see also API Key policy). |
| API Security | Choose between the options None, MTLS/Two-Way-SSL and BASIC Authentication (see Endpoint Level Security). Please note that BASIC Authentication is not ideal. It is especially insecure if not using SSL/HTTPS to connect to the backend API. |
Do not forget to click the Save button when you have finished.
Endpoint Level Security
Policy security alone does not secure an API’s unmanaged endpoint. Endpoint security also secures the APIs from attempts to bypass the gateway.
Scheer PAS API Management supports two endpoint security options:
- BASIC Authentication
- MTLS (Two-Way-SSL)
With Mutual TLS, a two-way trust pattern is created. The gateway trusts the APIs and the APIs trust the gateway. The APIs, however, do not trust the clients. The use of enpoint security prevents that a client can bypass the gateway and access the APIs directly.
The endpoint level of security applies to all requests made to the APIs, regardless of the policies configured.
Definition
On the Definition tab, you can see and edit the definition of an API:

An API definition file allows consumers to better understand how to use your API. If you want to test your API directly from API Management, it is necessary to have an API definition.
If you have imported the API from an instance of the integration component (Bridge), the API definition is populated automatically. Alternatively, you can load a definition from a URL, or add a definition manually (see further below).
Drop-down menu API Definition shows the type of definition file:
- No API Definition
- OpenAPI & Swagger v2/v3 (JSON)
- OpenAPI & Swagger v2/v3 (YAML)
- WSDL
If needed, you can copy the API definition from here, or download it via the Download button.
| Definition Task | |
|---|---|
Adding a Definition Manually | If no definition has been imported, you can add a definition manually:
|
Loading a Definition from a URL | If no definition has been imported or if you need to update an existing definition, you can load a definition from a URL:
|
Updating a Definition | If the definition of an imported API needs to be updated, you have to do this manually:
|
Plans
Open tab Plans to define the visibility of your API and wether it should be Public or Private :

Public API
In section Public API, enable the checkbox Make this API public if you want the API to be accessible publicly. For Public APIs, the public endpoint is displayed directly in the API Developer Portal. Use the drow-down list next to the checkbox to define to whom the API is displayed (see Visibility for details).
Available Plans
| Option | Description |
|---|---|
| Attach | Enable the checkbox of a plan that should be presented to a client who wants to create a contract to this API. |
| Plan | This column shows the name of already locked plans. The names are displayed as links so that you can direcly switch to the details page of a plan. On page Locking a Plan you can find out how to lock plans. Visit page Creating a Contract to learn how a contract can be created. |
| Plan Version | Use the drop-down list to select the version of the plan you want to use. |
| Require Approval | Enable the checkbox if the user should be able to use the plan only after granted approval.
|
| Visibility | Use the drop-down list to define which user group can browse the API and the corresponding plan. This affects the view in the API Management itself as well as in the API Developer Portal:
For detailed information about the visibility concept, visit page The Concepts of API Management. |
Do not forget to click the Save button when you have finished.
Developer Portal
PAS 22.1
Open tab Developer Portal to design the display of your API in the Developer Portal and to define the visibility and order of the attached plans (for detailed information see page Exposing an API):

You have several options to design the display of your API in the Developer Portal:
| Option | Description |
|---|---|
| Feature in Developer Portal | Enable the checkbox Feature this API if you want to display the API directly on the landing page of the API Developer Portal. |
| Attached Plans | In this section, all available plans for the API are displayed and can be managed as follows:
|
| Logo | In the Developer Portal, your API will be displayed as a tile. You can upload a logo or picture for your API that will be displayed within in the tile:
|
| Extended API Description | In this section, you can provide a Markdown description of your API to help developers understand how to use your API. |

Do not forget to click the Save button when you have finished.
Policies
Open tab Policies to display the list of policies that have been assigned to this API. To add another policy to this API, use the Add Policy button. You will be redirected to the page Add Policy, where you can choose a policy and customize it:

Refer to Policies for an overview of the standard policies supplied with Scheer PAS API Management. Refer to Assigning Policies for detailed explanations on how to configure a policy.
The order of the policies is important. The order in which the policies appear in the user interface determines the order they will be applied at runtime. You can drag a policy up and down the list to change the order:

The listed policies will be applied to all invocations of this API by any client, regardless of the plan used in its contract. If you want to delete a policy from this API, use the Remove button of the policy in question.
Contracts
This tab is only visible for published APIs.
Use tab Contracts to display a list of all contracts between all clients and this API. The list shows all clients that may potentially consume this API:

The status label indicates if the client is able to use the API:
| Status | Description |
|---|---|
| The API has been assigned to the client, he can use the API. |
| The client's application to use the API is still pending. Click the Approve button to make the API available to the client. |
Endpoint
This tab is only visible for published APIs.
Open tab Endpoint to display Managed Endpoint. This is only applicable for Public APIs.
A client must send the request to the appropriate endpoint to successfully invoke this managed API. When invoking the API through a contract, a valid API Key must be included in each request. If the API is Public, it can be invoked without an API Key through the endpoint that is displayed here.
When you open the tab Endpoint for Private APIs, a warning message is displayed:

Use the button ![]() to copy the inserted link to your clipboard.
to copy the inserted link to your clipboard.
Metrics
This tab is only visible for published APIs. Navigate to tab Metrics in the APIs section of API Management to display basic metric information about the API. Once an API has been used, you can use the Metrics tab to view basic analytics information and to figure out, how often the API has been used and when. PAS 22.1 For more elaborated metrics, have a look at the Log Analyzer which offers a default dashboard visualizing API Management insights. You can adapt the presentation of the data by selecting from the following options: Option Select one of the pre-defined time ranges: Click Refresh to update the page and load the latest data.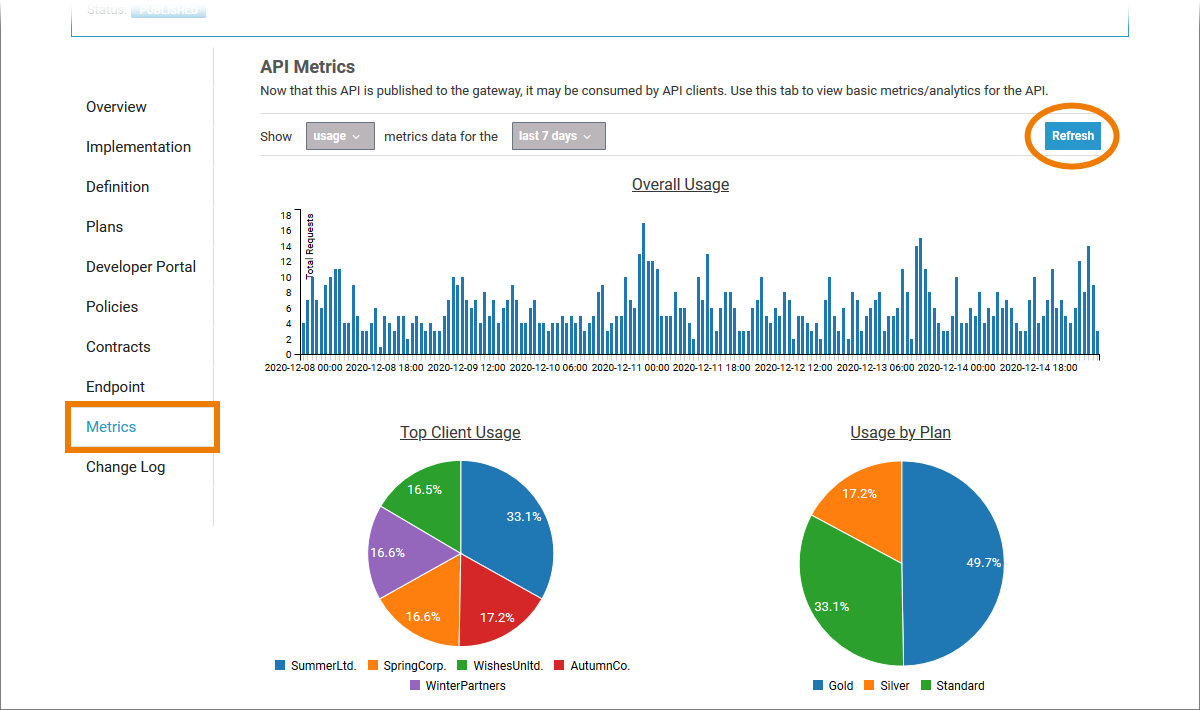
Description Allowed Values Type of Metric Select the type of metric you want to see. usage Show the count of requests per date (default). response type Show the count of requests per response type (success, failed, error). Time Range
Change Log
Navigate to the Change Log tab if you want to see an overview of changes made for this API. All configuration changes made by API Management users associated with this API are listed here:

On this Page:
Overview
Content Tools