Example File (Builder project Advanced Modeling/UI):
| <your example path>\Advanced Modeling\UI\uml\uiFileUpload.xml |
File upload is a common technique to send e.g. flat files from a web client to the server to be processed. The file upload consists of the user interface and a HTTP port which will take over the file handling on the server side.
Upload Frontend
File upload user interfaces have a special input field, the file selector. The file selector binds a file to the upload form and is the interface to the local file system of the application user.
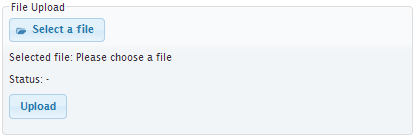
File Selector and Form Submit Button
Modeling the file selector element within MagicDraw is done by simply drawing a button and assigning the open icon to it. The button element will be rendered in the upload form as a file input element.

Compared to the classic file selector where the selected file is actually displayed in a read-only text field, the selected file needs to be displayed using a jQuery script reading the filename and writing it into a label. This is can be seen in the example model.
The specialization of the normal button to a file selector is done in the controller where the file selector button is bound to. From within the web browser, the file selector, when clicked, will open the file system browser. A file can be chosen.
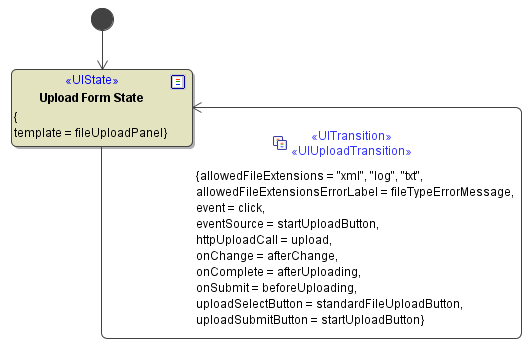
Upload Controller
The <<UI>> controller is the heart of the upload form. It is the place where the definition of the upload processes is found. The required parameters are defined on an <<UITransition>> extended by the stereotype <<UIUploadTransition>>. Within the specifications of the transition the necessary file upload parameters are set.
| Parameter | Description |
|---|---|
| HTTP Upload Call | Definition of the HTTP upload url |
| On Change | A JavaScript which will be executed on the onChange event. Parameters: file, extension |
| On Complete | A JavaScript which will be executed when the upload is complete. Parameters: file, result (HTTP response) The result string can be used to check for errors. It may contain an explicit description of errors. Note, if it is empty, the request couldn't be executed at all. |
| On Submit | A JavaScript which will be executed when the upload is started. Parameters: file, extension |
| Allowed File Extensions Error Label | Refers to a UI Label that is used to display the text for not allowed extensions. |
| Allowed File Extensions | Settings to define file extensions which will be allowed to upload. If no file extensions are defined, all types of files can be uploaded. |
| Upload Submit Button | Definition of the submit button which will trigger the upload |
| Upload Select Button | Definition of the file select button which is used to select the file to be uploaded |
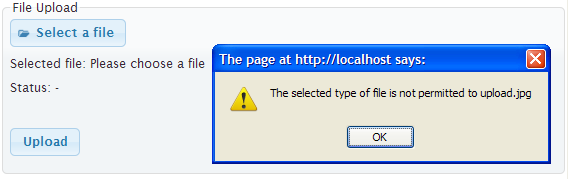
Upload Error Message
When the Allowed File Extensions Error Label is defined, a message will alert the user of not being able to upload the selected type of file.
Upload Progress Indication
An essential UI behaviour when uploading files to a server is to give a visual feedback of the progress. As implemented in the chapters example there are two ways of indicating that the process has started. The use of the JavaScript hooks onChange, onComplete and onSubmit allow to interact using e.g. jQuery to handle the progress indication.
Upload Backend
A file upload is done via HTTP POST which has of course the precondition of the backend to be a HTTP service. On how to create a HTTP Service please refer to section HTTP Service.
Uploaded files are received as multipart/mixed mime messages. These mime messages need to be converted and the files extracted from the message to be able to handle them e.g. process a CSV file to an XML or write the file using the File System Adapter.
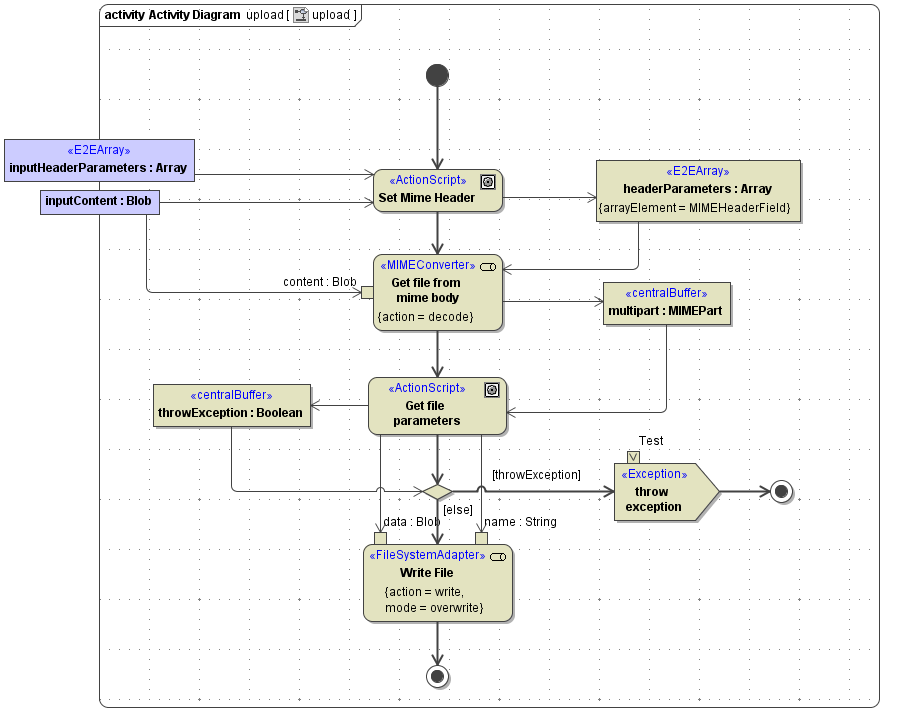
The HTTP Service recieves a multipart MIME message and therefore needs two input parameters, inputHeaderParameters and inputContent. As seen in the above figure, the mime message needs to be decoded using the <<MIMEConverter>>, separating the different components of the MIME message and giving access to the actual file content that was sent. For details on the <<MIMEConverter>> please refer to MIME Adapter.
Overview
Content Tools