| Chapter | Name | Excerpt | |||||||||||||||||||||||||||||||||||||||||||||
|---|---|---|---|---|---|---|---|---|---|---|---|---|---|---|---|---|---|---|---|---|---|---|---|---|---|---|---|---|---|---|---|---|---|---|---|---|---|---|---|---|---|---|---|---|---|---|---|
| Designer Panel Overview | hide_panels | You can hide panels that you do not currently need. The icons of hidden panels are displayed in the right upper corner. | |||||||||||||||||||||||||||||||||||||||||||||
| Designer Panel Overview | panels_general_description | The Designer panels are displayed on left and right side of the canvas and support the user during modeling. | |||||||||||||||||||||||||||||||||||||||||||||
| Designer Panel Overview | show_panels | To show a hidden panel again, click on its icon. Hover over an icon to show the name of the corresponding panel. | |||||||||||||||||||||||||||||||||||||||||||||
| Designer Panel Overview | use_attribute_panel | Use the Attributes Panel to edit the attributes or to display them on the canvas. | |||||||||||||||||||||||||||||||||||||||||||||
| Managing Projects | bpmn_created | The new BPMN model is created and a new tab opens where you can directly start to model. If you switch back to the explorer tab, the new BPMN model is also displayed in the tree. | |||||||||||||||||||||||||||||||||||||||||||||
| Managing Projects | create_bpmn | Enter a name for the BPMN model in the pop-up window Create New Model. Click Save. | |||||||||||||||||||||||||||||||||||||||||||||
| Managing Projects | create_folder | Enter a name for the folder in the pop-up window Create New Folder. Click Save. | |||||||||||||||||||||||||||||||||||||||||||||
| Managing Projects | create_project | Enter a name for the project in the pop-up window Create New Project. Click Save. | |||||||||||||||||||||||||||||||||||||||||||||
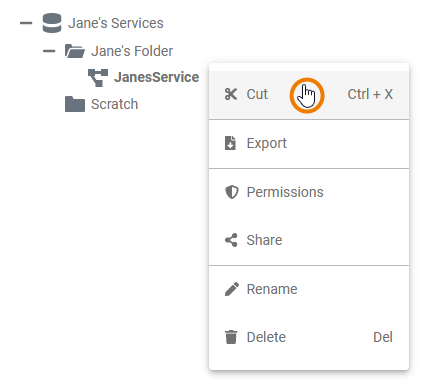
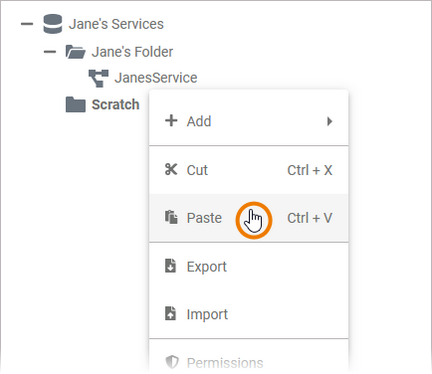
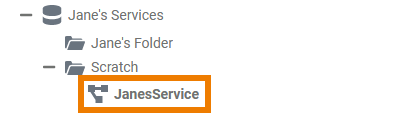
| Managing Projects | cutting_and_pasting | Cutting and Pasting
| |||||||||||||||||||||||||||||||||||||||||||||
| Managing Projects | description_editor | Enter your text in the editor. Various formatting tools are provided | |||||||||||||||||||||||||||||||||||||||||||||
| Managing Projects | description_editor_save | Click Save and close to confirm your text or Cancel to abort the action. | |||||||||||||||||||||||||||||||||||||||||||||
| Managing Projects | folder_created | The new folder is created and displayed in the tree. | |||||||||||||||||||||||||||||||||||||||||||||
| Managing Projects | info_libraries_mandatory | The Libraries folder is a mandatory part of a project, therefore users cannot delete it. | |||||||||||||||||||||||||||||||||||||||||||||
| Managing Projects | note_element_restrictions | Restrictions on Element Names
| |||||||||||||||||||||||||||||||||||||||||||||
| Managing Projects | paste_url | You are now able to paste the URL, for example in an email. | |||||||||||||||||||||||||||||||||||||||||||||
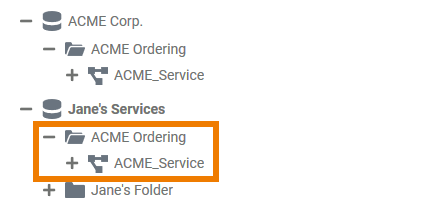
| Managing Projects | project_content | Each newly created project contains already a folder Libraries and a folder Models. | |||||||||||||||||||||||||||||||||||||||||||||
| Managing Projects | project_created | The new project is created and displayed in the tree. | |||||||||||||||||||||||||||||||||||||||||||||
| Managing Projects | tip_profiles_admin_guide | For further information on namespaces visit the Administration Guide. | |||||||||||||||||||||||||||||||||||||||||||||
| Managing Projects | toast_confirmation | The action is confirmed by a toast message. | |||||||||||||||||||||||||||||||||||||||||||||
| Managing Projects | tree_export | Export
| |||||||||||||||||||||||||||||||||||||||||||||
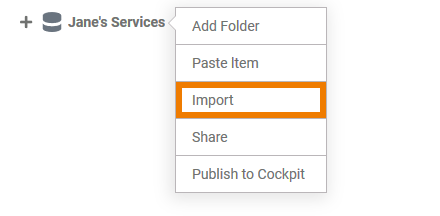
| Managing Projects | tree_import | Import
| |||||||||||||||||||||||||||||||||||||||||||||
| Modeling Services | create_bpmn_objects | Creating Objects on the BPMN Canvas
| |||||||||||||||||||||||||||||||||||||||||||||
| Modeling Services | execution_toolbar | The execution toolbar assists you during modeling on the execution canvas. The following table explains the available tools:
| |||||||||||||||||||||||||||||||||||||||||||||
| Modeling Services | model_toolbar | The model toolbar assists you during modeling on the BPMN canvas. The following table explains the available tools:
| |||||||||||||||||||||||||||||||||||||||||||||
| Supported BPMN Elements | attributes | All available attributes of an object are displayed in the Attributes Panel. | |||||||||||||||||||||||||||||||||||||||||||||
| Supported BPMN Elements | attributes_display_name_of_attribute | Display Name of Attribute Activate the checkbox if you also want to display the names of the attributes on the canvas. | |||||||||||||||||||||||||||||||||||||||||||||
| Supported BPMN Elements | attributes_font | Font Use this section to select the font for display of the object's attributes on the canvas. You have also several formatting options. | |||||||||||||||||||||||||||||||||||||||||||||
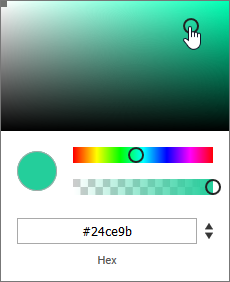
| Supported BPMN Elements | attributes_font_color | Font Color You can also adapt the font color of the object's attributes on the canvas. Click on the color placeholder to display the color picker. Use the color picker to select a new color or enter the hexadecimal code of the desired color:
| |||||||||||||||||||||||||||||||||||||||||||||
| Supported BPMN Elements | attributes_font_size | Font Size In this section you can change the font size of the object's attributes on the canvas. | |||||||||||||||||||||||||||||||||||||||||||||
| Supported BPMN Elements | attributes_word_wrap | Word Wrap If the checkbox is activated, the line break is applied to the display of the object's attributes on the canvas. | |||||||||||||||||||||||||||||||||||||||||||||
| Supported BPMN Elements | displaying_attributes | You can display the attributes of an object on the BPMN canvas: Select the attribute you want to show in the Attributes Panel and move it to the canvas by using drag&drop. | |||||||||||||||||||||||||||||||||||||||||||||
| Supported BPMN Elements | editing_attributes | As soon as you have created an attribute of an object on the canvas, the Styling Panel will show the tab Attributes. Open this tab to edit the formatting of the displayed attributes. | |||||||||||||||||||||||||||||||||||||||||||||
| Supported BPMN Elements | objects_config_options | Open the Styling Panel to use the configuration options of the element. | |||||||||||||||||||||||||||||||||||||||||||||
| Supported BPMN Elements | objects_font | Font Use this section to select the font for the text within the object. You have also several formatting options. | |||||||||||||||||||||||||||||||||||||||||||||
| Supported BPMN Elements | objects_font_color | Font Color You can also adapt the font color of text within the object. Click on the color placeholder to display the color picker. Use the color picker to select a new color or enter the hexadecimal code of the desired color:
| |||||||||||||||||||||||||||||||||||||||||||||
| Supported BPMN Elements | objects_font_size | Font Size In this section you can change the font size of the text within the object. | |||||||||||||||||||||||||||||||||||||||||||||
| Supported BPMN Elements | objects_shape_tab | Shape
| |||||||||||||||||||||||||||||||||||||||||||||
| Supported BPMN Elements | objects_word_wrap | Word Wrap If the checkbox is activated, the line break is applied to the text within the object. | |||||||||||||||||||||||||||||||||||||||||||||
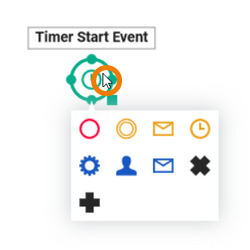
| Supported BPMN Elements | open_objects_menu | Click on the element to open the objects context menu which supports you in creating new objects: For detailed information see page BPMN Canvas. | |||||||||||||||||||||||||||||||||||||||||||||
| Supported BPMN Elements | open_relation_menu | If you right click an arrow the relation context menu opens allowing you to edit the relation: For detailed information see page BPMN Canvas. | |||||||||||||||||||||||||||||||||||||||||||||
| Supported BPMN Elements | open_tools_menu | If you right click an element the tools context menu opens allowing you to edit the current model: For detailed information see page BPMN Canvas. | |||||||||||||||||||||||||||||||||||||||||||||
| Supported BPMN Elements | set_timeout | To set the duration of the timer, the event should be trigged by a persisted property of type integer. You have two options to set the timeout in the attributes panel:
|


Overview
Content Tools