TO DO: Translate missing excerpts to English!
Note for authors: Please do not attach any pictures to this excerpt page! Upload all images you want to use in an excerpt to the page _BPaaS_images.
| Chapter | Name | Excerpt | |||||||||||||||||||||||||||||||||||||||||
|---|---|---|---|---|---|---|---|---|---|---|---|---|---|---|---|---|---|---|---|---|---|---|---|---|---|---|---|---|---|---|---|---|---|---|---|---|---|---|---|---|---|---|---|
| Authorization Concept using Roles | old_authorization_concept | The following usage description of roles is deprecated. Starting with version PAS 18.1 we urgently recommend to create apps with central role management. Starting with version PAS 18.1 please only use the element Role. | |||||||||||||||||||||||||||||||||||||||||
| Developer Guide | execute_export | The coding must be adapted individually for each template. During execution of the code, the instance data is assigned to the corresponding placeholders in the template and the file is downloaded. We are happy to help you with the implementation of your data exports. If you would like to use the export function of Scheer PAS BPaaS, please contact your Scheer PAS Consultant. | |||||||||||||||||||||||||||||||||||||||||
| Developer Guide | provide_export_template | The template can be uploaded in a form or made available directly in the system by an administrator. | |||||||||||||||||||||||||||||||||||||||||
| Executing Processes | applink_parent_child | Child Instance = instance in opening app | |||||||||||||||||||||||||||||||||||||||||
| Executing Processes | button_close_form | Attention: All following process steps will no longer be executed, the process will stop at this position. | |||||||||||||||||||||||||||||||||||||||||
| Executing Processes | column_type_config | Configure Column Type This option allows you to define your own column types. You could replace actual values with other output values, for example to display a picture instead of a value from the container. In order to define when a set value is replaced by a defined value, conditions have to be defined. How to configurate a column type is described on page Defining Column Types. | |||||||||||||||||||||||||||||||||||||||||
| Executing Processes | column_wizard_disabled | The column wizard can only be used if the model was assigned to a process app. Otherwise the button remains inactive:
| |||||||||||||||||||||||||||||||||||||||||
| Executing Processes | column_wizard_info | The column wizard is only available for instance tables. | |||||||||||||||||||||||||||||||||||||||||
| Executing Processes | default_buttons_config |
| |||||||||||||||||||||||||||||||||||||||||
| Executing Processes | delete_responsive_element | Important information regarding the deletion behavior of responsive elements: If you delete a responsive element, it is erased from your work space including all content. While the responsive element will also be erased from your database, its content can still be found and used via the search function. If the responsive element was linked prior to deleting, then only the current element is erased. The linked element remains intact and can be found via the search function. | |||||||||||||||||||||||||||||||||||||||||
| Executing Processes | example_table_config_upload | Example: Overview configuration to display uploaded data
| |||||||||||||||||||||||||||||||||||||||||
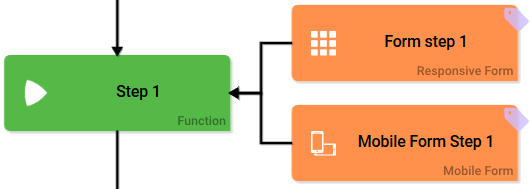
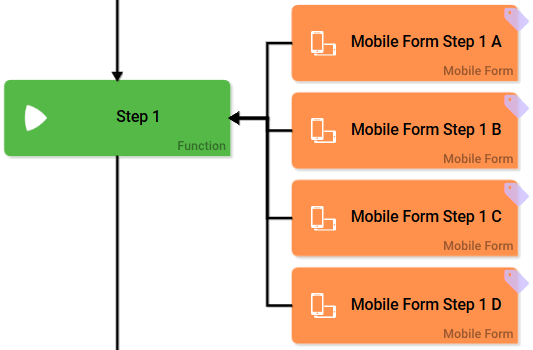
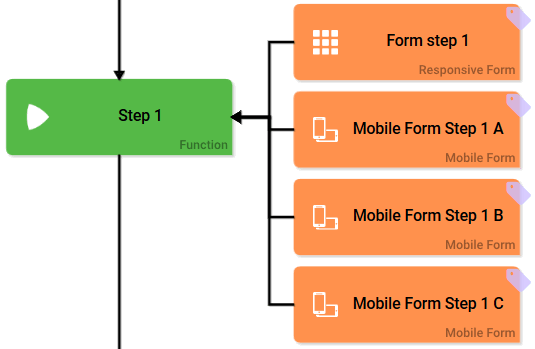
| Executing Processes | form_combinations | Forms always have to be attached to a function. When modeling an EPC you may use the following form combinations:
| |||||||||||||||||||||||||||||||||||||||||
| Executing Processes | form_elements_additional_css_classes | Additional CSS Classes Enables a field acurate layout customization. | |||||||||||||||||||||||||||||||||||||||||
| Executing Processes | form_elements_app_project | Process App Project Insert the name of the App Project you wish to link. This field uses auto-complete and shows matching App Projects in a recommendation list. If an App Project was entered, you can open the corresponding model using the button | |||||||||||||||||||||||||||||||||||||||||
| Executing Processes | form_elements_column_config | Column Configuration Click on the gear wheel to open an editor, which enables editing the columns of the table. An overview of available options can be found on page Configure Tables manually. | |||||||||||||||||||||||||||||||||||||||||
| Executing Processes | form_elements_create_new_tab | Open New App in New Tab If this option is activated, a click on | |||||||||||||||||||||||||||||||||||||||||
| Executing Processes | form_elements_current_value | Current Value This field can be used to insert default settings for the form element. The field Current Value contains a default value, which appears during form completion. If not overwritten by the user, this value will be transfered to the container while saving. | |||||||||||||||||||||||||||||||||||||||||
| Executing Processes | form_elements_default_page_size | Default Page Size Determines the default value for the table page size. | |||||||||||||||||||||||||||||||||||||||||
| Executing Processes | form_elements_description | Description When a user hovers over a form field during execution, the content of the commentary field is shown as a quick info: | |||||||||||||||||||||||||||||||||||||||||
| Executing Processes | form_elements_edit_mode | To choose an option as default setting, click | |||||||||||||||||||||||||||||||||||||||||
| Executing Processes | form_elements_edit_mode_text | To insert a text as default click | |||||||||||||||||||||||||||||||||||||||||
| Executing Processes | form_elements_execute_model | Execute Model Option to insert a different EPC model from a current BPaaS project. | |||||||||||||||||||||||||||||||||||||||||
| Executing Processes | form_elements_fieldname_for_possible_values | Field Name for Possible Values Possible values can not only be entered manually, one can also reference data objects from a container. In this case please enter the reference to the in container defined object into the field Field Name for Possible Values . The configuration field Possible Values remains empty. | |||||||||||||||||||||||||||||||||||||||||
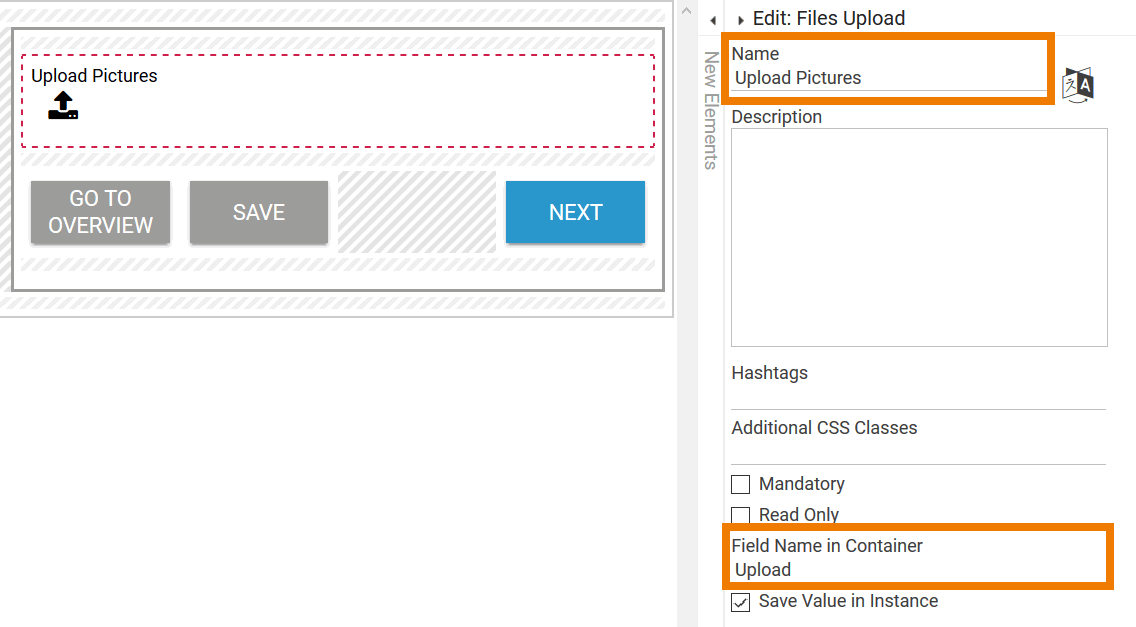
| Executing Processes | form_elements_fieldname_in_container | Field Name in Container Defines the name under which the form field will be saved in the data container. If the Field Name in Container remains empty, then the field identifier (name) will be used to save in container. If two form fields share the same field name in container, then both will access the same value. The Field Name in Container is a technical identifier. It is often used for extended coding. Therefore the Field Name in Container should not contain any spaces, special characters or umlaut. For further information please visit page The Container Principle. | |||||||||||||||||||||||||||||||||||||||||
| Executing Processes | form_elements_focus | Focus on Element This field is ready for input and will be visually enhanced during form completion. | |||||||||||||||||||||||||||||||||||||||||
| Executing Processes | form_elements_hashtags | Hashtags Possibility to insert your own key terms. The leading hashtag sign # (hash) will be inserted automatically. Use the space bar to separate multiple hashtags: One hashtag may be issued for multiple elements:
| |||||||||||||||||||||||||||||||||||||||||
| Executing Processes | form_elements_hide_input | Hide Input Instead of the entered content only dots are visible. This functionality finds its primary use in password entry. | |||||||||||||||||||||||||||||||||||||||||
| Executing Processes | form_elements_instance_new_tab | Open Instance in New Tab If this option is activated, a selected instance is opened in a new browser tab. | |||||||||||||||||||||||||||||||||||||||||
| Executing Processes | form_elements_mandatory | Mandatory The marked element must be filled or used. | |||||||||||||||||||||||||||||||||||||||||
| Executing Processes | form_elements_name | Name Field name shown in the form. | |||||||||||||||||||||||||||||||||||||||||
| Executing Processes | form_elements_overview_new_tab | Open Overview in New Tab If this option is activated, a click on | |||||||||||||||||||||||||||||||||||||||||
| Executing Processes | form_elements_possible_values | If in the field Possible Values a pair of values with same values was entered, for example 2;2 or yes;yes then one of these values will be deleted from the field display during saving. This value will be saved to the database as both value and label. For more information please see page Possible Values: Value and Label | |||||||||||||||||||||||||||||||||||||||||
| Executing Processes | form_elements_read_only | Read Only This field is read-only. | |||||||||||||||||||||||||||||||||||||||||
| Executing Processes | form_elements_save_in_instance | Save Value in Instance If this checkbox is marked, the value entered in this field will be saved to the database during form execution. | |||||||||||||||||||||||||||||||||||||||||
| Executing Processes | form_elements_show_label | Show Label If this option is activated, the name of the element will appear in the top row. | |||||||||||||||||||||||||||||||||||||||||
| Executing Processes | form_elements_show_label_inline | Show Label Inline The field identifier is shown within the field and can be overwritten. | |||||||||||||||||||||||||||||||||||||||||
| Executing Processes | forms_edit_sidebar | The form field may be edited via the Edit Sidebar. | |||||||||||||||||||||||||||||||||||||||||
| Executing Processes | forms_table_config | Tables have to be configured by the modeler. Please see chapter Configure Table Columns to learn more about the available configuration possibilities. | |||||||||||||||||||||||||||||||||||||||||
| Executing Processes | gear_color | The color of the gear wheel shows, whether an element is empty (light grey) or if content has already been saved (dark grey). | |||||||||||||||||||||||||||||||||||||||||
| Executing Processes | note_execution_model | Execution Model If you previously created your own EPC model, which shall be the basis for executing the Process App, please overwrite the entry in the field Execution Model. This field uses auto-complete. | |||||||||||||||||||||||||||||||||||||||||
| Executing Processes | note_init_model | Initialization Model The same holds true for the Initialization Model. An initialization model is used when a process shall be executed prior to starting the process app. An example would be data retrieval from a separate system to enable data access in a process app. | |||||||||||||||||||||||||||||||||||||||||
| Executing Processes | note_signature_scaling | The input is centered. The more accurate the aspect ratio of the signature field corresponds to the drawing field, the larger the input will fill the field. The scaling of the aspect ratio of the field will vary depending on the terminal device. Use the preview option to adapt the size of the signature field to your device. | |||||||||||||||||||||||||||||||||||||||||
| Executing Processes | start_column_wizard | The button Start Wizard opens the column wizard. | |||||||||||||||||||||||||||||||||||||||||
| Executing Processes | tip_block_elements | It is recommended to only keep standard formatting in block elements. Define all individual changes such as font or font color for all headers in CSS instead. | |||||||||||||||||||||||||||||||||||||||||
| Executing Processes | upload_allowed_types | Allowed File Types PAS 18.1.1 If you want to allow certain file types only, specify the allowed file types in this field. Separate multiple file types by comma. Example: Word and JPG files are allowed
| |||||||||||||||||||||||||||||||||||||||||
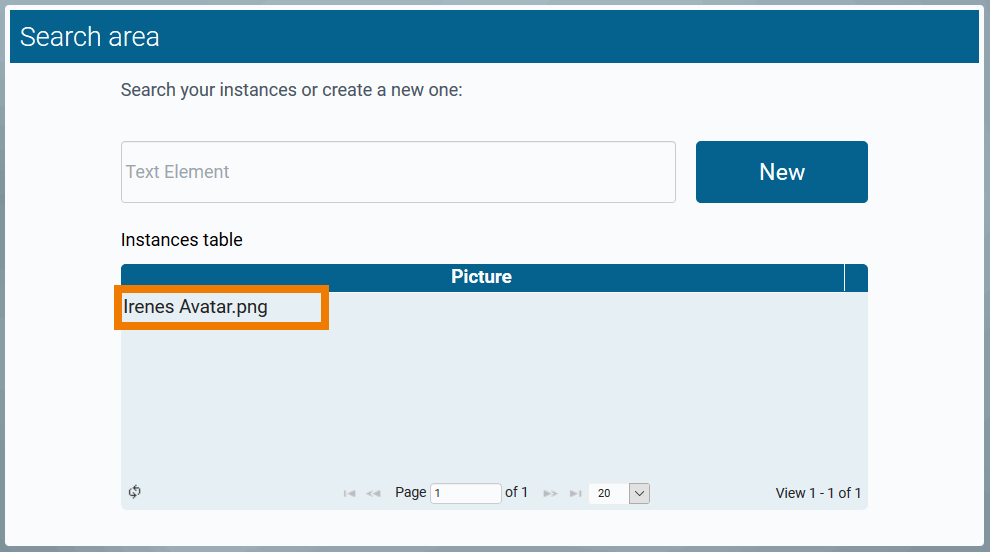
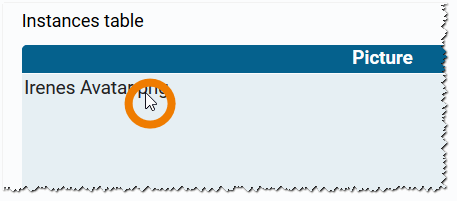
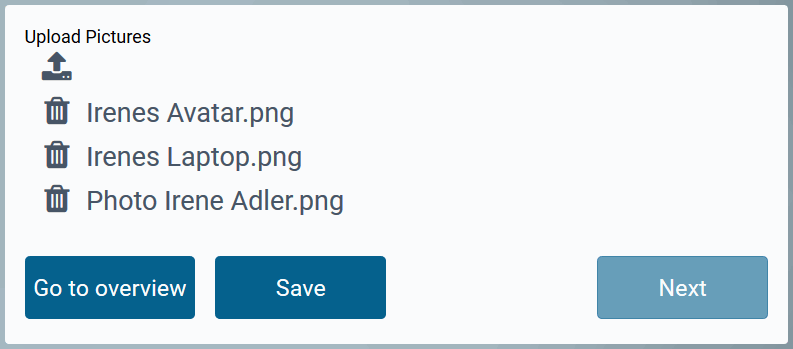
| Executing Processes | upload_element_instance_table | The element File Upload allows the upload of multiple files. This field's content is saved as array . In the overview table, only one value per table field can be displayed. If you wish to display the content of the form element File Upload in the overview, you need to configure which array value shall be used. The array's first value is addressed with the number 0. Since it can be uncertain how many files were uploaded during multiple file upload, we recommend to always reference the first file. There are two options to display the content of the upload field:
Example: Display of the first uploaded file in the overview
| |||||||||||||||||||||||||||||||||||||||||
| Executing Processes | uuid_note | Purpose of column "uuid" Each instance is assigned a UUID in the database to enable explicit identification. Instance tables contain a by default hidden column uuid. Unhide the column in order to show instance identification numbers. This information is needed for example when contacting BPaaS Support with a support request regarding faulty instances. | |||||||||||||||||||||||||||||||||||||||||
| FAQ | note_error_handling | For an overview of BPaaS error messages, possible causes and solutions, see page Fehlerbehandlung BPaaS (German) in section BPaaS Support. | |||||||||||||||||||||||||||||||||||||||||
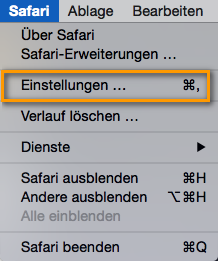
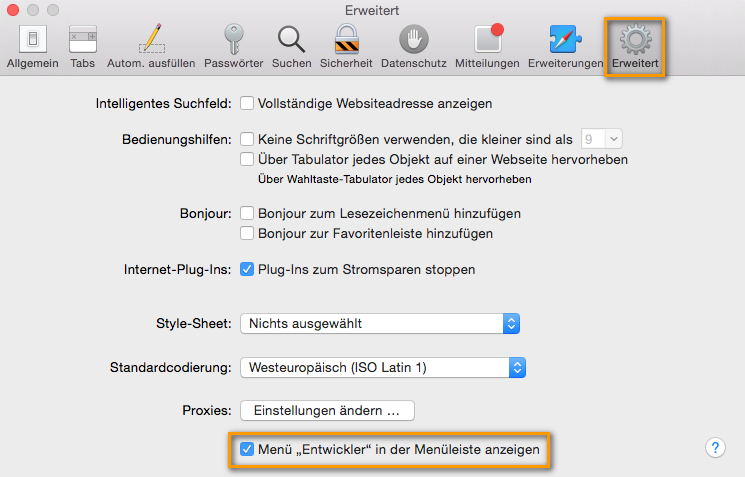
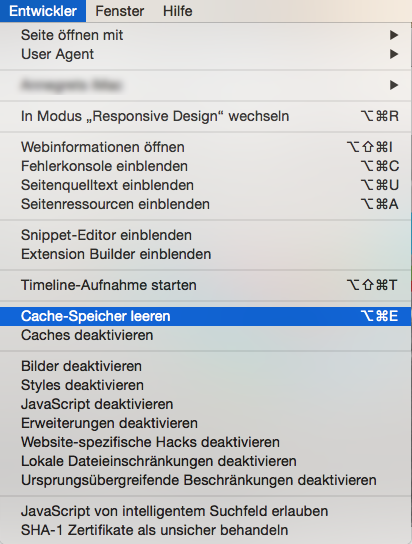
| FAQ | safari_developer_options | Öffnen Sie dafür im Menü Safari > Einstellungen und wechseln Sie hier zur Registerkarte Erweitert:
Aktivieren Sie die Checkbox Menü "Entwickler" in der Menüleiste anzeigen:
Die Option Entwickler wird in der Safari-Menüleiste hinzugefügt:
Jetzt können Sie über das Entwicklermenü den Cache-Speicher leeren.
| |||||||||||||||||||||||||||||||||||||||||
| General Information | authorization_check_during_saving | An authorization check will always be performed while saving. | |||||||||||||||||||||||||||||||||||||||||
| General Information | cancel_does_not_save | Attention: Unsaved data will be lost when clicking Cancel. | |||||||||||||||||||||||||||||||||||||||||
| General Information | close_does_not_save | Attention: Unsaved data will be lost when clicking Close. | |||||||||||||||||||||||||||||||||||||||||
| General Information | date_formats | The following place holders may be used to specify the date format:
The place holders may be combined with a fill character, for example blank space, dot, comma, hyphen, horizontal line. Fill words are accepted as well.
| |||||||||||||||||||||||||||||||||||||||||
| General Information | editing_focus | Tip for working in BPaaS editors
| |||||||||||||||||||||||||||||||||||||||||
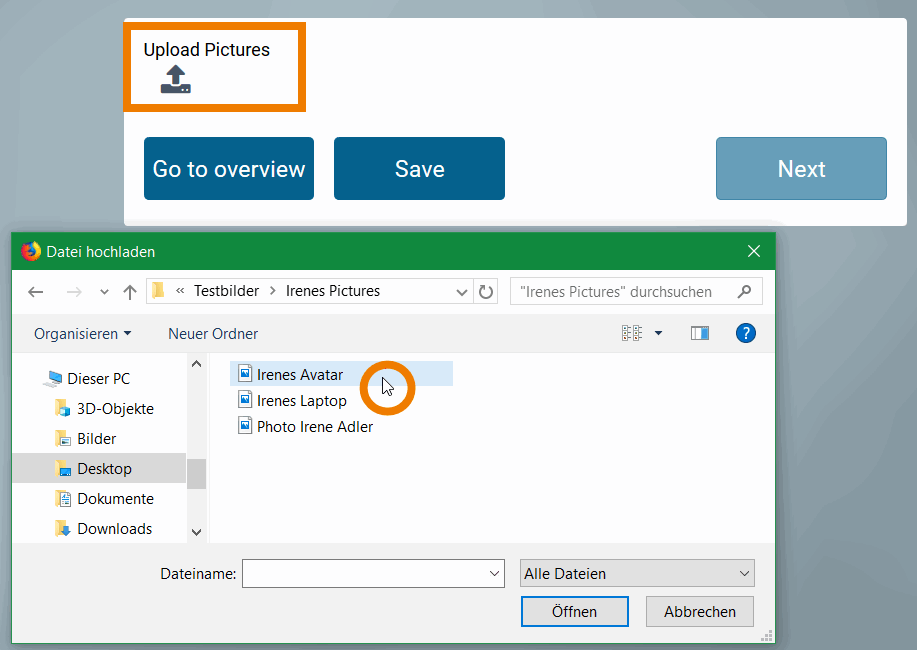
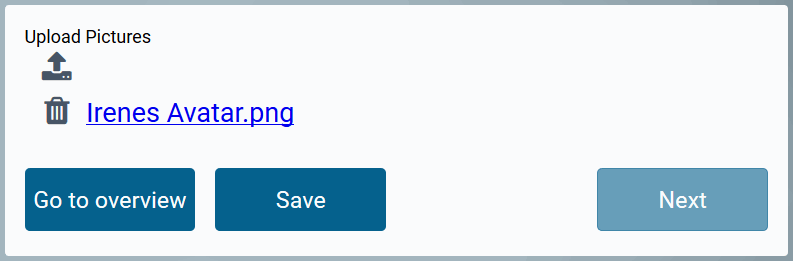
| General Information | fileupload | Alternatively you may upload a file using the | |||||||||||||||||||||||||||||||||||||||||
| General Information | fileupload_image_format | Supported formats for image files are *.bpm, *.gif, *.jpeg, *.jpg, *.png and *.tiff. | |||||||||||||||||||||||||||||||||||||||||
| General Information | form_test_mode | The testing possibilities of a form are limited within play mode. To test the interaction between multiple apps start the apps using their tiles in the Scheer PAS Cockpit or use the Process App's start link in the project editor. | |||||||||||||||||||||||||||||||||||||||||
| General Information | metainfos_unchangeable | Meta information are not changeable. If you would like to display meta information in a form field you always need to activate read-only characteristic for the relevant fields. If the field remains editable and changes are made to the meta information, those entries will not be saved! | |||||||||||||||||||||||||||||||||||||||||
| General Information | note_authorization_concept | Additional information regarding creating role based apps can be found in the BPaaS Documentation on page Berechtigungskonzept mit Rollen (German). | |||||||||||||||||||||||||||||||||||||||||
| General Information | note_element_name | Make sure to always name your elements. This name may not contain any of the following special characters: $ * + ? . ( ) [ ] { } / \ | ^ | |||||||||||||||||||||||||||||||||||||||||
| General Information | overview_one_value_per_field | The instance table in an overview can only show one value per field. | |||||||||||||||||||||||||||||||||||||||||
| General Information | synchronization | Please be aware that no synchronization will occur between simultaneously opened browser tabs and windows while working on models and forms. Changes made in one window/tab will not automatically appear in a second window/tab. In order to display changes made in a separate window/tab you need to reload your current page. | |||||||||||||||||||||||||||||||||||||||||
| General Information | timestamp | The date is saved in amounts of milliseconds (long) since 01.01.1970. Dates that are further in the past are therefore marked with a negative sign. | |||||||||||||||||||||||||||||||||||||||||
| Modeling Processes | bpaas_collection_name | Collection Name All app data is saved in its own name space. In this field you can define sub-name spaces for the instances of this precise start link in the database. As soon as a collection's name is saved for a start link, its instances will no longer be saved in the same place as the data of the remaining start links of the project. We highly recommend to use this option for trial only. Preferably define the name of the collection in the app project. | |||||||||||||||||||||||||||||||||||||||||
| Modeling Processes | close_pop-up | Leave the pop-up window via the Close button. Caution: Changes will not be saved! | |||||||||||||||||||||||||||||||||||||||||
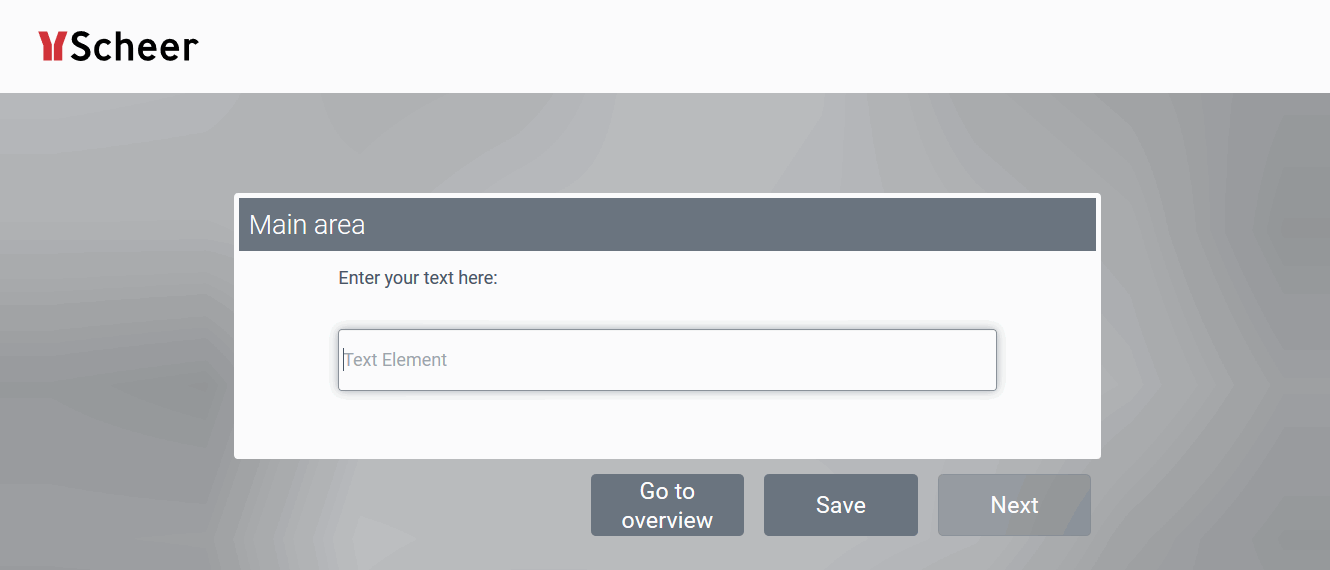
| Modeling Processes | css_template_blue | As a standard both the Reference model and the Overview model of newly created app projects are assigned the CSS template CSS Blue. | |||||||||||||||||||||||||||||||||||||||||
| Modeling Processes | css_templates | Template CSS blue
Template CSS red
Template CSS grey
| |||||||||||||||||||||||||||||||||||||||||
| Modeling Processes | developer_options |
| |||||||||||||||||||||||||||||||||||||||||
| Modeling Processes | doubleclick_editor | Double click on the element to open the editor. | |||||||||||||||||||||||||||||||||||||||||
| Modeling Processes | epc_elements _connector_constraints | In order to prevent an EPC from being ineffective always verify event and counterevent when designating constraints. Example: A form offers the answers YES and NO. In the process, yes-answers shall follow a different path than no-answers. Therefore it has to be verified which of both paths needs to be followed after the form has been saved. Instead of checking if YES or NO was specified, check if YES or NOT YES was entered. This enables you to also pick up cases where neither answer was specified. The counterevent to YES is not NO, but NOT YES! | |||||||||||||||||||||||||||||||||||||||||
| Modeling Processes | epc_elements_activate_roles | Activate Role Check Activate this option to verify during app execution if the user was assigned the necessary roles. For further information visit page Berechtigungskonzept mit Rollen (German). | |||||||||||||||||||||||||||||||||||||||||
| Modeling Processes | epc_elements_admin_model | Administration Model The Administration Model verifies that all users were assigned the necessary roles. The Administration Model is defined globally in the App Project element. If you configurated an Administration Model to be used with only this precise start link, please save its name here. DEPRECATED with PAS 18.1 Deprecated with PAS 18.1Do not use the Administration Model f or role based apps but manage roles centrally via Scheer PAS Administration. For further information visit the Administration Guide. | |||||||||||||||||||||||||||||||||||||||||
| Modeling Processes | epc_elements_app_start | Start Use the Start button or double click on the element to execute the process app. | |||||||||||||||||||||||||||||||||||||||||
| Modeling Processes | epc_elements_cockpit_hide | Hide in Cockpit If this checkbox is marked, this element will not be shown in the cockpit sidebar. It is also impossible to create a tile for this element in the cockpit. | |||||||||||||||||||||||||||||||||||||||||
| Modeling Processes | epc_elements_css | CSS Model If layout specifications were defined in your own CSS model, please insert its name in this field. Your predefined design will then be in effect for this model. | |||||||||||||||||||||||||||||||||||||||||
| Modeling Processes | epc_elements_defining_app_project | If you define a model directly in the process app element, then the model assigned to the app project will be ignored. | |||||||||||||||||||||||||||||||||||||||||
| Modeling Processes | epc_elements_description | Description A commentary field for the modeler. Its content is invisible to users and its sole purpose is internal documentation. | |||||||||||||||||||||||||||||||||||||||||
| Modeling Processes | epc_elements_edit | Edit the element via the Edit Sidebar. | |||||||||||||||||||||||||||||||||||||||||
| Modeling Processes | epc_elements_execution_model | Execution Model The Execution Model is defined globally in the App Project element. If you configurated an EPC model, that shall be used with only this precise start link, please save its name here. | |||||||||||||||||||||||||||||||||||||||||
| Modeling Processes | epc_elements_eye | This field uses auto-complete. Use the icon | |||||||||||||||||||||||||||||||||||||||||
| Modeling Processes | epc_elements_fieldname_rest | Field Name in Container Assign a name under which the server answer is saved in the container. If the Field Name in Container remains empty, integration.result will be used. | |||||||||||||||||||||||||||||||||||||||||
| Modeling Processes | epc_elements_first_level | Elements, that are saved to the work area of the project editor cannot be linked via connections. | |||||||||||||||||||||||||||||||||||||||||
| Modeling Processes | epc_elements_hashtags | Hashtags Possibility to insert your own key terms. The leading hashtag sign # (hash) will be inserted automatically. Use the spacebar to insert multiple hashtags:
One hashtag may be issued for multiple elements:
| |||||||||||||||||||||||||||||||||||||||||
| Modeling Processes | epc_elements_init_model | Initialization Model The initialization model defines process steps that shall be completed prior to executing the app. The to be executed initialization model will be defined globally in the element App Project. If you have already configured an initialization model that shall be used for this precise start link, please save its name here. This model will then be used prior to executing the elements. | |||||||||||||||||||||||||||||||||||||||||
| Modeling Processes | epc_elements_mandatory | Mandatory Marks the corresponding element as required. | |||||||||||||||||||||||||||||||||||||||||
| Modeling Processes | epc_elements_name | Name Name of the element within modeling. | |||||||||||||||||||||||||||||||||||||||||
| Modeling Processes | epc_elements_query | Search Query Define here which information of an instance shall be searched for. Click on the gear wheel to open the editor to save the search query as JSON object. | |||||||||||||||||||||||||||||||||||||||||
| Modeling Processes | epc_elements_role_for_link | Role for Link Insert the name of the role to receive app authorization here. The field Role for Link is supported by auto-complete and will list matching suggestions. | |||||||||||||||||||||||||||||||||||||||||
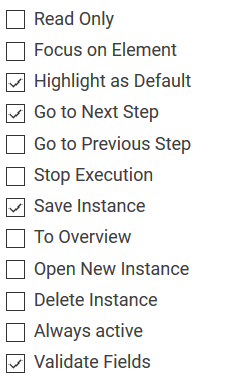
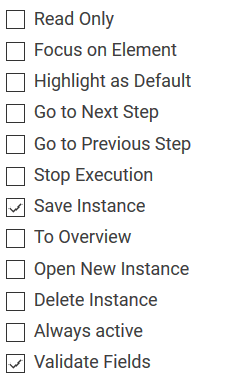
| Modeling Processes | epc_elements_save_instance | Save Instance Use this option to save instances to database. | |||||||||||||||||||||||||||||||||||||||||
| Modeling Processes | epc_elements_show_favorites | Show as Favorite PAS 18.1 Activate this checkbox to show this element as favorite in the Scheer PAS Mobile App. | |||||||||||||||||||||||||||||||||||||||||
| Modeling Processes | epc_elements_start | Start Use this button to start your model. | |||||||||||||||||||||||||||||||||||||||||
| Modeling Processes | link_function | Avoid linking functions (to reuse functions via the search or content menu, see Copy and Insert EPC Elements). Linked functions within an EPC or sub-EPC will lead to errors during process execution. | |||||||||||||||||||||||||||||||||||||||||
| Modeling Processes | logical_operators | Find an overview of commonly used logical operators below:
Generally always use the strict (in-)equality operator. This is to ensure that two operands match not only in value but also by type. | |||||||||||||||||||||||||||||||||||||||||
| Modeling Processes | note_mobile_elements | Mobile elements can only be executed in Scheer PAS Mobile. | |||||||||||||||||||||||||||||||||||||||||
| Modeling Processes | note_process_apps_until_17.2 | ||||||||||||||||||||||||||||||||||||||||||
| Modeling Processes | note_roles_in_apps | Keep in mind to always issue two roles! Each role must be assigned to a New and an Overview element. | |||||||||||||||||||||||||||||||||||||||||
| Modeling Processes | pop-up_save | Use the Save button in the pop-up window to save changes. | |||||||||||||||||||||||||||||||||||||||||
| Modeling Processes | process_step_deleted | Caution when deleting process steps out of a (productive) EPC: Instances, which are situated in this process step can not be opened again after deletion. When trying to open an affected instance an error message will be displayed in the overview. The message contains name and ID of the deleted process step. | |||||||||||||||||||||||||||||||||||||||||
| Modeling Processes | restifier_url_internal | If your SAP Restifier is situated in a customer environment, do not forget to fill out the field URL (internal) in the System element. | |||||||||||||||||||||||||||||||||||||||||
| Modeling Processes | sidebar_categories | The drop-down menu in the Sidebar New Elements will only show elements that can actually be created on this current editor level. | |||||||||||||||||||||||||||||||||||||||||
| Modeling Processes | volatile_data | Without further modeling the data is volatile, meaning it has been deposited in the container, but not saved. For further information see Save and Delete Instances. | |||||||||||||||||||||||||||||||||||||||||
| Modeling Processes | worker_declaration | Do not start worker coding with a declaration. | |||||||||||||||||||||||||||||||||||||||||
| Starting BPaaS | bpaas_supported_browser |
* Usage of Internet Explorer Please use BPaaS 16.04 or more recent along with Internet Explorer 11 or its successor Edge, because Microsoft stopped the support for Internet Explorer 10 and BPaaS no longer supports IE10. If you are using Internet Explorer 11, make sure it is running in Edge mode. There are a number of other web browsers with which BPaaS can be used, but Scheer GmbH's support is limited to the browsers listed in the table above. | |||||||||||||||||||||||||||||||||||||||||
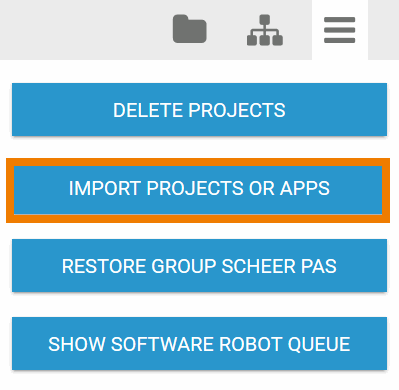
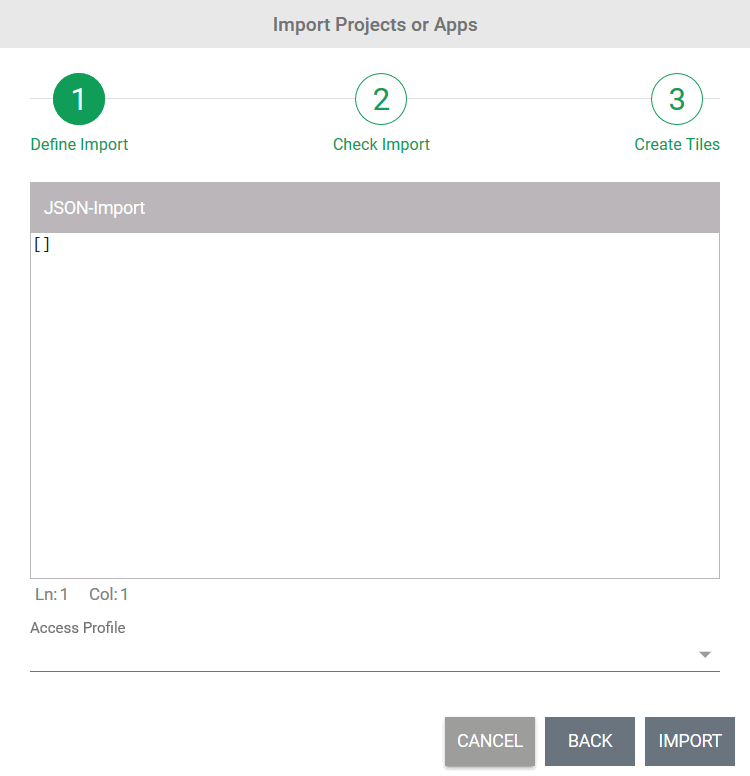
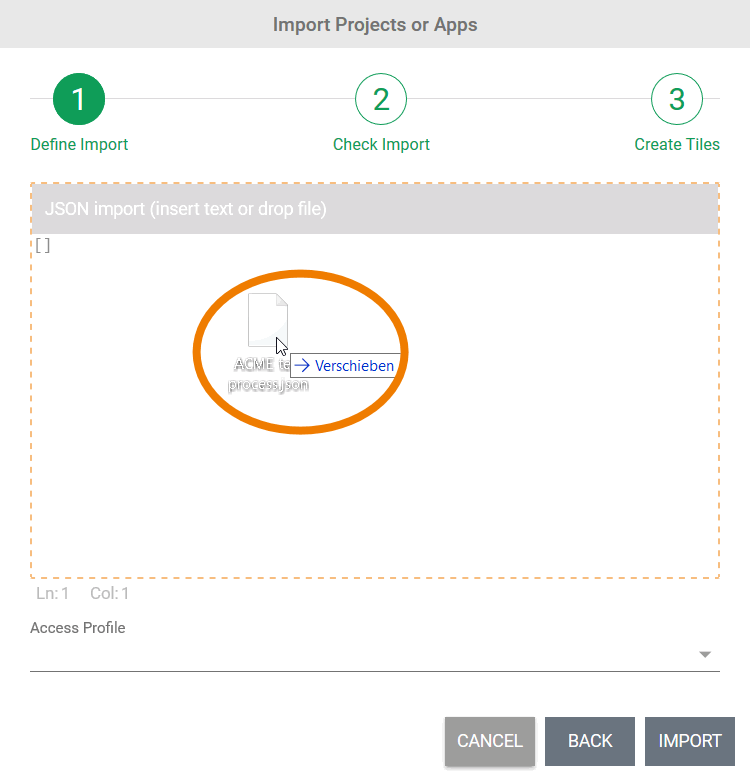
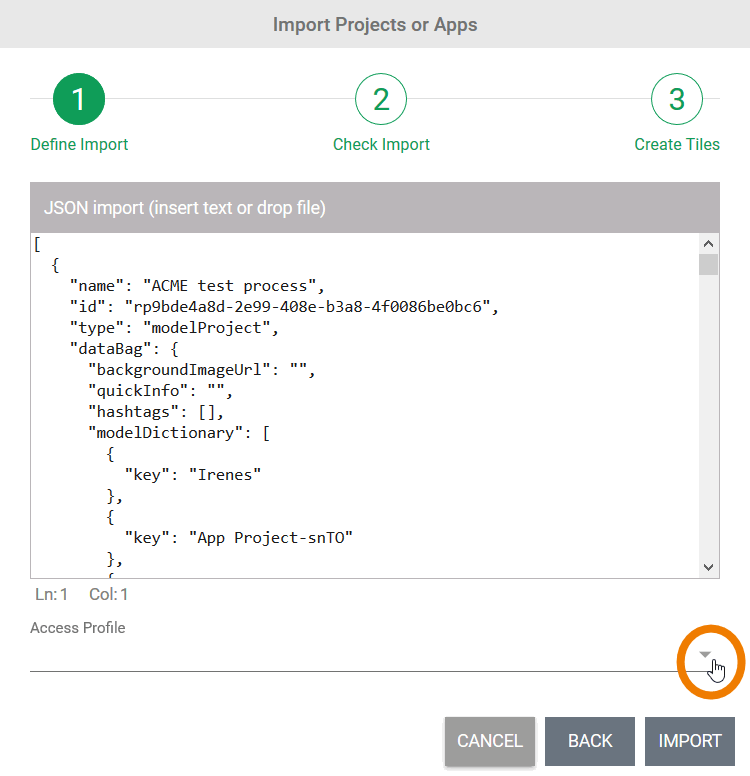
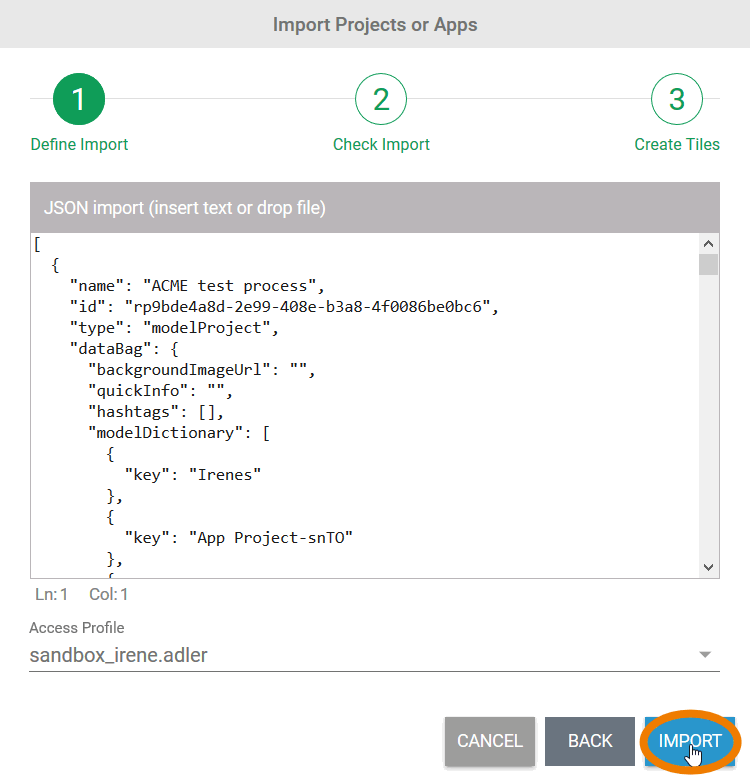
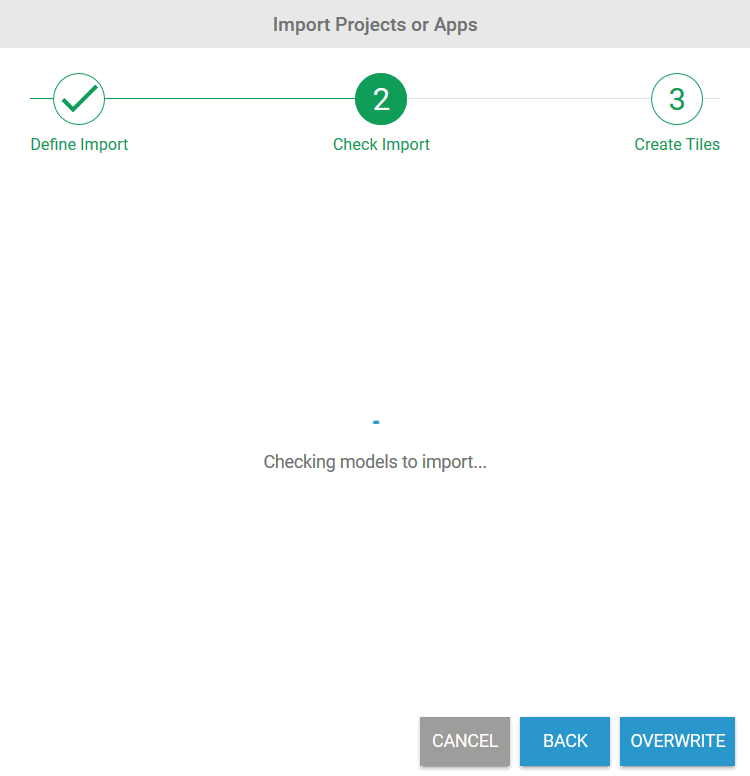
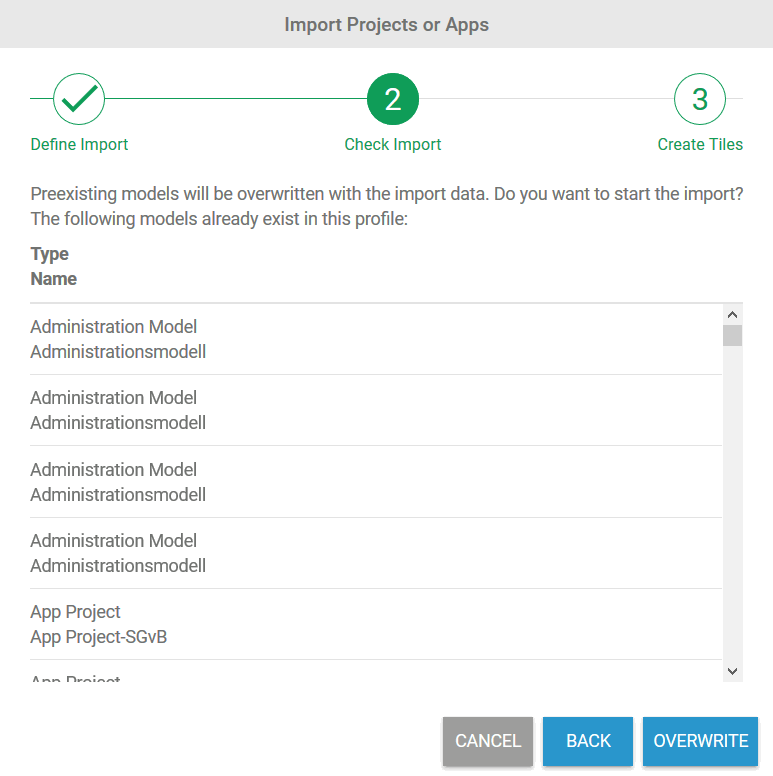
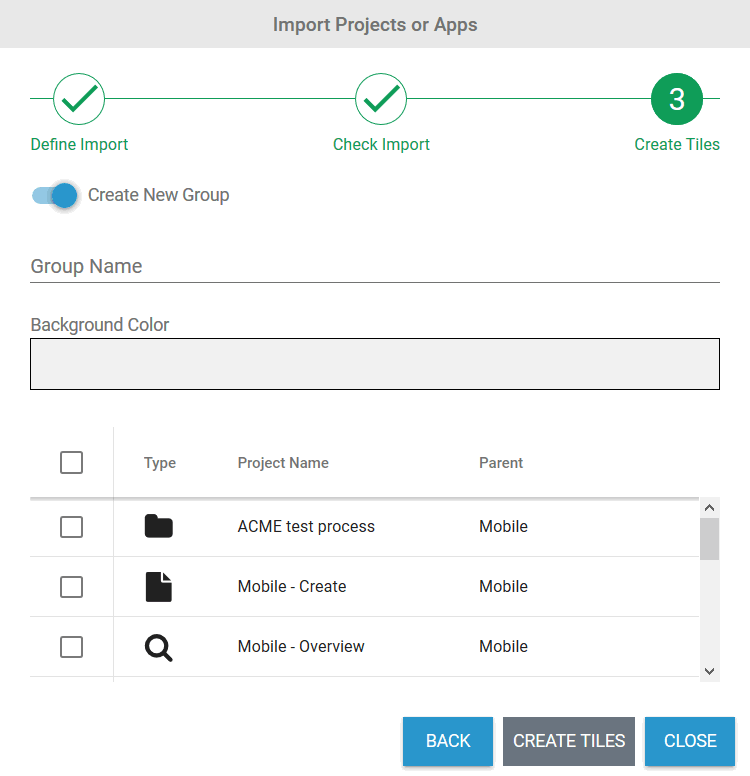
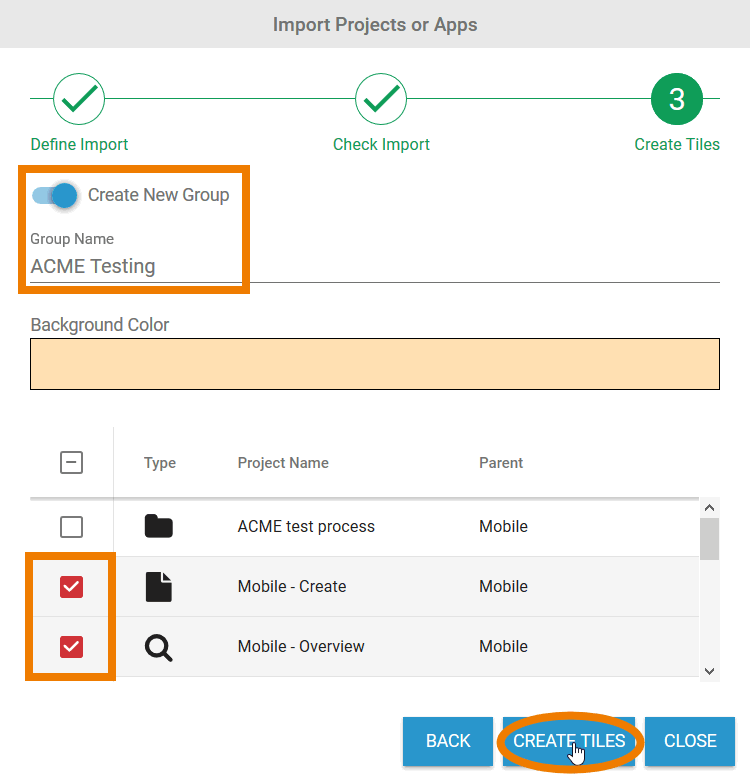
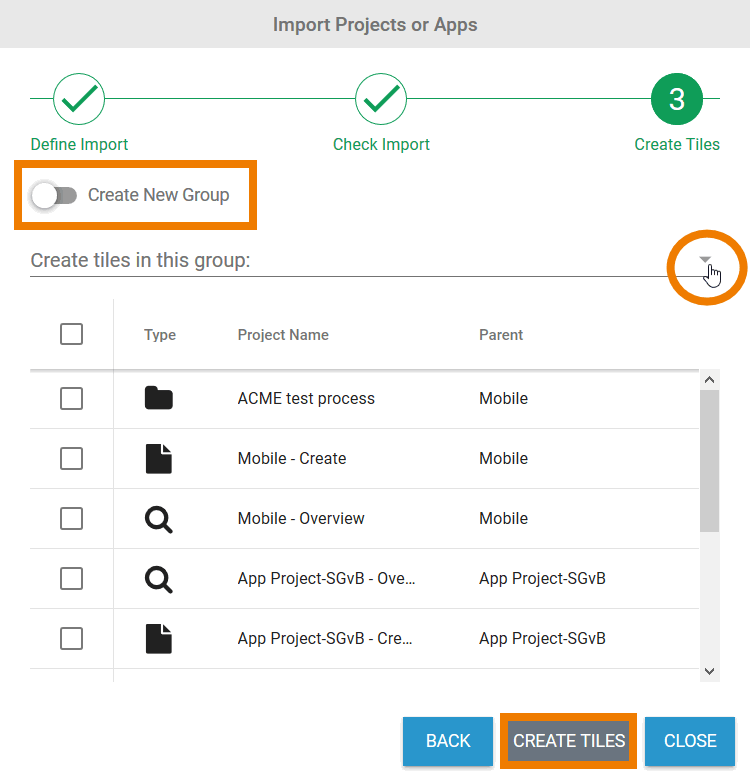
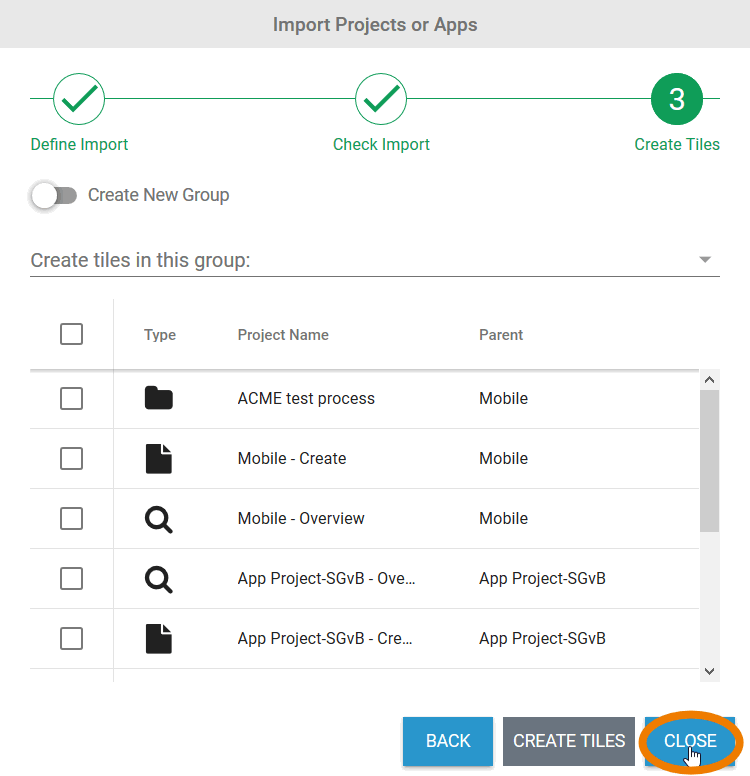
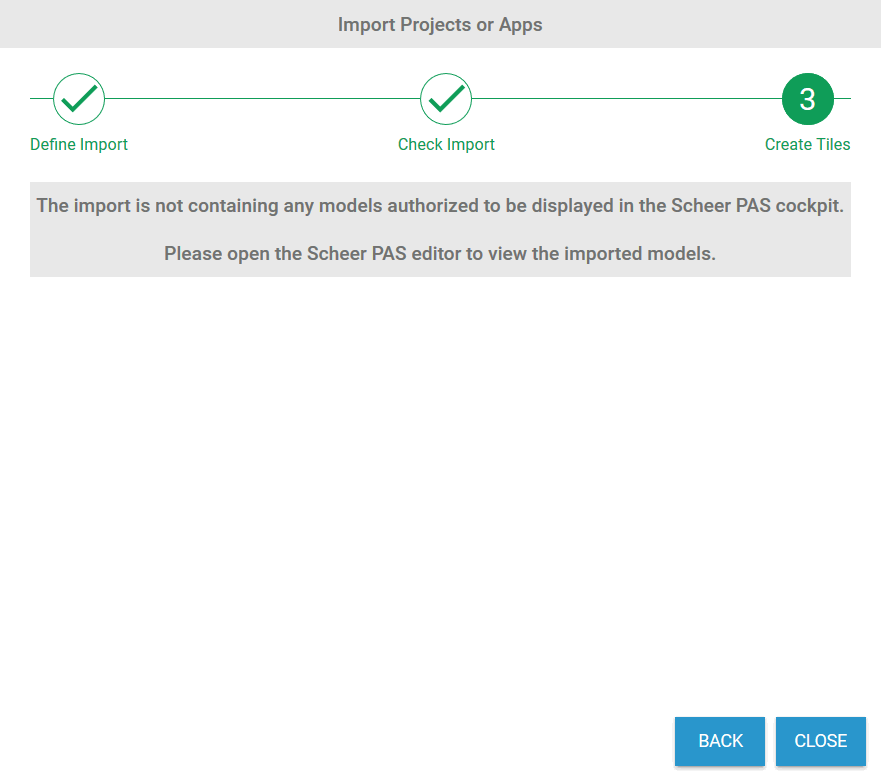
| Starting BPaaS | cockpit_import | Exported apps or entire projects can be imported into the cockpit.
Step 1: Define Import
Step 2: Review Import
Step 3: Create Tiles
| |||||||||||||||||||||||||||||||||||||||||
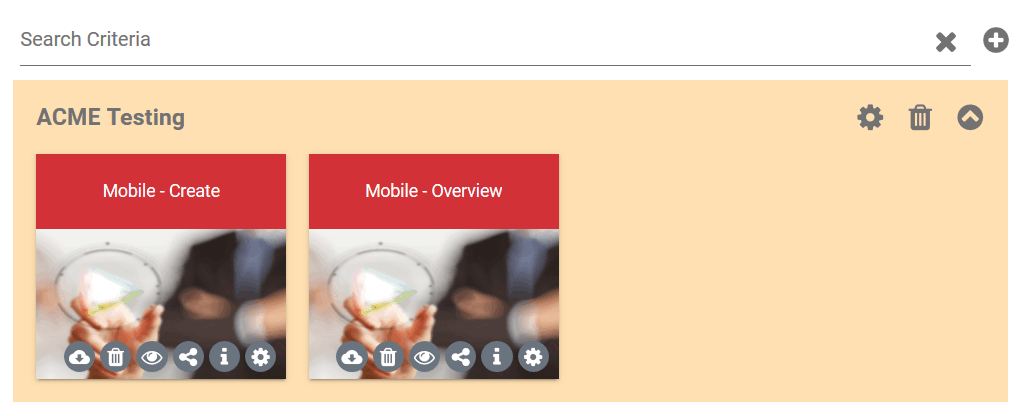
| Starting BPaaS | create_tile | To create a new tile, use the links in the Sidebar New Elements. | |||||||||||||||||||||||||||||||||||||||||
| Starting BPaaS | create_tile_note | Modelers can create project, app and external link tiles. App users are only authorized to create tiles for apps and external links. | |||||||||||||||||||||||||||||||||||||||||
| Starting BPaaS | delete_tile | To delete a tile from cockpit, please click on the icon | |||||||||||||||||||||||||||||||||||||||||
| Working with BPaaS Editor | bpaas_search | Hilfreiche Tipps zur Verwendung der globalen Suche finden Sie auf der Seite Suchen im BPaaS-Editor. | |||||||||||||||||||||||||||||||||||||||||
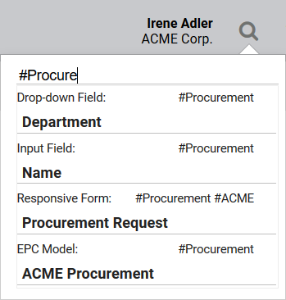
| Working with BPaaS Editor | search_maximum | The hit list displays a maximum of 15 results. If the object you are looking for is not below it, refine the search entry. The system searches according to several criteria: Name, translation for the current language, object type and hashtag. |


Overview
Content Tools