Starting the Bridge
The Bridge Windows service/Unix daemon E2E Console must be started to run services on the Bridge. If your system is mainly used to run the Bridge, we recommend to configure the service/daemon to start-up automatically. This option can be set during installation of the Bridge or in the Windows Services application.
As long as the service E2E Console is stopped, you cannot open the Bridge main page with a Web browser. After starting the service, you can manage Bridge node instances and Bridge services with the Web-based user interface by using a browser like Microsoft Internet Explorer, Firefox, Opera, or Konqueror.
Windows Platforms
After the installation of the Bridge, you will find the entry E2E Console in the Services list of your Windows operating system. Depending on the installation options you have chosen, you may need to have administration rights on the Windows system in order to start and stop the service.
You will find a second service entry called E2E Proxies, which controls the apache HTTPD when using a proxy in front of Bridge SOAP or HTTP frontend services. This service is managed via the E2E Bridge and should not be stopped or started directly.
Figure: Managing the E2E Console Service

Unix Platforms
After the installation of the Bridge on Linux, you will find a shell script e2e_console in directory /etc/init.d/. This script enables you to start and stop the E2E Console service, and to check its status. You need to login to the system as root in order to run the script.
Open a shell on the Unix system and enter the command
/etc/init.d/e2e_console
The system will display the usage of the script.
[root@system]# /etc/init.de/e2econsole
Usage /etc/init.de/e2e_console (start|stop|restart|status|list) [HOSTNAME]
Use /etc/init.d/e2e_console status to check, whether the service is running. If the service is not running, use /etc/init.d/e2e_console start in order to start it.
Refer to Starting and Stopping the Bridge on Linux for more information on the e2e_console shell script.
Installation Modes
The Bridge supports two installation modes: the Workstation Mode and the Server Mode. For notebooks or single workstations, we recommend the workstation mode. Most of the time, this is the case when working offline, for instance, in order to study the development tutorials. The workstation mode prevents problems if you are working offline with your notebook and no IP address is available. For all other systems (e.g. used for development, testing, and productive environments), you need to use the server mode installation.
Workstation Mode
In workstation mode, the Bridge can only manage the local system. All hostnames are fixed to localhost, there is no ability to manage other node instances, and it is not possible to deploy to another node instance. There are no requisites regarding network interfaces, DNS, and hostnames in this mode.
In workstation mode, a default domain localhost is created during installation and is not alterable by the user.
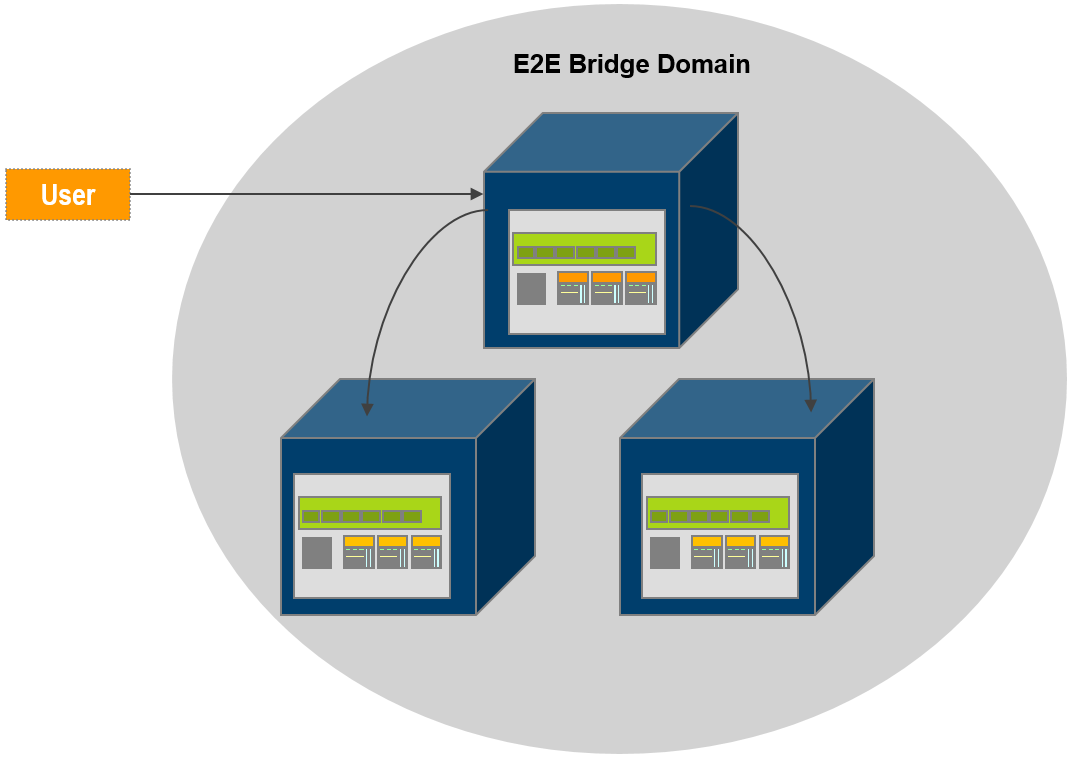
Server Mode
In server mode, the Bridge can manage multiple installations of itself on different systems, called a domain. The domain serves as distributed data storage for user and group information. All domain members share the same user and group information. You can deploy to every domain member, not only to the current node. All changes are replicated over all nodes in the domain to keep them up-to-date (see also Bridge Domains).
In this mode, each system must have a fully qualified domain name, which has been registered by the Bridge during installation. A node instance is always identified by this name only.
Figure: E2E Bridges in an E2E Domain
There are two methods to create a domain: you can either enter a domain name during installation or convert a stand-alone node to a domain using the Bridge.
Using the node instance management, you can join and remove node instances from a domain, convert stand-alone node instances into a domain and vice versa.
Login
Open a web browser and enter the URL of the Bridge in the address bar. If you use a proxy, make sure that the proxy is bypassed for localhost, or alternatively for the external name or IP address of the node instance, where the Bridge has been installed.
If the Bridge runs on your local system, you can enter the URL for a local connection ( https://localhost:8080 ). Note that the port 8080 was suggested as default value during Bridge installation. If you changed that value, you have to enter the new port number in the URL. Note, that the URL is case sensitive.
If you work on a remote system in a local network, replace localhost in the URL with the IP-address or the DNS name of the host where the Bridge has been installed, for instance http://e2ebridge.e2e.ch:8080 .
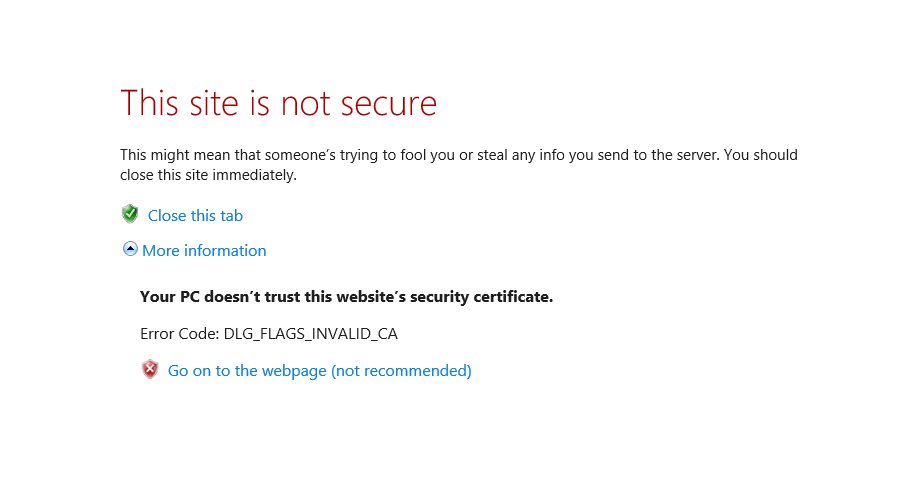
During the installation, a self-signed certificate was created and will be used to encrypt the communication between members of an Bridge domain and when deploying services to the Bridge.
When entering the URL of the Bridge, the web browser will display a security alert, as the Bridge runs with this self-signed security certificate, whose name may not match to the name of the site, or the certifying authority is not known by the browser. As this is a default certificate, always accept this certificate to access the Bridge.
Figure: Security Alert
After accepting the certificate by clicking Continue ..., the Bridge login page will be opened.
Figure: Bridge Login Screen

Directly after having installed the Bridge, there is only one pre-defined user called Administrator. Enter its User Id admin and the Password that you defined during the installation process, then click Login.
On this Page:
Overview
Content Tools