Page History
| Otp |
|---|
| Version | ||
|---|---|---|
| ||
|
...
Each xUML service starts its own instance of a Java Virtual Machine (JVM) at service startup, if the composite contains one or more <<JavaComponent>>s.
The settings the JVM used to execute the imported Java code can be configured on the composite:
JVM Settings on the E2E Composite
Its tagged values are:
| Multiexcerpt | ||||||||||||||||||||||||||||||
|---|---|---|---|---|---|---|---|---|---|---|---|---|---|---|---|---|---|---|---|---|---|---|---|---|---|---|---|---|---|---|
| ||||||||||||||||||||||||||||||
|
A component diagram can be drawn with the help of the
...
...
...
we recommend the usage of the wizard.
The following pictures show how to add java components to component diagram.
 | All imported Java Components are listed in column Existing Services. Take all the items the service needs for its execution from the list on the left hand side to the right hand side |
...
and click Add. | |
 | Upon completion, the component wizard will draw the component diagram as exemplified by the first figure. |
Java
...
| Version | ||
|---|---|---|
| ||
|
...
| title | Click here to read the documentation of the component diagram used in E2E Builder releases before 6.0 ... |
|---|
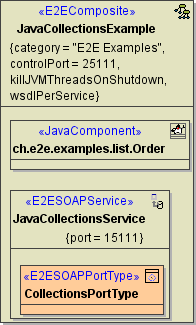
Each xUML service starts its own instance of a Java Virtual Machine at startup. Thus, the configuration component has a Java Virtual Machine component resident with stereotype <<JavaVirtualMachine>> . It can have one or more <<JavaComponent>> component residents, which are manifested by <<JavaComponentDeployment>> artifacts.
...
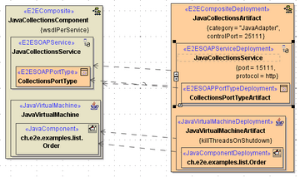
The <<JavaVirtualMachineDeployment>> artifact shown in the component diagram above configures the JVM used to execute the imported Java code:
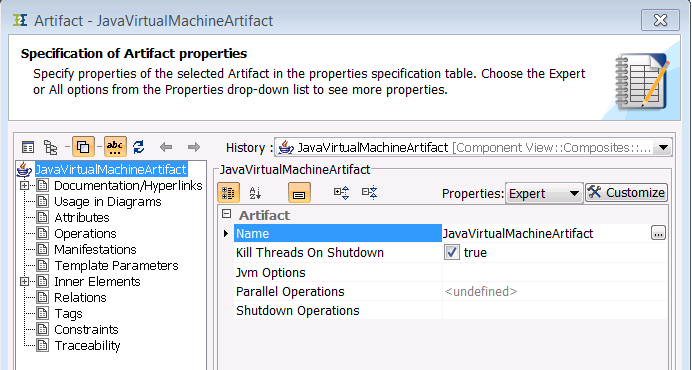
Its tagged values are:
- Kill Threads On Shutdown (killThreadsOnShutdown): If threads are still running on shutdown they are killed.
- JVM Options (jvmOptions): Java Virtual Machine options. The option strings has one of the following formats: "-D=...", "-X...", "_...", The system properties java.class.path and java.library.path are set by the model compiler and can not be overridden in the model.
- Parallel Operations (parallelOperations): Number of parallel open JavaVM threads within the runtime. Default: 100. If the limit is reached, the runtime tries for 60 seconds to obtain a free JVM thread. If it does not succeed, an error (JAVAADLM/19) is thrown.
Shutdown Operations (shutdownOperations): Java operation being called before shutdown.
A component diagram can be drawn with the help of the E2E Component Wizard (for more information refer to the E2E Builder User Guide ). To ensure that the component diagram is correct, E2E recommends the usage of the wizard.
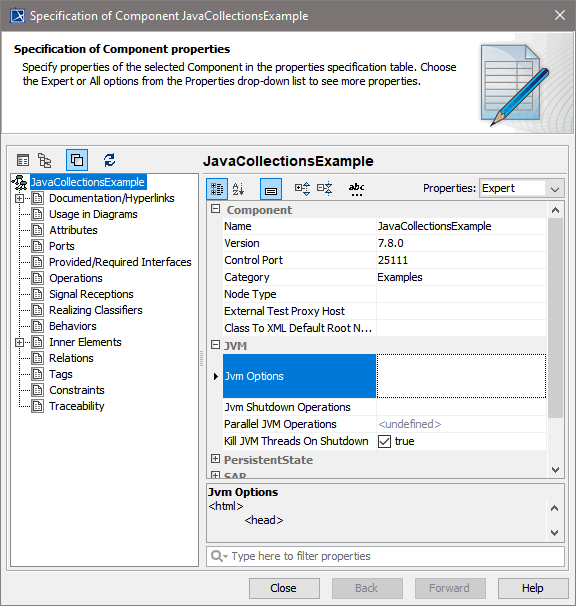
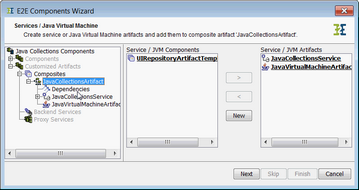
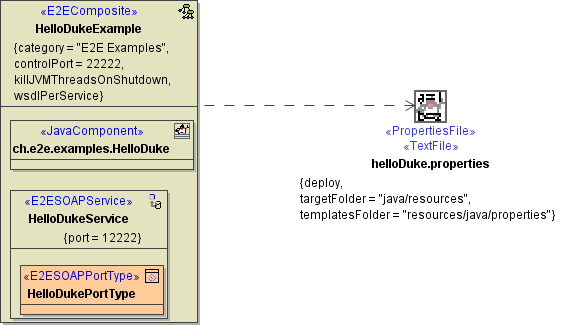
The following pictures show how to create a component diagram that contains a Java Virtual Machine artifact. Having defined the configuration artifact, the SOAP service artifact, and the port type artifact, you need to define the Java Virtual Machine. The Java Virtual Machine is defined as a new service component resident on a configuration. In the underlying example the JVM service resides on the configuration artifact JavaCollectionsExample.
 Figure: Creating the Java Virtual Machine at Service Level in the E2E Component Wizard
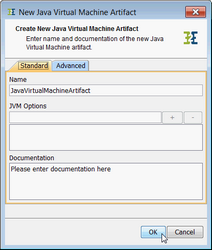
By clicking the New button in the above dialog the following dialog pops up.
Figure: Selecting the Java Virtual Machine Template
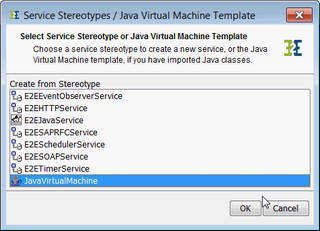
Select the JavaVirtualMachine template and confirm the dialog with OK. In the subsequent dialog you create an artifact on the basis of the JavaVirtualMachine template. In the field jvmOptions you can enter some specific parameters to be passed on to the Java Virtual Machine instance of the composite service.
Figure: Creating an Artifact on the Basis of the Java Virtual Machine Template
The Java Virtual Machine artifact is listed in the right panel as one of the artifacts of the composite service.
Figure: A New Java Virtual Machine Artifact
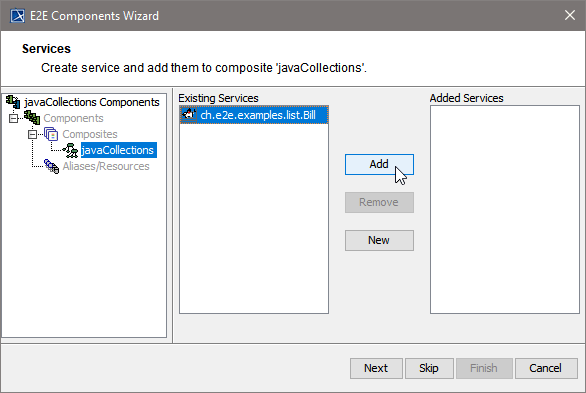
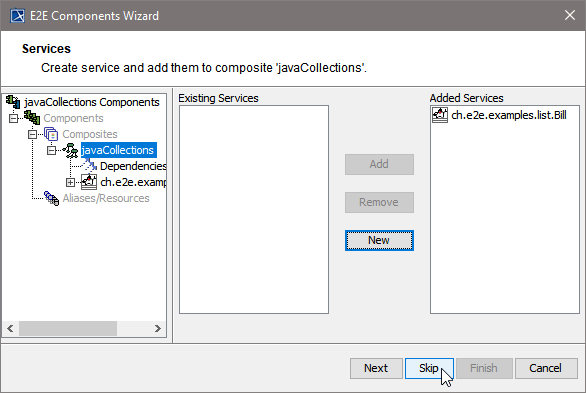
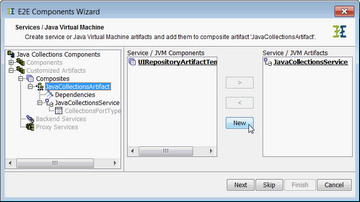
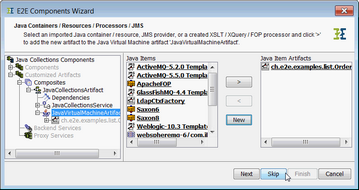
In the next step all imported Java Components are listed.
Figure: All Imported and predefined Java Components
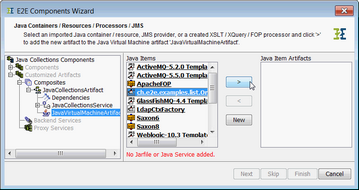
Take all the items the service needs for its execution from the list on the left hand side to the right hand side. Use the > button.
 Figure: Selecting Java Components
Upon completion, the component wizard will draw the component diagram as exemplified by the first figure .
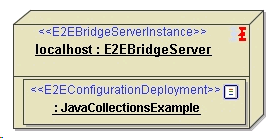
In the deployment diagram, you actually allocate component artifacts defined in the component diagram to their supposed target systems.
| Note | ||
|---|---|---|
| ||
A deployment is the allocation of artifacts to a target system. |
Figure: Deployment Diagram with a Java Virtual Machine

...
Archive Artifacts
<<JarFile>> artifacts have two tagged values, deploy and boot.
In the example above, the artifact JavaCollections.jar will be deployed together with the compiled xUML service (the tagged value deploy is set to true). It is also possible to deploy Java archives via the Bridge to prevent transferring big amounts of data when deploying them together with the service repository via the Builder. Another advantage of deploying Java archives via the Bridge is that they are not only used locally by the xUML service as it would be the case with the Java archive JavaCollections in the example above, but also globally by all xUML services deployed to the node instance. For more details on deploying Java archives via the Bridge, refer to Deploying and Managing Java Archives.
The tagged value boot indicates if the Java archive is to be contained in the Java boot class path. In the example above, the tagged value is set to false.
The Importer will prompt you to define both tagged values for each Java archive you want to import. For more details, see Importing Java Classes and Properties Resource Files.
| Info | ||
|---|---|---|
| ||
In the Builder, you must always import all Java archives that are necessary at runtime, no matter if you deploy them via the Builder or the Bridge. This way, all involved Java archives will be documented in the component diagrams, too. All imported Java archives reside in the <<JavaComponent>> created by the Java Importer. |
Resource File Artifacts
The Importer can also import properties resource files, which imported Java class may need at run-time. In the component diagram a resource file is represented by an artifact stereotyped as <<ResourceFile>>. It is a resident of an instance of a Java Component artifact. Logically, a resource file artifact is a manifestation of a class having the stereotype <<Resource>>.
| Panel | ||
|---|---|---|
| ||
|
| Panel | ||
|---|---|---|
| ||
Overview
Content Tools