Page History
| Panel | ||||
|---|---|---|---|---|
| ||||
David has now designed the forms that need to be filled during the process as well as the process model. Now he can assign the forms to the corresponding user tasks so that user can fill in the required data in the desired process step. |
| In the first step of the process, order data is entered into a web form. This is depicted in the process by a User Task ( User task Enter Web Order should show the form to enter the order data (Form_EnterWebOrder) and provide the order data to the process. Click on the user task Enter Web Order on the BPMN canvas. | |||||||||||||||||
| Switch to the Attributes panel and select Form_EnterWebOrder from the list of available forms provided in attribute Form. | |||||||||||||||||
| Next, you need to assign a button that triggers the form to continue the process. This is done by adding a trigger event. To do this, click the attribute Trigger Events and select buttonOK.click.
| |||||||||||||||||
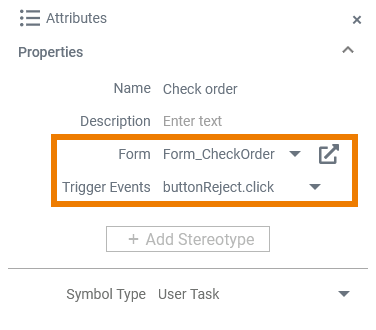
| All necessary attributes are now set for user task Enter Web Order, so you can continue to assign your other three forms to the corresponding user tasks:
| |||||||||||||||||
| If an order should be approved manually, you want to trigger the approval branch by clicking the Approve button in Form_CheckOrder. To define that process, click the Plain Event element and switch to the attributes panel. Select the trigger event buttonApprove.click.
|


Your process is now ready for a first test.
moveon
Link
LinkText Step 4: Run a First Test
| Panel |
|---|
| Panel | ||
|---|---|---|
| ||
Overview
Content Tools