Page History
Prerequisites
| Multiexcerpt include | ||||
|---|---|---|---|---|
|
Step 1: Download and Extract the Software
| Multiexcerpt | ||
|---|---|---|
| ||
API Management uses Docker to provide a simple setup which is easy to update and scalable if necessary. |
| Note |
|---|
Make sure you have network access during the installation, because you have to download images from Docker hub. |
Download the following files provided by Scheer to the folder you want to install API Management to:
api-mgmt-gateway-<VERSION>.tar
api-mgmt-ui-<VERSION>.tar
api-mgmt-keycloak-<VERSION>.tar
api-mgmt-<VERSION>.zipTip Later on, in step 6, you will need file apiman-default-config.json from the api-mgmt-<VERSION>.zip on an API Management client. You can copy the ZIP file to your client now (or later), or download the needed file from this page in step 6.
Extract api-mgmt-<VERSION>.zip.
Extracting this file will create a folder api-mgmt which is required permanently. It contains configuration files with sensitive data such as passwords, so access to this folder should be restricted. The Docker container however must be able to read the data.Load the Docker images:
Multiexcerpt include MultiExcerptName load_docker_images PageWithExcerpt INTERNAL:_api_excerpts
| Anchor | ||||
|---|---|---|---|---|
|
Configure the installation settings in the Docker .env file as described below. This file resides in folder api-mgmt\single-host-setup\.
| Info |
|---|
.env is a hidden file. |
| Note |
|---|
This setup is designed to run on one host only. The SSL KeyStore is shared between all services. |
| Setting | Description | Default Value | ||||||
|---|---|---|---|---|---|---|---|---|
BRIDGE_URL | Provide your BRIDGE hostname. | bridge.acme-corp.com | ||||||
BRIDGE_PORT | Provide the BRIDGE port. | 8080 | ||||||
BRIDGE_USERNAME | Provide the user name to access your BRIDGE. | username | ||||||
BRIDGE_PASSWORD | Provide the password to access your BRIDGE. | password | ||||||
ELASTICSEARCH_JAVA_MEMORY
| Provide the amount of memory that Elasticsearch can allocate.
| 2g | ||||||
ENDPOINT
| Provide the hostname of your API Management HOST.
| api.acme-corp.com | ||||||
GATEWAY_PORT | Provide the port to access the published APIs. | 8444 | ||||||
KEYCLOAK_ADMIN_USERNAME | Define a Keycloak user. | username | ||||||
KEYCLOAK_ADMIN_PASSWORD | Set a password for the Keycloak user. | password | ||||||
KEYCLOAK_PORT | Provide the port to access Keycloak. | 8445 | ||||||
MYSQL_PASSWORD | Set a password for the Keycloak database connection. | password | ||||||
MYSQL_ROOT_PASSWORD | Set a root password for the MySQL installation. | root_password | ||||||
SELF_SIGNED | Specify certificate usage.
| false | ||||||
TRUSTSTORE_KEYSTORE_PASSWORD | Provide the password of the Java truststore file that contains the certificates. | secret | ||||||
UI_PORT | Provide the port to access the API Management user interface. | 8443 |
| Anchor | ||||
|---|---|---|---|---|
|
Overview on the Docker Setup of API Management
Have a look at the figure below to get a technical overview on the Docker setup of Scheer PAS API Management.

Overview on the Installation Containers
| Note |
|---|
The three mentioned ports should be available. Otherwise you have to adapt the configuration files. |
Overview on the Installation Process
To install the Scheer PAS API Management, you need to got through the following steps:
API Management uses Docker to provide a simple setup, which is easy to update and scalable if necessary.
For a description on how to load and run the Docker files, refer to Setting up API Management.
An overview of the values that have to be configured is shown on page Configuring API Management.
| Multiexcerpt | ||
|---|---|---|
|
You need a certificate to establish secure connections between |
clients and API Management, as well as between the different components of API Management itself. You can use an official certificate, or you can create a self-signed one. |
| Tip |
|---|
We recommend using an official and valid certificate. |
| Info |
|---|
Folder api-mgmt\configs already contains an example structure of the needed files. |
Use Official Certificate
To use your official certificate, proceed as follows:
- Copy apiman.jks and the tls files of your certificate (tls.crt and tls.key) to folder api-mgmt\configs (see example structure).
Create a Java keystore which includes the certificate. The keystore must be secured by a store password. Assign the name apiman.jks to the keystore file .
Exchange entry
TRUSTSTORE_KEYSTORE_PASSWORDin the Docker .env file with the store password, see table above for details.
If you have certificates and intermediate certificates, please consult the keycloak documentation Keycloak Docker image > Setting up TLS(SSL).
| Anchor | ||||
|---|---|---|---|---|
|
If you do not possess a valid certificate, you can create a self-signed one. You can use Java Keytool to do this.
Generate a keystore with the following command:
Note Please note:
- Please replace secret, api.acme-corp.com, ACME-Development and ACME in the command as these are example settings only.
- The passwords must have at least 6 characters each.
Code Block title Creation of a self-signed certificate with Java Keytool keytool -genkeypair \ -keyalg RSA \ -validity 365 \ -keysize 4096 \ -alias apimancert \ -keystore ./apiman.jks \ -storepass "secret" \ -keypass "secret" \ -dname "CN=api.acme-corp.com, OU=ACME-Development, O=ACME"Copy the generated file apiman.jks to folder api-mgmt\configs\.
Export key and crt from the self generated keystore.
Keycloak will generate his own keystore automatically at startup. Therefore we have to move the certificate and the corresponding key out of our generated keystore.
Perfom the following commands in folder configs:Code Block keytool -importkeystore -srckeystore apiman.jks -destkeystore apiman.p12 -deststoretype PKCS12Code Block openssl pkcs12 -in apiman.p12 -nokeys -out tls.crt
StartCode Block openssl pkcs12 -in apiman.p12 -nocerts -nodes -out tls.
key
If you have certificates and intermediate certificates, please consult the keycloak documentation Keycloak Docker image > Setting up TLS(SSL).
| Anchor | ||||
|---|---|---|---|---|
|
| Multiexcerpt | ||
|---|---|---|
| ||
Keycloak is an open source identity and access management solution and is used to create and manage the users of API Management and OAuth2 secured APIs. |
An overview of the values that have to be configured is shown on page Configuring API Management.
You have to create the Keycloak administration user and change some of the Keycloak settings.
For a description on how to create the Keycloak administration user, refer to Setting up API Management.
An overview of the values that have to be configured is shown on page Configuring API Management.
To start API Management, you will have to start all containers.
For a description on how to start all services, refer to Setting up API Management.
Finally you can log in to Scheer PAS API Management.
Further information about the default login credentials can be found on page Setting up API Management.
Before you can start the Docker containers, you need to change some of the Keycloak settings in the Docker configuration file .env . The values you need to replace the default values with, are to be obtained from your Keycloak instance.
Start Keycloak. To do this, run the following command from folder api-mgmt/single-host-setup (folder containing the file docker-compose.yml):
Code Block docker-compose up keycloakKeycloak has been started when the log reads something like
Code Block [...] Keycloak 7.3.0 (WildFly Core 6.0.2.Final) started in 50476ms - Started 673 of 933 services [...]Open your Keycloak URL, e.g. https://api.acme-corp.com:8445/auth/admin, and login to the administration console. To login, use username and password as configured in the .env file.
Change the Valid Redirect URIs of the below listed clients.
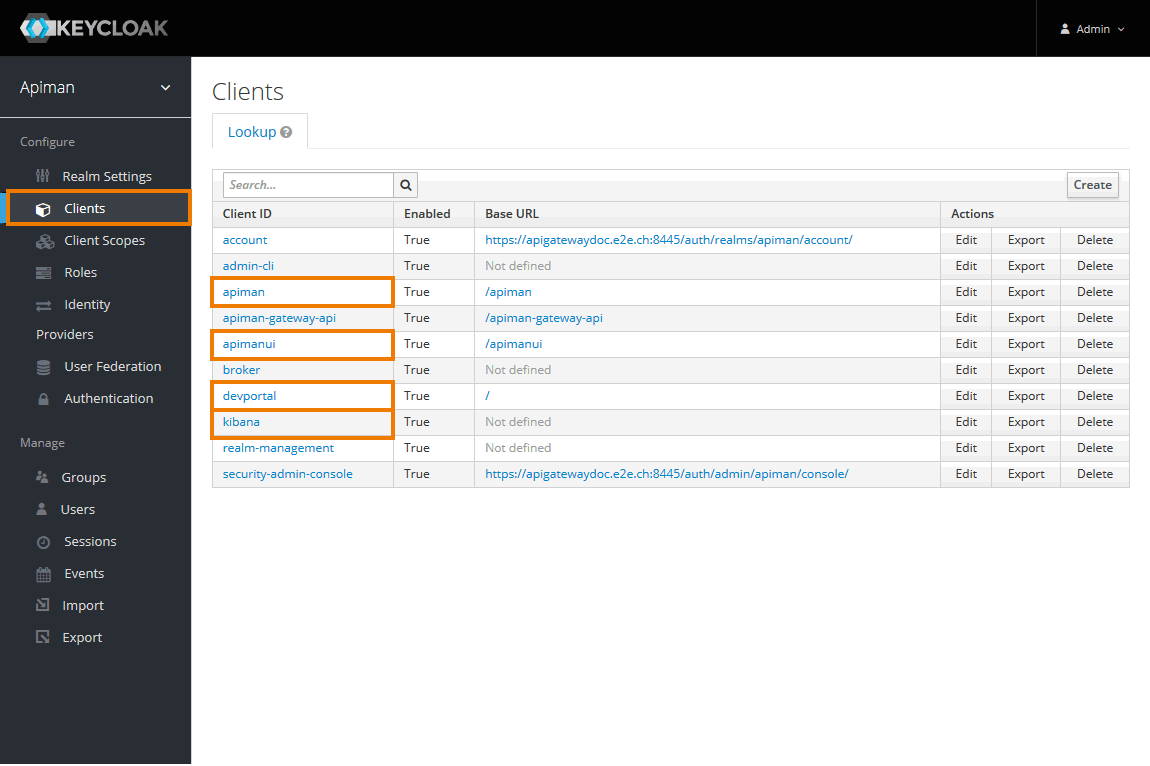
Navigate to Clients.
You will have to change the settings for the following clients:
- apiman
- apimanui
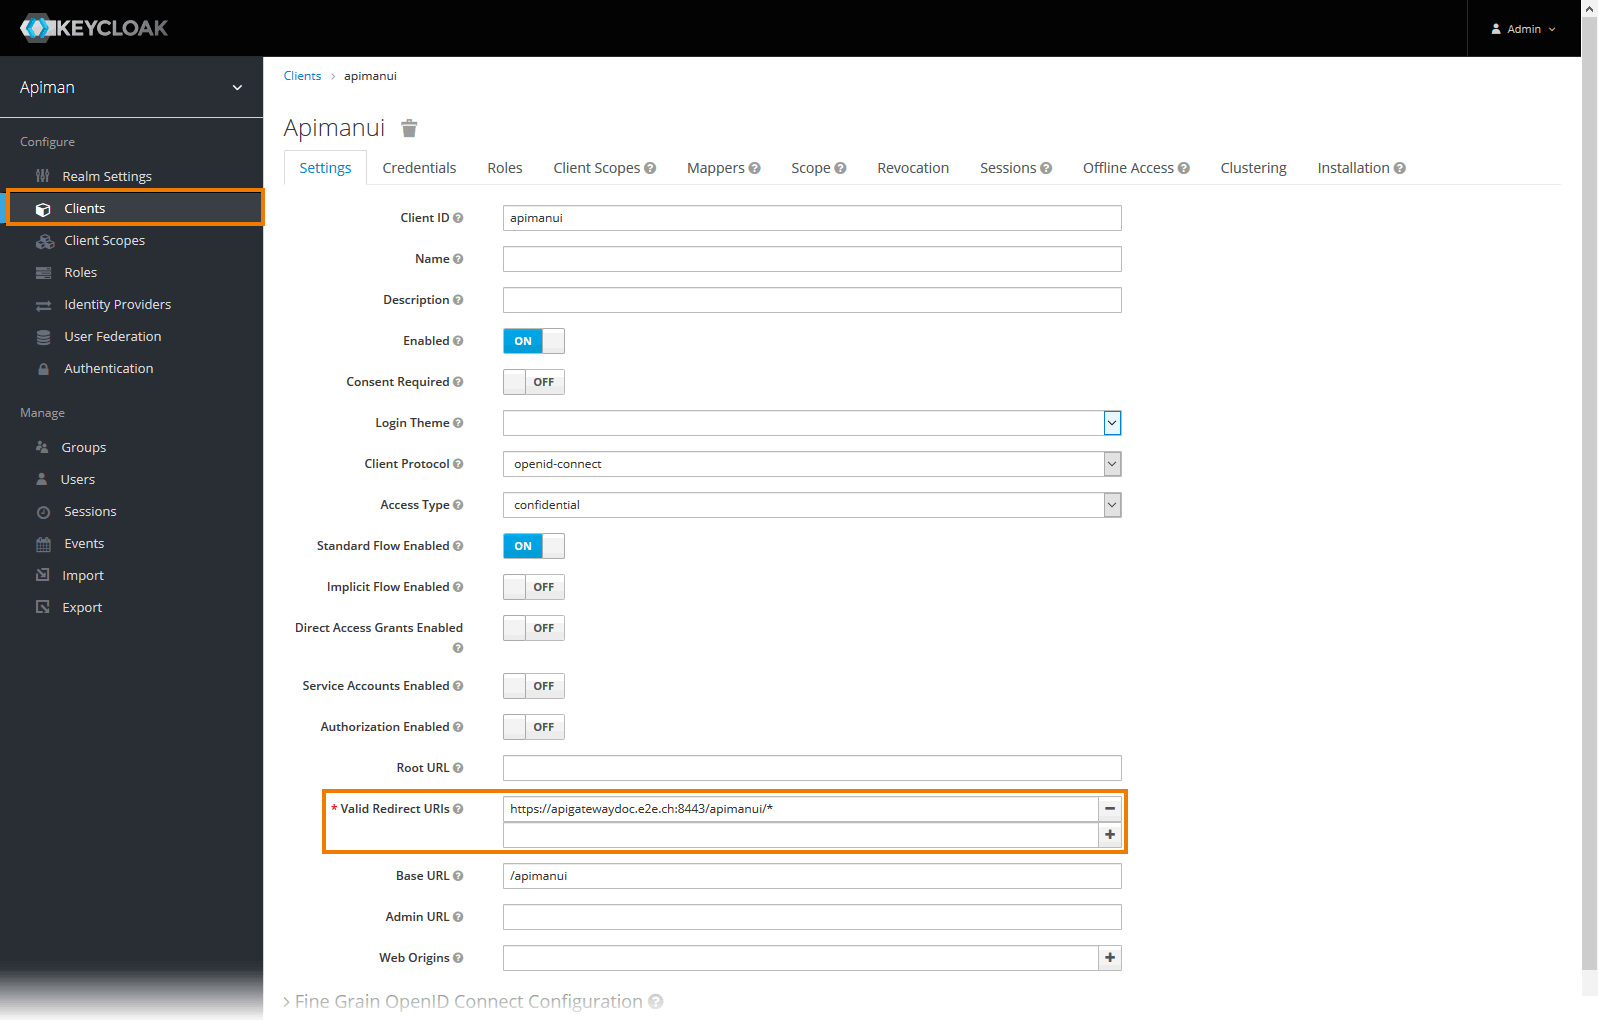
Open tab Settings for each of the two clients and change the entry in field Valid Redirect URIs to match your setup:
- For client apiman, e.g.
https://api.acme-corp.com:8443/apiman/* - For client apimanui, e.g.
https://api.acme-corp.com:8443/apimanui/*
Now, change all default credentials for clients apiman, apimanui and apiman-gateway-api and copy the new passwords to the Docker configuration file.
Setting Description Default Value KEYCLOAK_APIMAN_SECRETProvide the password for client apiman generated in Keycloak. passwordKEYCLOAK_GATEWAY_SECRETProvide the password for client apiman-gateway-api generated in Keycloak.
passwordKEYCLOAK_APIMANUI_SECRETProvide the password for client apiman_ui generated in Keycloak.
passwordKEYCLOAK_REALM_PUBLIC_KEYProvide the realm public key generated in Keycloak. MIGfMA0GCSqGSIb3DQEBAQU[...]Do this as follows:
Navigate to Clients.
You will have to change the settings for the following clients:
- apiman
- apiman-gateway-api
- apimanui
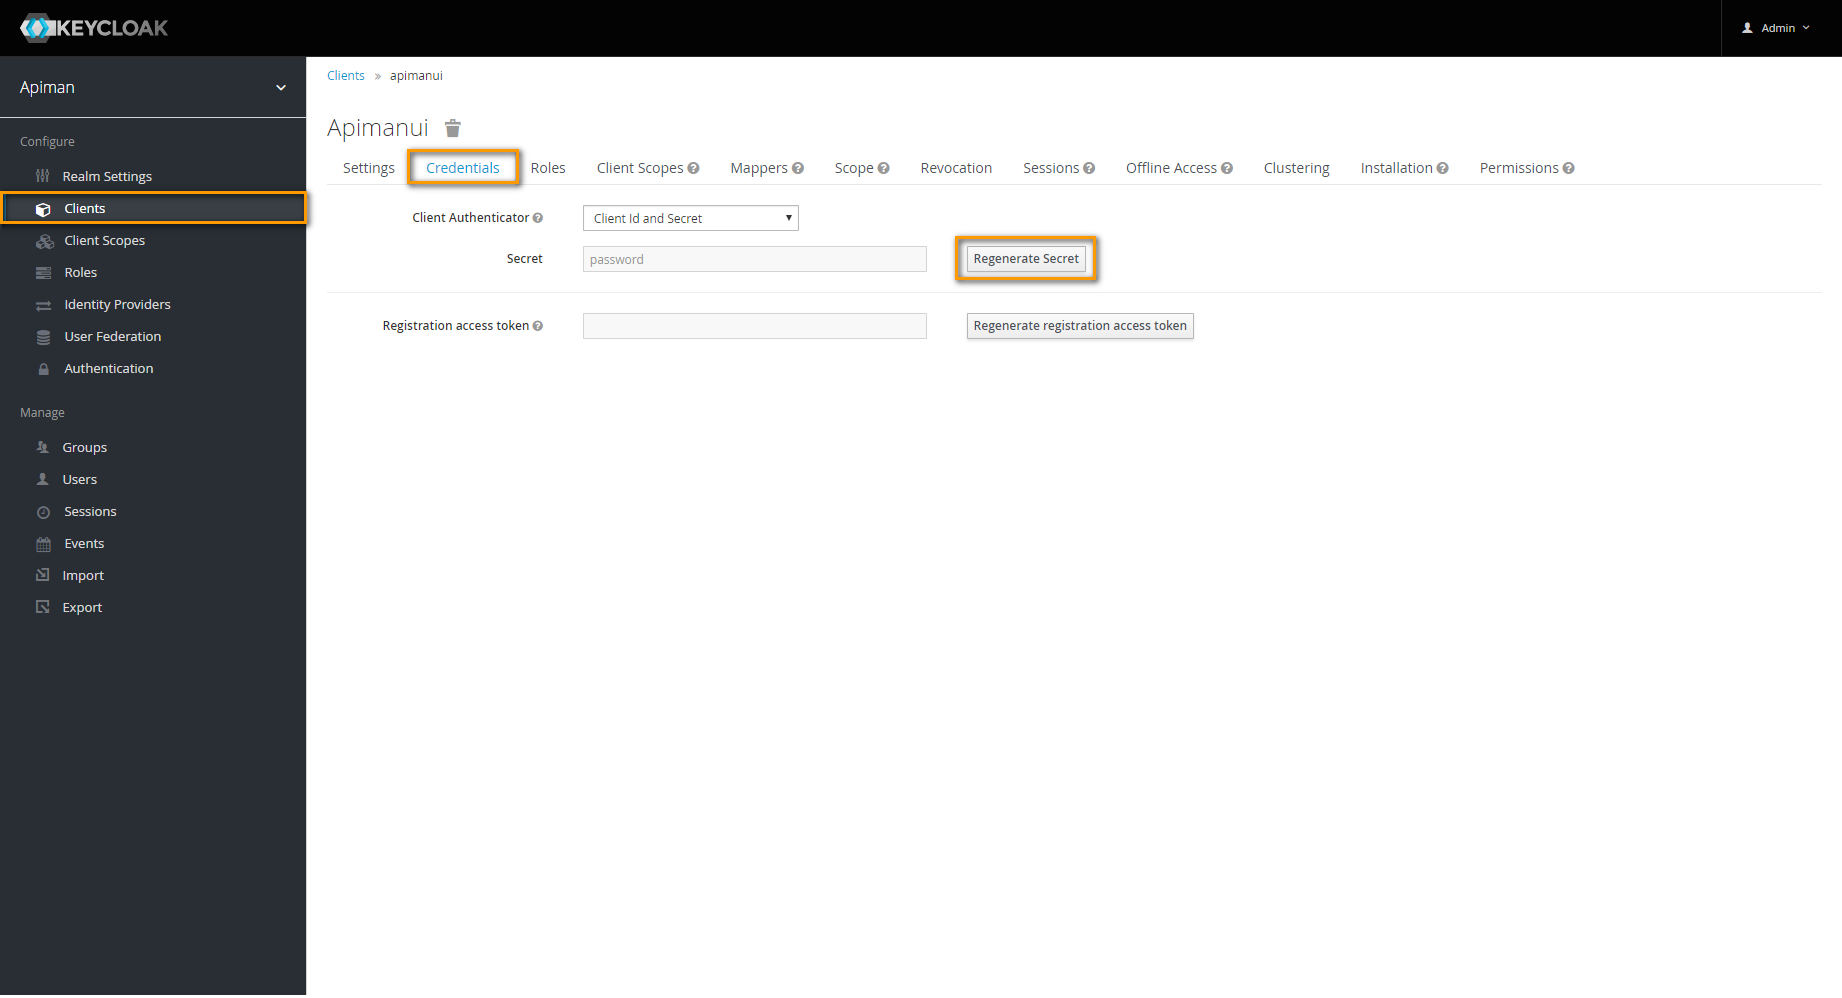
For each client, go to tab Credentials and click Regenerate Secret.
- Set the generated secret for client apiman to entry
KEYCLOAK_APIMAN_SECRETin the Docker .env file. - Set the generated secret for client apiman-gateway-api to entry
KEYCLOAK_GATEWAY_SECRETin the Docker .env file. - Set the generated secret for client apimanui to entry
KEYCLOAK_APIMANUI_SECRETin the Docker .env file.
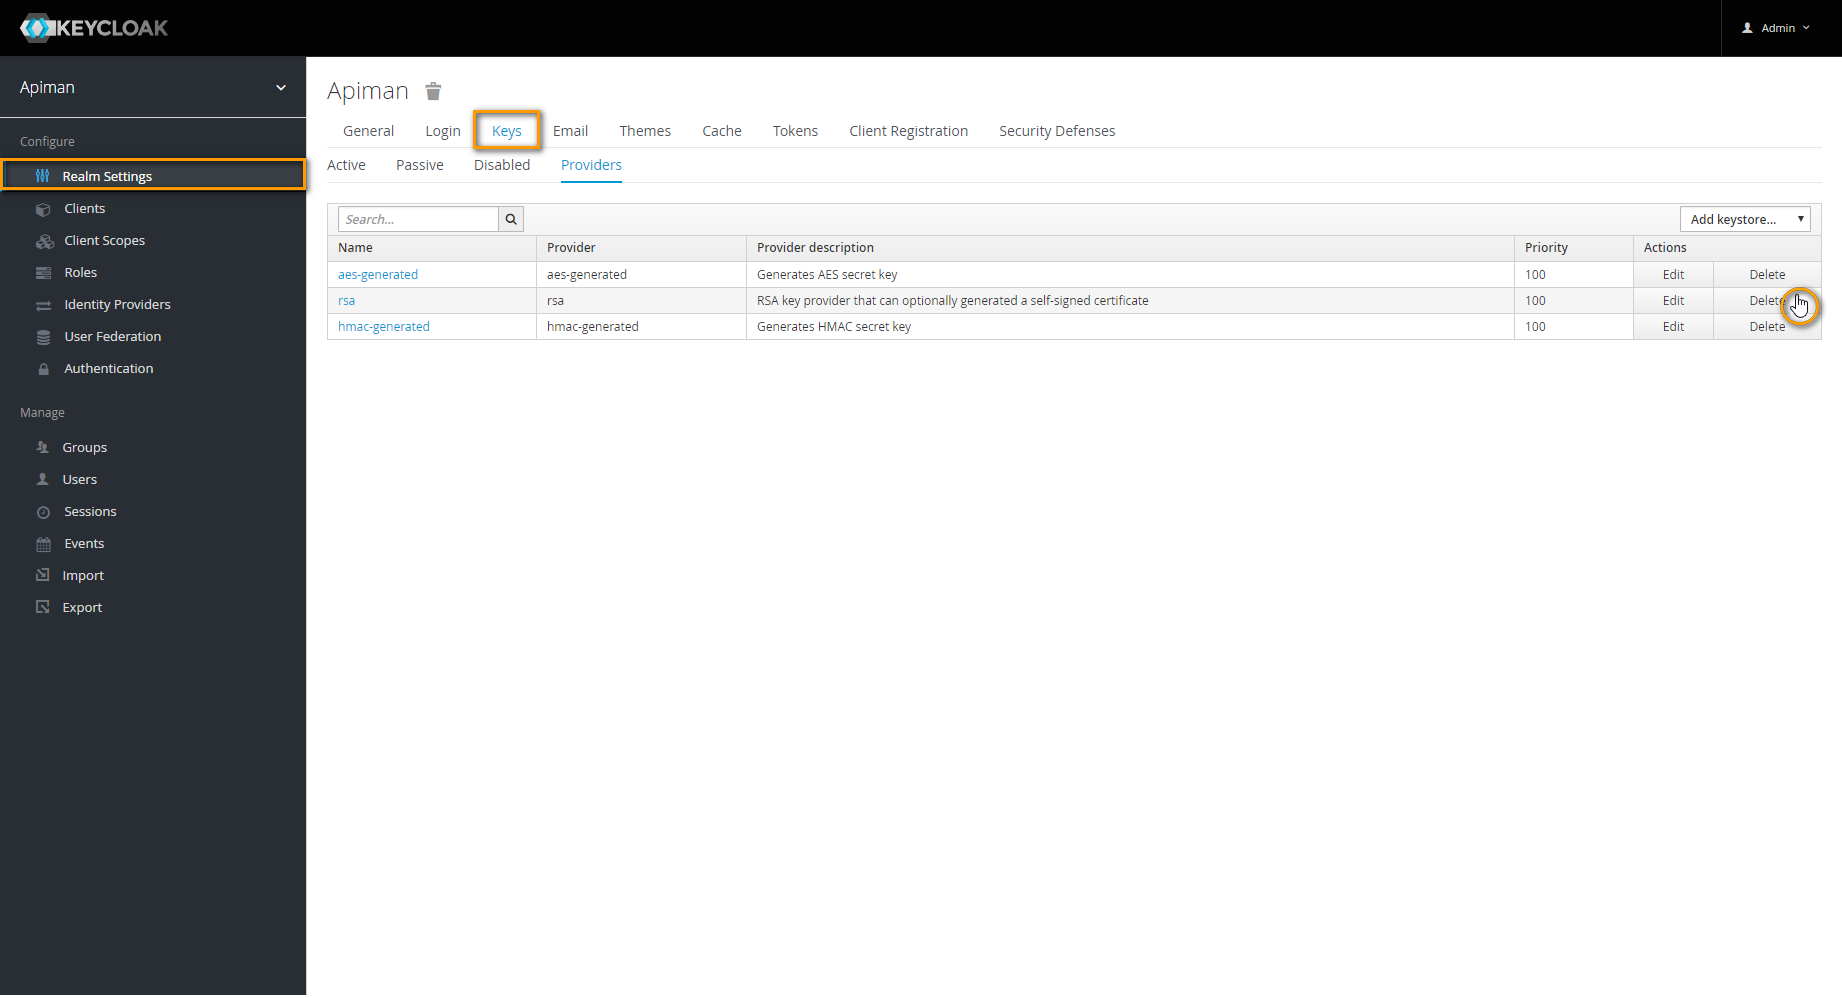
In Realm Settings go to tab Keys.
Navigate to tab Providers and delete provider rsa.
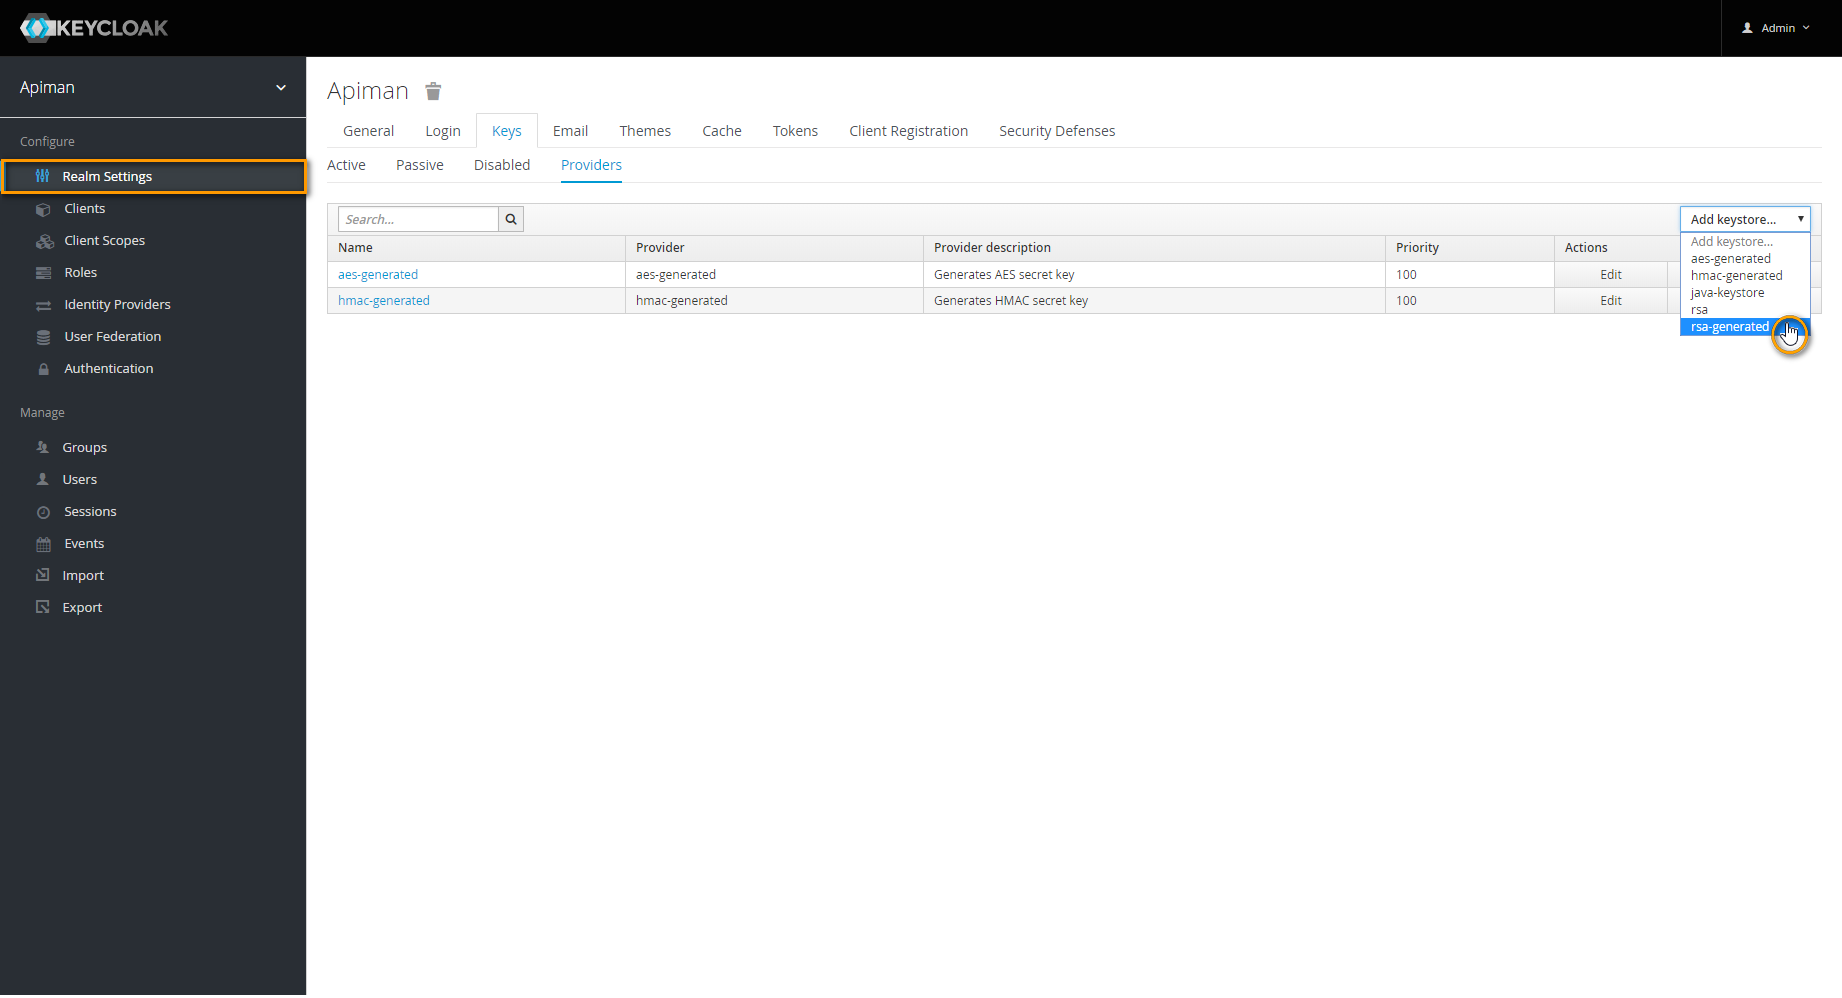
Next, choose rsa-generated from select box Add keystore.

In the upcoming dialog, set Key size to the maximum available value and save your changes. 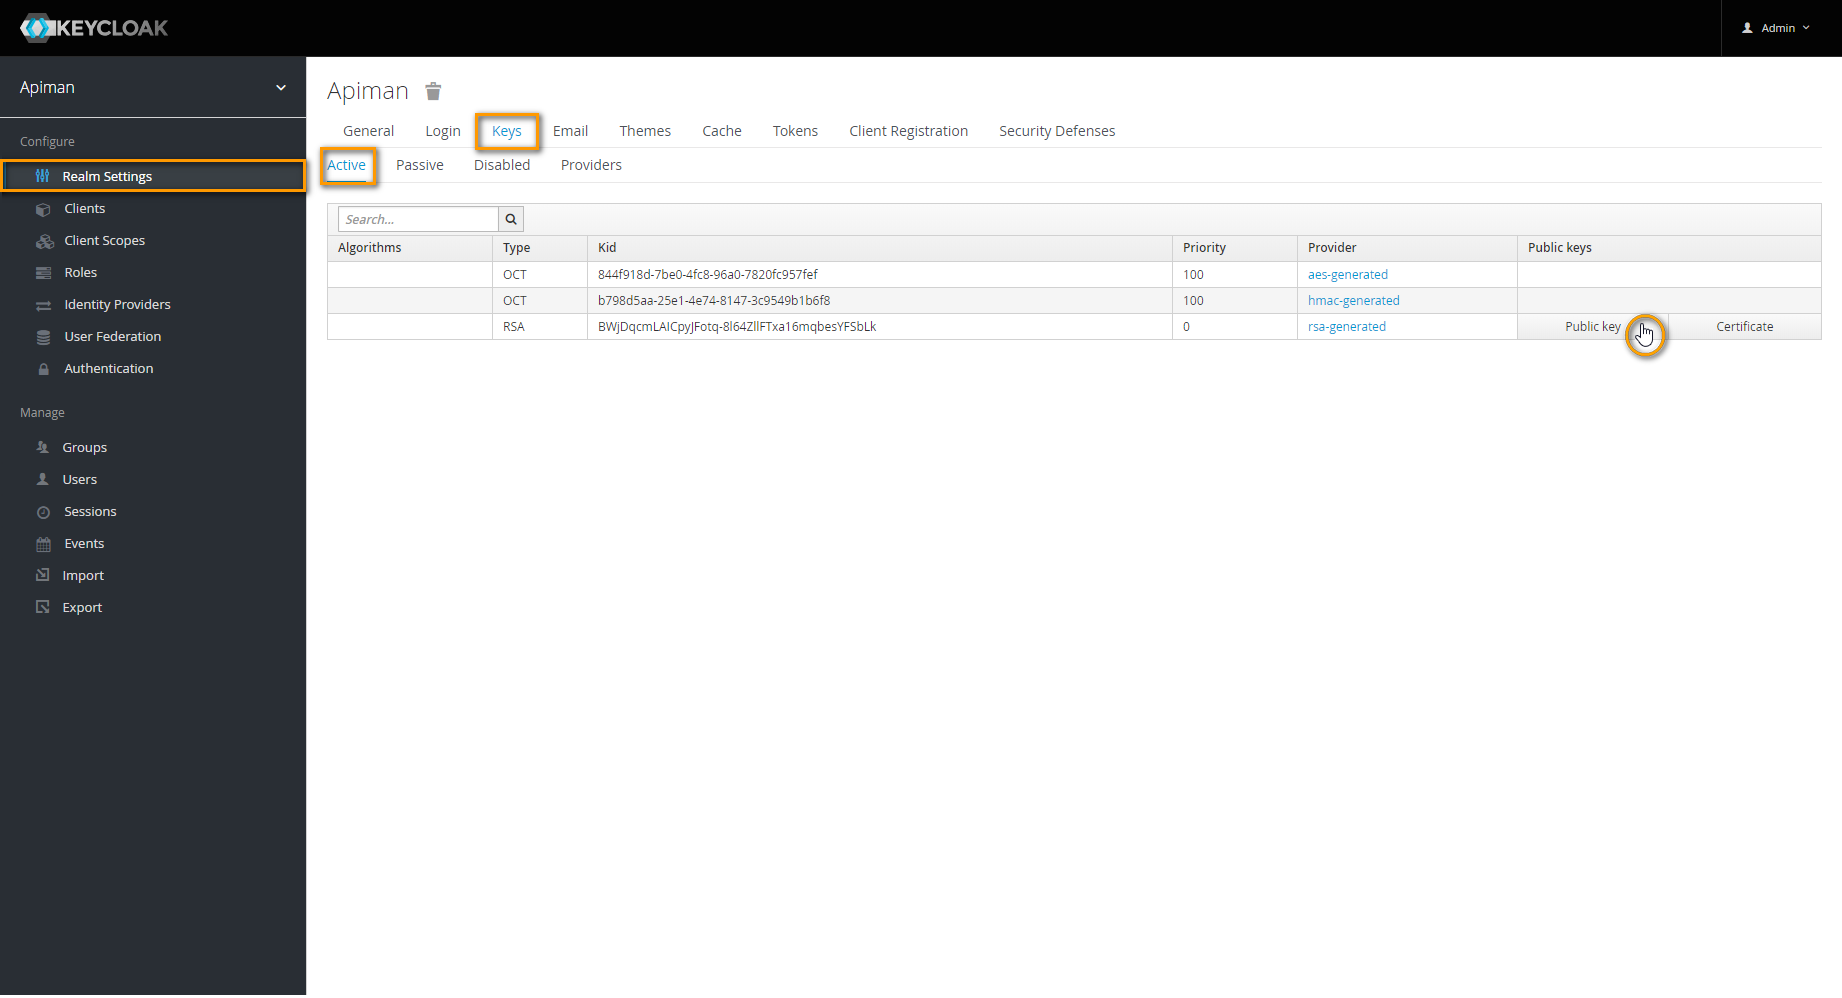
Go back to tab Active and click Public key.
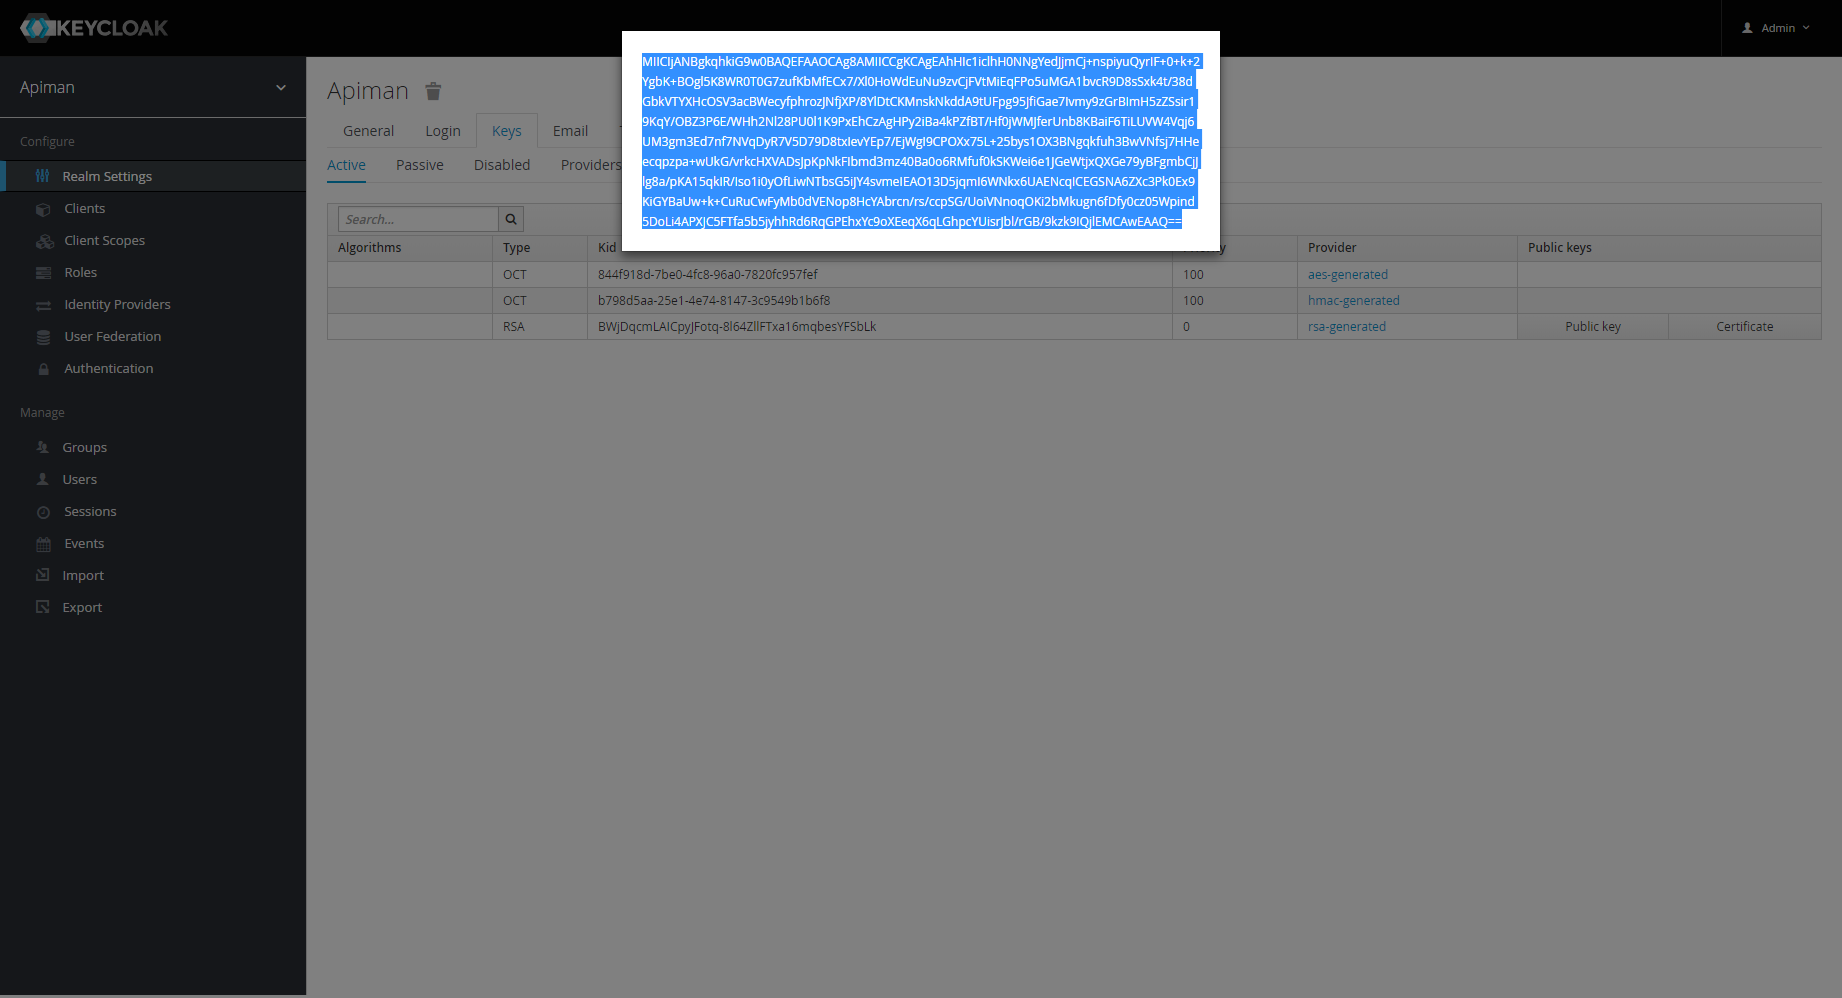
The key will be displayed in a separate pop-up window.
Copy the key and paste it to variable
KEYCLOAK_REALM-PUBLIC_KEYin the Docker .env file.
| Anchor | ||||
|---|---|---|---|---|
|
All Keycloak-related settings have been configured now, and you need to stop docker-compose and restart all containers.
Stop the Keycloak container by pressing Ctrl-C.
Check the configuration, if necessary.
Tip You can check, if everything has been configured, with
Code Block docker-compose configThis command will list the Docker configuration and will throw warnings, if something is still missing.
Multiexcerpt include MultiExcerptName start_all_containers PageWithExcerpt INTERNAL:_api_excerpts
| Anchor | ||||
|---|---|---|---|---|
|
| Info |
|---|
Starting all services (previous step) may take some time. If the UI is not available yet, just wait a moment. |
Open the URL of your API Management, e.g. https://api.acme-corp.com:8443 and log in with the standard administration user, which is admin/admin.
Upload the initial configuration of API Management.
To do this, go to Administration > Export/Import and import file api-mgmt/configs/bootstrap/apiman-default-config.json from api-mgmt-<VERSION>.zip. If you did not transfer the file to your client in step1, you can download the file here.Test the connection between UI and gateway.
To do this, go to Administration > Manage Gateways and click on the name of the gateway. Then, click Test Gateway.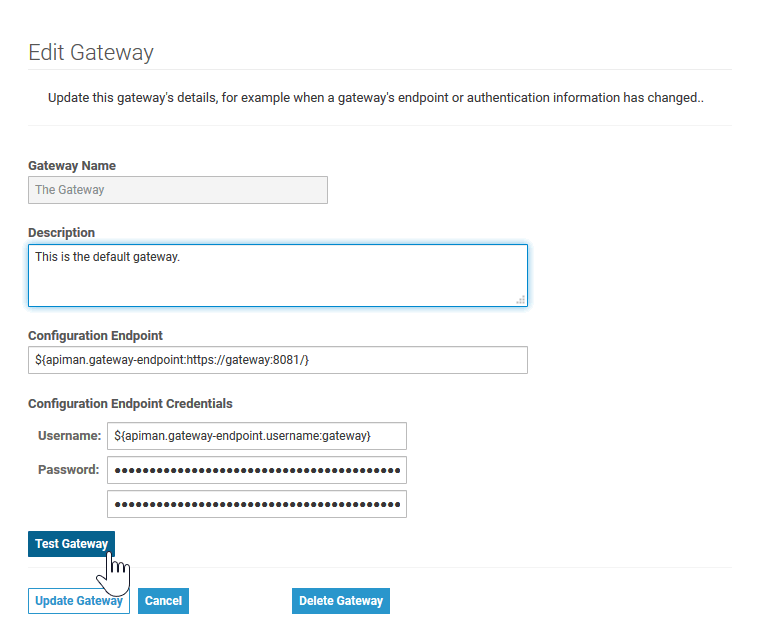
Multiexcerpt include MultiExcerptName test_gateway_ok PageWithExcerpt INTERNAL:_api_excerpts Multiexcerpt include MultiExcerptName test_gateway_nok PageWithExcerpt INTERNAL:_api_excerpts Note A technical user (gateway/gateway) connects the UI of API Management with the gateway. It is highly recommended to change the default passwords for both, the admin user and the gateway user. Both passwords can be changed in Keycloak.
| Otp | ||||
|---|---|---|---|---|
|
| Rde |
|---|
Elasticsearch: |
| Rp |
Overview
Content Tools