Page History
A Project is equivalent to Service contains one executable service. Within a project service you manage the necessary settings for your service such as the used libraries, the BPMN model and , the service properties and forms. Each newly created project service contains already a folder Libraries and a folder Models.further folders:
- Libraries
- Models
- Forms
Creating a
ProjectService
Projects Services can only be created in folders. To add a project service to a folder, right click on the folder and choose the option Add project Service from the context menu. | |||||||||||||||||
| |||||||||||||||||
| |||||||||||||||||
|
The
ProjectService Context Menu
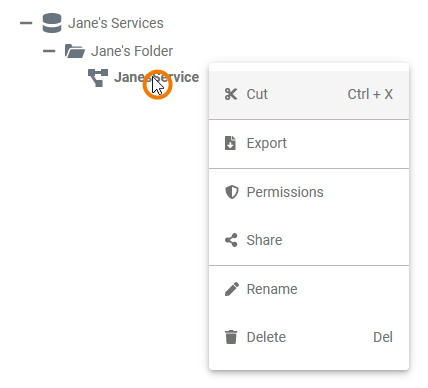
| Right click a project service to open its context menu. The context menu displays all options available for a projectservice: |
Editing the
ProjectService Name
| If you want to change the name of a projectservice, choose the option Edit project nameService Name. | |||||||||
| Enter the new name in the pop-up window Edit ProjectService. Click Save.
| ||||||||
| The new name is displayed in the tree. |


| Multiexcerpt include | ||||||||
|---|---|---|---|---|---|---|---|---|
|
| Multiexcerpt include | ||||||||
|---|---|---|---|---|---|---|---|---|
| ||||||||
| Multiexcerpt include | ||||||||
|
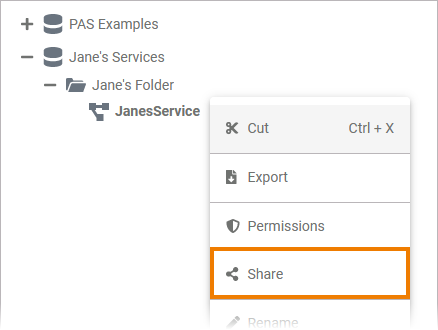
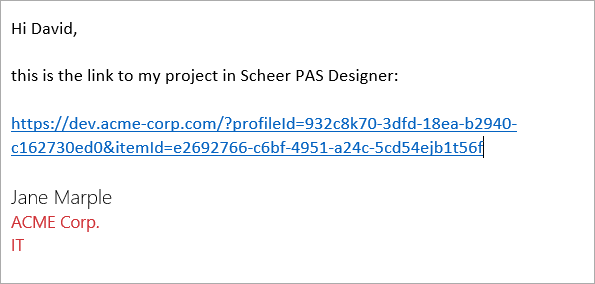
Sharing a
ProjectService
| You can also share the link for a projectservice. Choose the option Share from the context menu to copy the link of the project service to the clipboard. | ||||||||
| |||||||||
|
|
Publishing a
ProjectService to the Cockpit
| If you want direct access to a project service in your Scheer PAS Cockpit, open the context menu and choose option Publish to cockpitCockpit. | ||||||||||
| |||||||||||
If you open your cockpit the next time, an external link tile grants you direct access to your project.service.
|

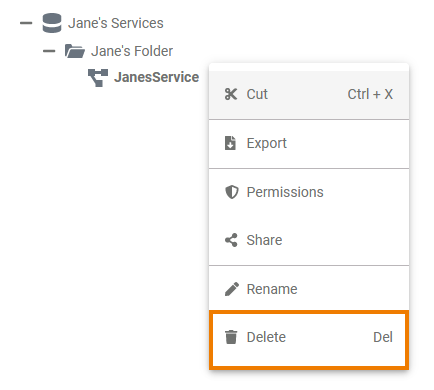
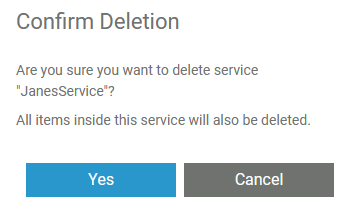
Deleting a
ProjectService
| To remove a project service from the tree, open its context menu and select option Delete projectService. | ||
| Confirm the security query in the pop-up window with Yes to delete the project service from the tree.
|
Service Settings
If you click on a project service in the tree, its settings are displayed in the settings window on the right side:
Editing the
ProjectService Description
Click the Edit descriptionDescription button if you want to enter a description for your projectservice.
| |||||||||
| |||||||||
|
Accessing the Application UI
You can access your application UIs directly from the service settings area. If the service already has been deployed and it contains forms, the Open Application button is enabled. | |
Click this button to open the service overview. All available processes are shown. Select the process you want to go to. | |
The process overview opens and you can start a new process using the displayed link. | |
| The first form opens and you can start to fill it. |
Editing the Service Properties
Within a project service you manage one executable service. You can edit the service properties in the settings window. Click on the Edit propertiesProperties button to enable edit mode. The table below displays the properties you are able to change. |
| Service Property | Input Type | Description | ||
|---|---|---|---|---|
| Version | text | Insert a version number for your service. | ||
| Category | text | Category in which the service is displayed in the BRIDGEBridge. As a default, the folder name the project service is stored in is used. | ||
| Control Port | integer | Enter the number of the service control port (for further information see page xUML Service Details). | ||
| Service Port | integer | Enter the number of the service port (for further information see page xUML Service Details). | ||
| Proxy Port | integer | The input in this field is optional. If a proxy server is configured, you can enter the proxy port you want to use for your project service here.
|
Managing the Service
In this section you can manage your service.
- Service statusStatus: Shows the status of the service.
- Deployed versionVersion: Displays the numer of the currently deployed version of the service.
| Button | Description |
|---|---|
| Start serviceService | Use this button to start your service on the BRIDGEBridge. |
| Stop serviceService | A click on this button stops the service on the BRIDGEBridge. |
| Open Bridge | If you want to switch to the UI of your Scheer PAS BRIDGEyour Bridge, use this button. |
| Deploy serviceService | Click on this button to deploy your service to the BRIDGEBridge. |
Overview
Content Tools