Versions Compared

Key

  • This line was added.
  • This line was removed.
  • Formatting was changed.
Comment: Published by Scroll Versions from space WDESIGNER and version 1.1.0

Once you have modeled your business process on the BPMN canvas, you have to add the necessary execution parts to this process to bring it to life. The execution canvas is the place where you make your model executable.

Multiexcerpt include
SpaceWithExcerptINTERNAL
MultiExcerptNameexecution_preliminaries
DisableCachingtrue
PageWithExcerptINTERNAL:_designer_excerpts

The Execution Canvas

The execution canvas is displayed below the BPMN canvas. It is shown as soon as you click on one of the BPMN elements:

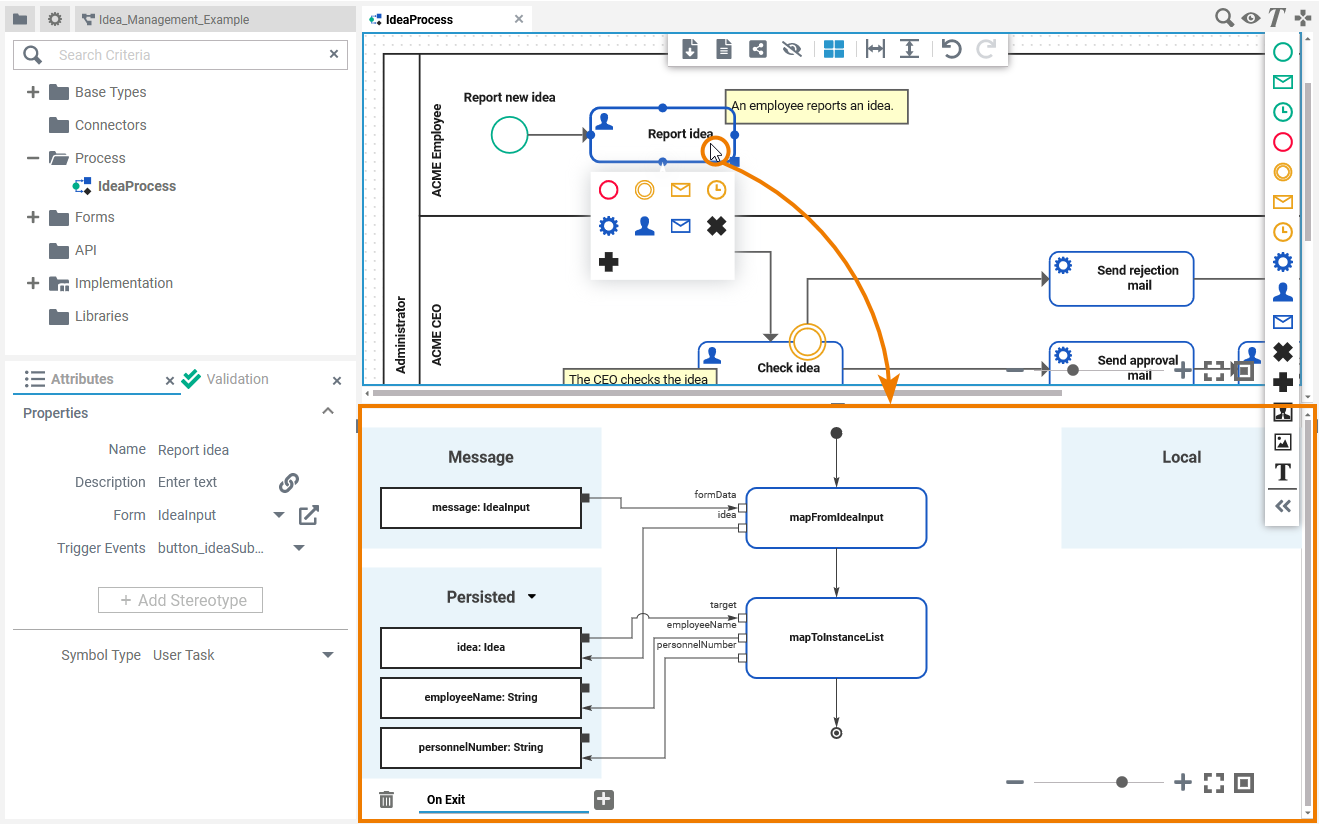
The content of the execution canvas depends on the selected object on the BPMN canvas - three different views are possible:

Selected BPMN ElementsCanvas ContentExecution Canvas View

  1. UML activity diagram
  2. Persisted
  3. Local
  4. Message

Image Modified

Image Modified

Image Modified

Image Added

  1. UML activity diagram
  2. Persisted
  3. Local

  1. UML activity diagram
  2. Persisted
  3. Local
  4. Return

Execution Canvas Contents

SectionDescription

UML activity diagram

The execution is modeled as a UML activity diagram. Every execution canvas contains an empty diagram with start and end node.

Persisted

Multiexcerpt include
SpaceWithExcerptINTERNAL
MultiExcerptNamepersisted
DisableCachingtrue
PageWithExcerptINTERNAL:_designer_excerpts

Local

Multiexcerpt include
SpaceWithExcerptINTERNAL
MultiExcerptNamelocal
DisableCachingtrue
PageWithExcerptINTERNAL:_designer_excerpts

MessageSection Message is shown for all BPM elements that need to process an incoming message. As per default, the incoming message has type any . To gain access to the data used in your process, you have to apply the correct type from a customized library.
ReturnOnly for outgoing relations of Exclusive Gateways Section Return is displayed, containing the unchangeable object return of type boolean.

Customizing the Canvas

You have several options to adjust the canvas.

When you open the canvas for the first time, the default view is displayed:

Managing the Canvas

Multiexcerpt include
SpaceWithExcerptINTERNAL
MultiExcerptNameenlarge_canvas
DisableCachingtrue
PageWithExcerptINTERNAL:_designer_excerpts

Multiexcerpt include
SpaceWithExcerptINTERNAL
MultiExcerptNamehide_sidebar
DisableCachingtrue
PageWithExcerptINTERNAL:_designer_excerpts

Use the icon in the model toolbar to hide or show the execution canvas.

Modeling on the Canvas

ActionExampleDescription
Zoom

When modeling, you have two options to apply the zoom on the canvas.

  • Press the Ctrl button and use the mouse wheel.
  • Use the zoom bar at the bottom of the Canvas.
    To zoom you can use the pin or press the plus or minus button of the zoom bar.
Shifting Content

You have various options to shift the content on the canvas:

  • Use the mouse wheel to move the canvas and its content vertically.
  • Use the scroll bar to scroll vertically.
  • Use the Arrow keys (up and down) of your keyboard to move the content vertically.
Scaling

Multiexcerpt include
SpaceWithExcerptINTERNAL
MultiExcerptNamefit_model_to_canvas
DisableCachingtrue
PageWithExcerptINTERNAL:_designer_excerpts

Multiexcerpt include
SpaceWithExcerptINTERNAL
MultiExcerptNamescale_model
DisableCachingtrue
PageWithExcerptINTERNAL:_designer_excerpts

The Execution Context Menus

Two different context menus support the user on the execution canvas:

Objects Context Menu

Anchor
objects_context_menu_exe

Image Modified

If you right click on an object, the tools context menu opens. Use it to edit the current object.

The following options are available:

  • = Delete the object.
  • = Go to library. Click on this icon to highlight the current object in the Library Panel.

Image Modified

You can use the objects context menu on all objects on the execution canvas.

Execution Canvas Context Menu

Anchor
canvas_context_menu_exe


Image Modified

A right click on the execution canvas opens another context menu including the following options:

  • = Undo the last action.
  • = Redo the last action.
  • = Show parameter name. Use this icon to show or hide the parameter names of operations on the execution canvas.
  • Image Added= Change relation path algorithm. The relations on the execution canvas are drawn automatically, starting from the first object. Branchings start on the left. For the next objects, the branches are moved slightly to the right:

    Image Added


    Use the menu icon Change relation path algorithm to start the first branching on the right side, all other branches are moved slightly to the left then:

    Image Added

Shortcuts

You can also use the following shortcuts on the execution canvas. The operations are applied to the currently selected object. The following list of shortcurts can be searched. Enter your search term in the Global Filter field.

Table Filter
hideControlstrue
inversefalse
sparkNameSparkline
datepatterndd M yy
globalFiltertrue
id1588166633583_-951954712
sortShortcuts ⇧
worklog365|5|8|y w d h m|y w d h m
isORAND
separatorPoint (.)
order0
ShortcutsDescription
CTRL + 1, 2, 3 ... 9Opens the tab corresponding to the chosen number. The first nine opened models are offered for activation. Press a number to activate the corresponding model and bring it to the foreground.
CTRL + DCloses the active model window.
CTRL + Mouse WheelReduces (scrolling down) or enlarges (scrolling up) the zoom factor of the model.
CTRL + SHIFT + DCloses all tabs and switches to explorer tab.
CTRL + YRepeats editing steps that have been undone.
CTRL + Z
Undoes previous editing steps.
DelPress Del to delete an object from the canvas.
Esc

Pressing the Esc key aborts the following processes:

  • adding a new object
  • drawing a relation
  • moving objects
  • hanging the name of an object
Mouse WheelMoves the model up or down.
SHIFT + Page downSwitches to the next tab from left to right.
SHIFT + Page upSwitches to the next tab from right to left.